Editor’s note: This is a guest article by Alexander Franz.
According to Brett’s article on how a car engine works, “The crankshaft is what converts the up and down motion of the pistons into a rotational motion that allows the car to move.”
It also makes for a sweet benchtop light.
If you want to add some virility to your garage, workshop, or man room, you can’t go wrong building a lamp out of old car parts. Maybe you’ll even get to put it in the living room window. At least until it “accidentally” gets broken.
Although the basic idea is straightforward, there are a ton of ways to customize this project to fit your space and style. Different crankshafts, bases, finishes, and light bulbs will give your final product the form and functionality you need. Use my example as a guideline, and alter it as you see fit. Let’s get started.
Materials & Tools
Materials
- Ford 351W V8 crankshaft, with balancer
- Rust neutralizer spray
- 2′ of 1×12 American red oak board
- 2″ of 1.5″ diameter American red oak dowel
- Walnut stain
- Poly clear coat sealer
- 8 brass machine screws
- 8 chrome acorn cap nuts
- 6′ of 16 gauge lamp wire
- Electric wire plug
- 60 watt Edison-style light bulb
- Nickel-plated push-through lamp socket
Tools
- Wire hand brush
- Power drill and bits
- Wire brush drill attachment
- Screwdriver
- Jigsaw and wood-cutting blade
- Sandpaper
- Foam brushes
- Clamps
Step 1: Gather Materials and Find a Crankshaft
Your local hardware store, lighting store, or big-box home improvement center will carry the basic supplies, and should be able to cut custom lengths of wiring for you.
I bought the crankshaft for this project from a local guy on Craigslist who restores cars as a hobby. Buying a used crank is significantly less expensive than ordering a new one (we’re talking about spending tens of dollars instead of hundreds of dollars), and the well-worn look brings character and authenticity to the final product. If you want to enjoy more of the hunt, you can search scrap yards and body shops for unloved parts. Many salvage yards will even allow you to bring your own tools in and remove a crank from a vehicle yourself.
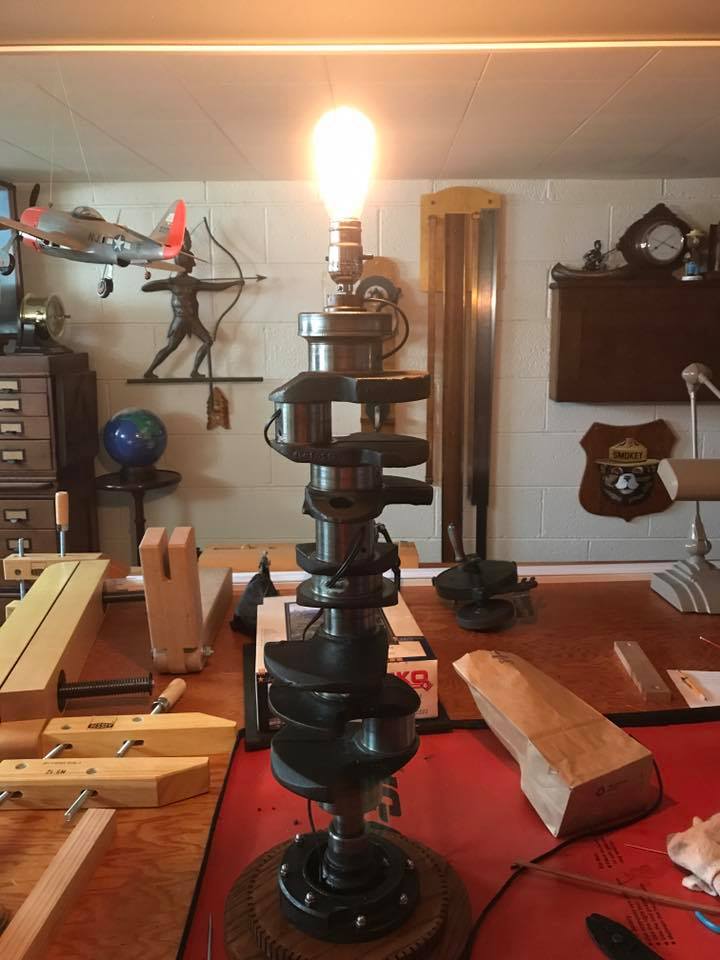
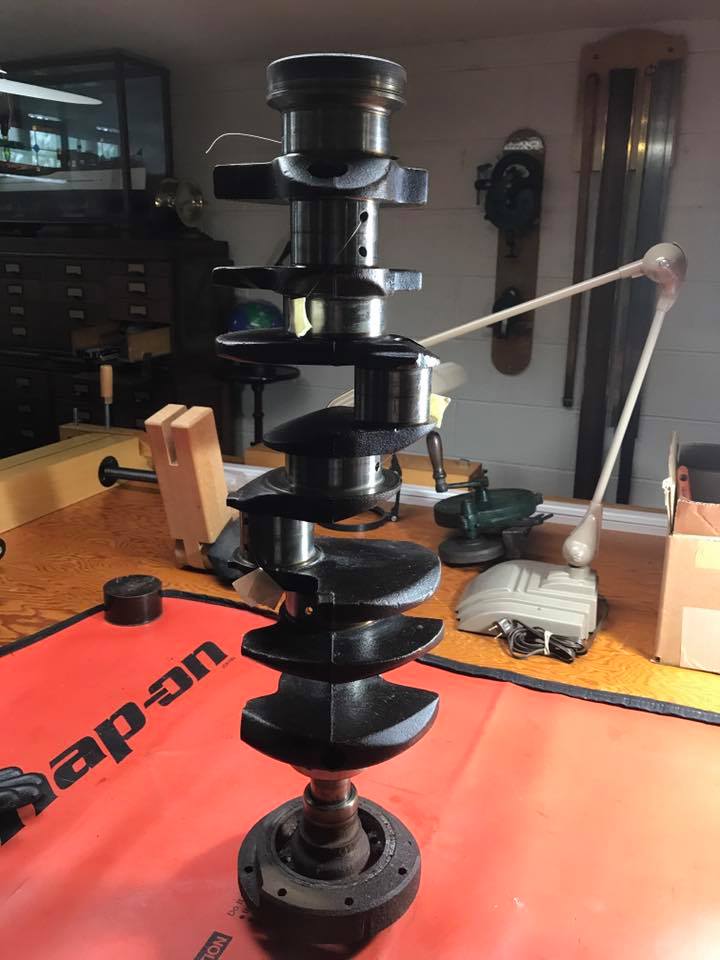
I chose a big Ford crank that had been used in a commercial truck. The size of the crank will naturally vary with the size of the engine it came from, so think about where you’ll want to show off your light once it’s done, and what size you’ll be able to accommodate. This crank is from a V8; it’s about 26” tall and 50 pounds.
Step 2: Attack the Rust
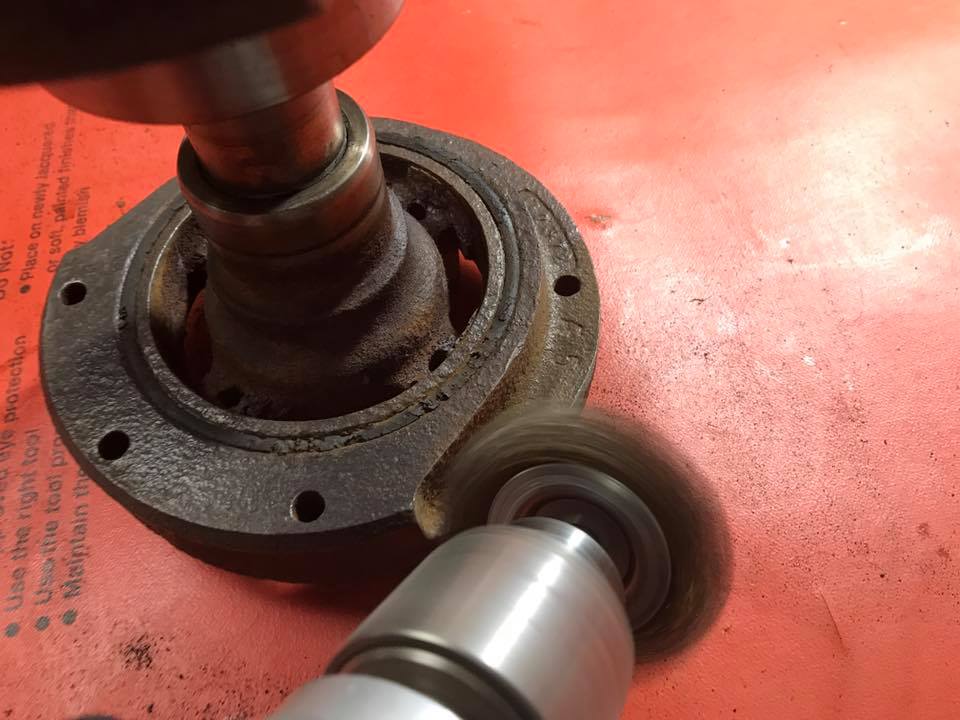
The restorer started to clean up the crank before I bought it, but it still needed work. The balancer, which is connected to one end of the crank and acts as a nice base for the light, was covered in rust. I started with a wire hand brush, and then fired up a power drill with wire brush attachment to blast the rest of it off (you could also use an angle grinder with a wire wheel). Wear gloves and a mask while you do this, unless you want to sneeze lug nuts two hours later.
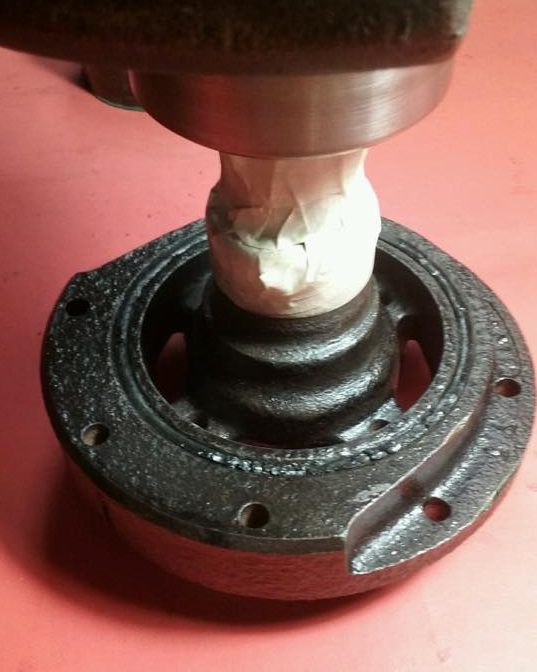
Once the rust had been tamed, I sprayed the balancer with Loctite rust neutralizer. This added a protective coating to prevent new rust from forming and also turned the balancer black.
Step 3: Build Your Base
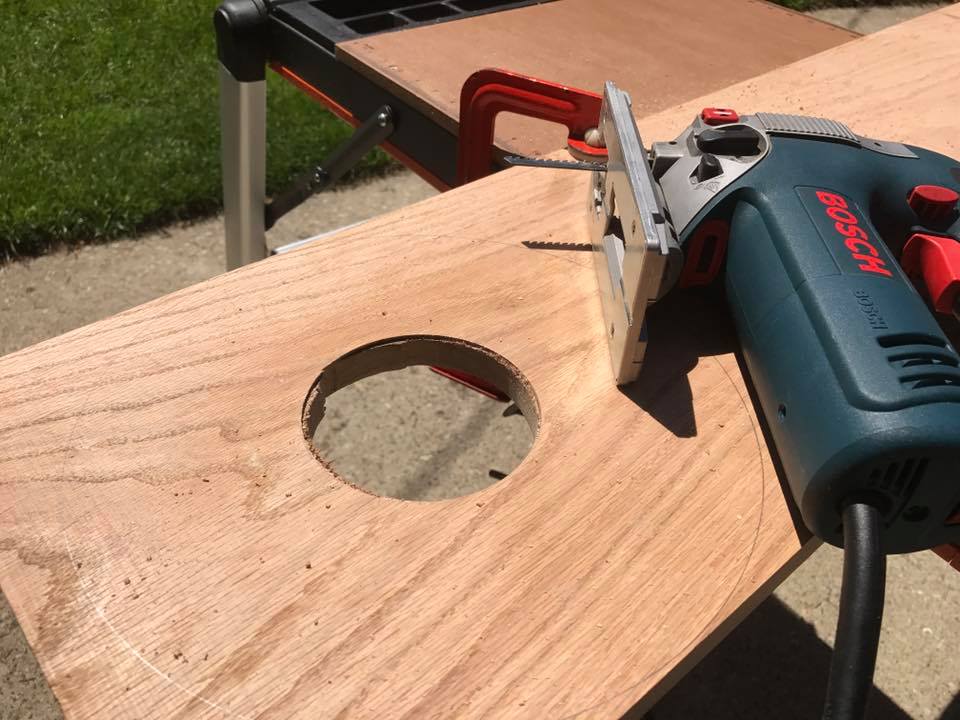
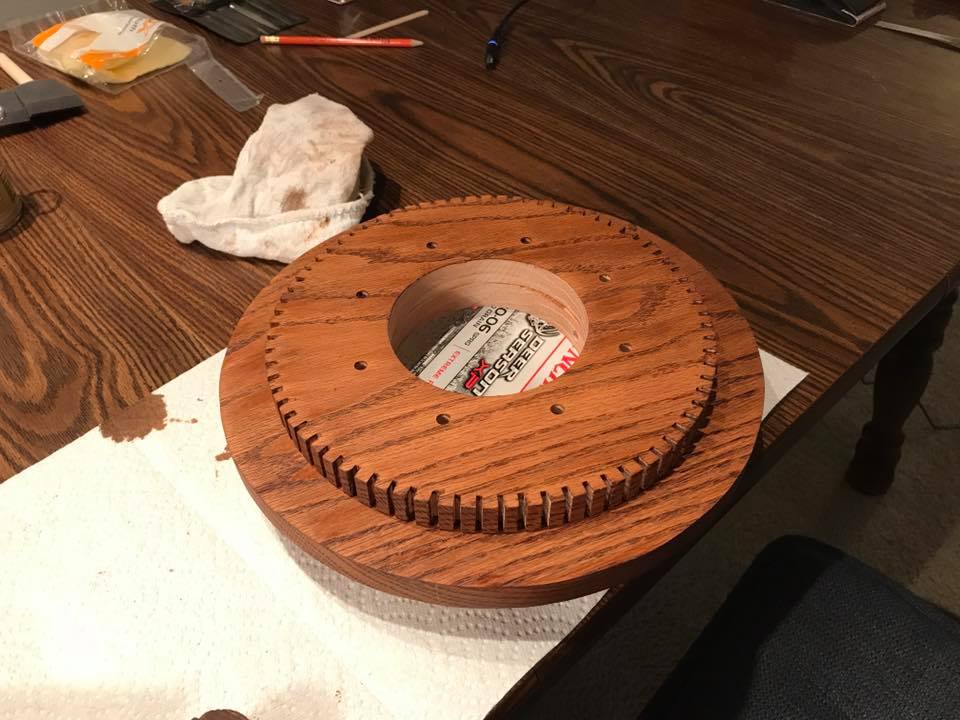
I made a two-layered circular base for the crank out of 1” American red oak. Given how heavy the crank is, I wanted a base that could hold up well, and oak does the job. The diameter of the bottom layer is 11”; the top layer, 9”. I also cut a hole in the center of the layers because the underside of the balancer on the crankshaft has a piece that juts out; the base is essentially an oak donut (now that’s manly). I cut the layers out with a jigsaw and then spent a lot of quality time sanding everything smooth.
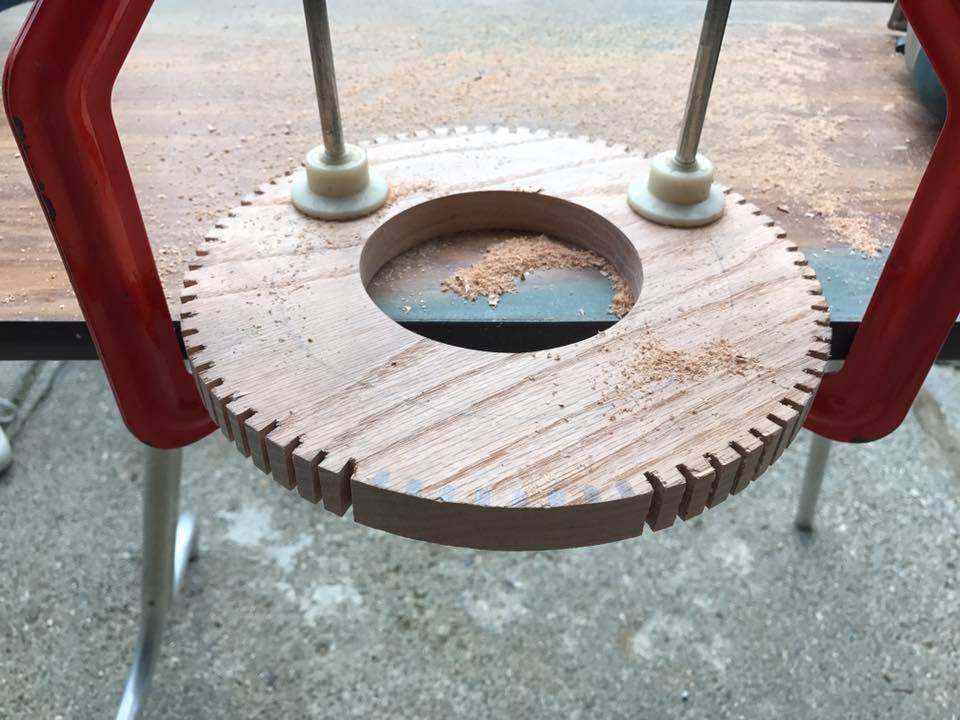
I went back with the jigsaw and cut notches in the top layer to make it look like a large gear. This took a lot of patience and focus, but it brought an element of mechanical design into the base and really enhanced the overall look.
Step 4: Drillin’ Time
On the bottom layer of the base, I drilled one hole horizontally from the outer edge all the way through to the center opening. This neatly feeds the lamp cord through the base and up to the crank.
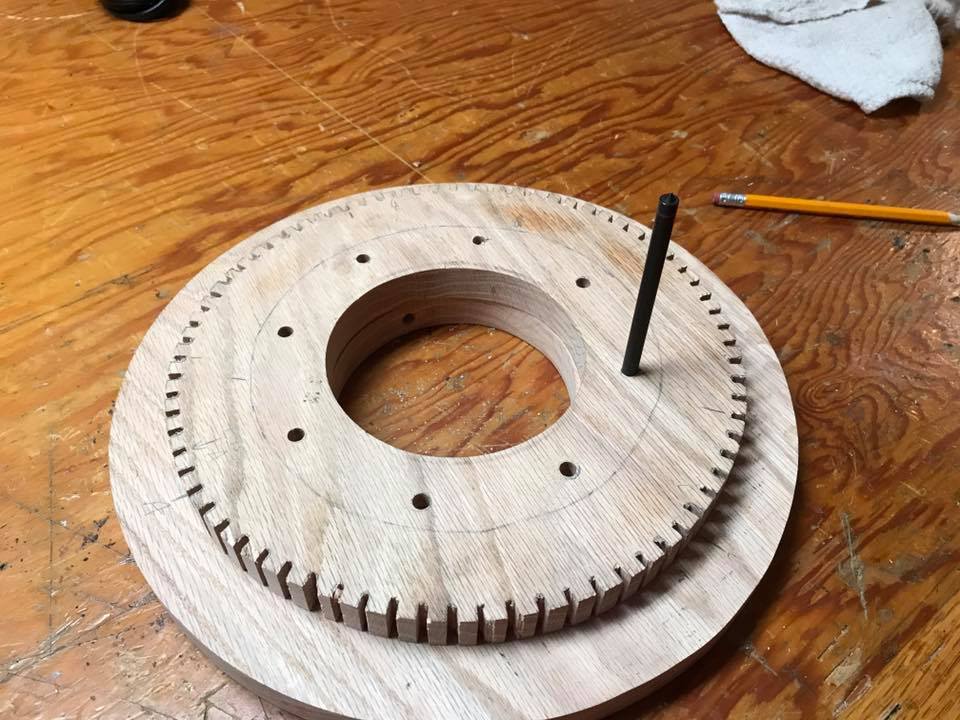
I also drilled eight holes vertically through both layers of the base to match the eight holes in the balancer. These provided an easy way to attach the crank to the base. Counter-sinking the holes under the bottom layer ensured that the heads of the machine screws wouldn’t stick out.
Step 5: Finish Your Base
After sanding the base again, I finished it with walnut stain and a poly clear coat sealer. I liked how the walnut stain darkened the grain pattern of the oak, but there are several options you can choose from.
Step 6: Set Up the Socket
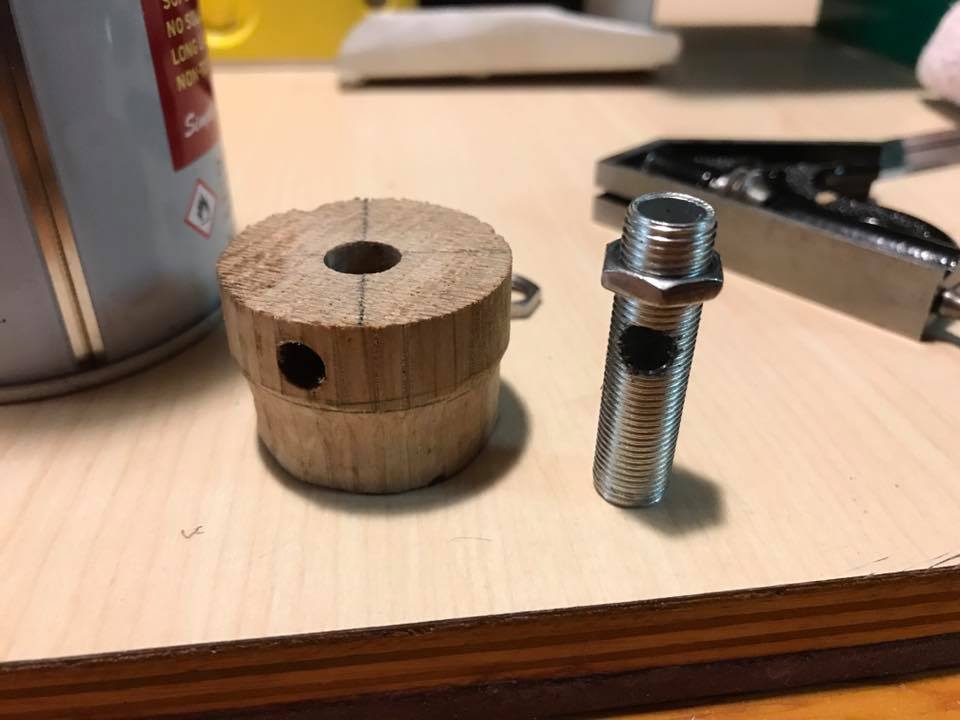
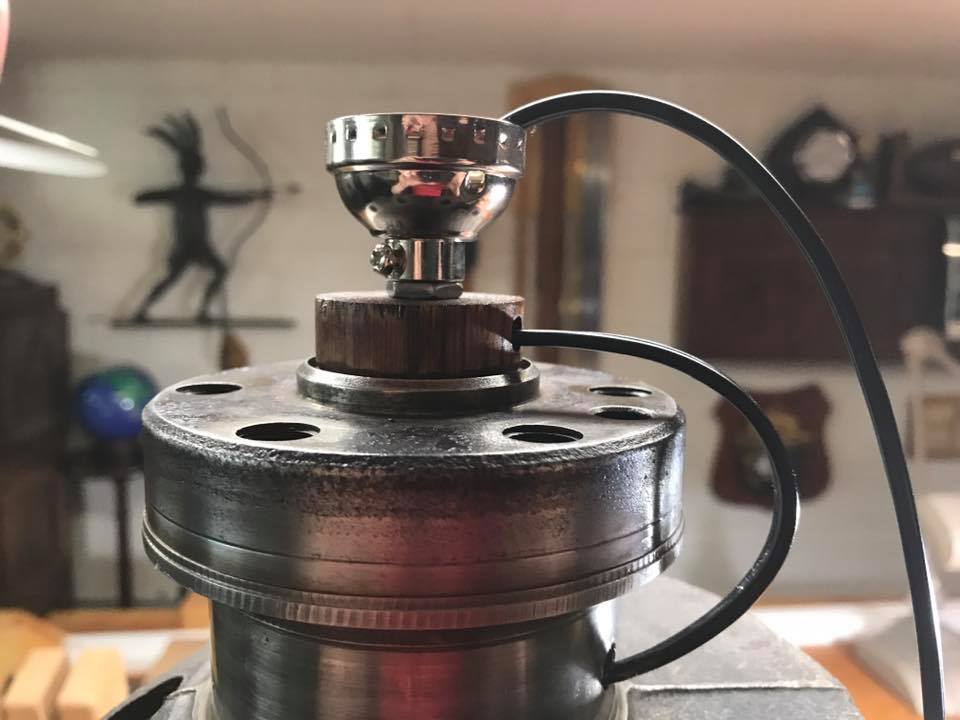
The top of the crank has a small 1.5” wide basin that is the perfect place for a lamp socket. To get a stable fit, I made a small wooden base to fit inside that basin and hold the socket upright. I took a scrap piece of 1.5” oak dowel and sanded the bottom half to get a snug fit with the basin. Then I drilled holes through the side and top to create a pathway for the cord.
The socket came with a small threaded pipe normally used for installation in a regular, less manly light. I shortened the length and also drilled a hole in it to guide the cord. The top of the pipe connects to the bottom of the socket, and the bottom of the pipe fits into the dowel. Lining up the holes I drilled allowed the cord to feed sideways into the dowel and up to the socket.
Step 7: Bolt the Base to the Crank

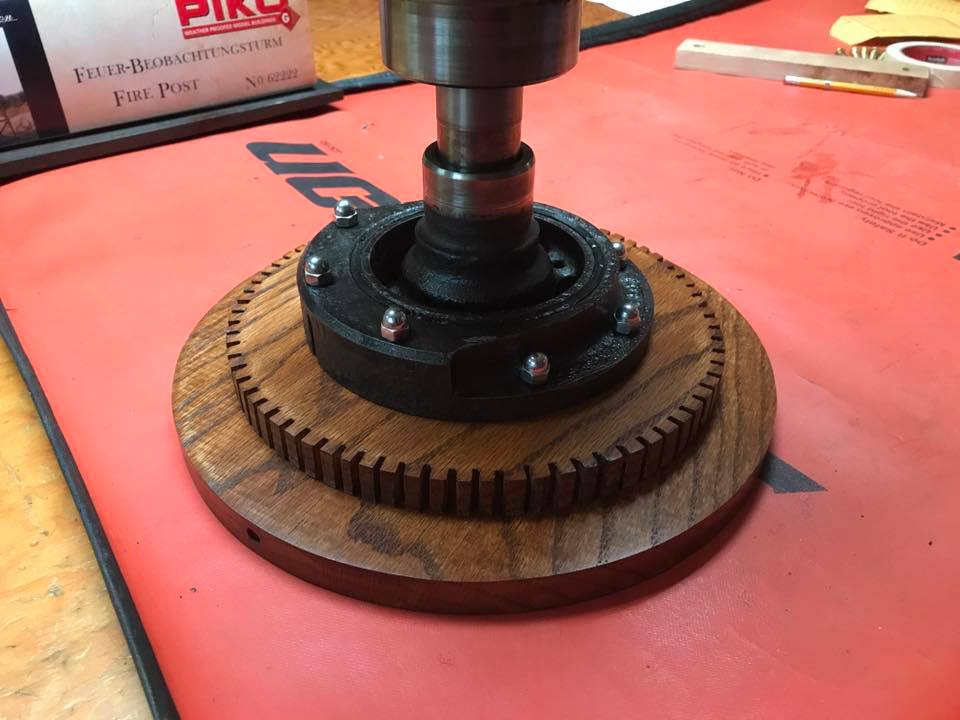
I laid the crankshaft down on the workbench so that the balancer stuck out over the side. Then I lined up the holes in the balancer with the two layers of the base and tightened them together with the machine screws. I put acorn caps on the exposed ends of the screws, because you can never have too much chrome.
Step 8: Wire It Up

I fed the lamp cord through the hole on the outer edge of the base, then pulled it up through the open center and above the balancer.
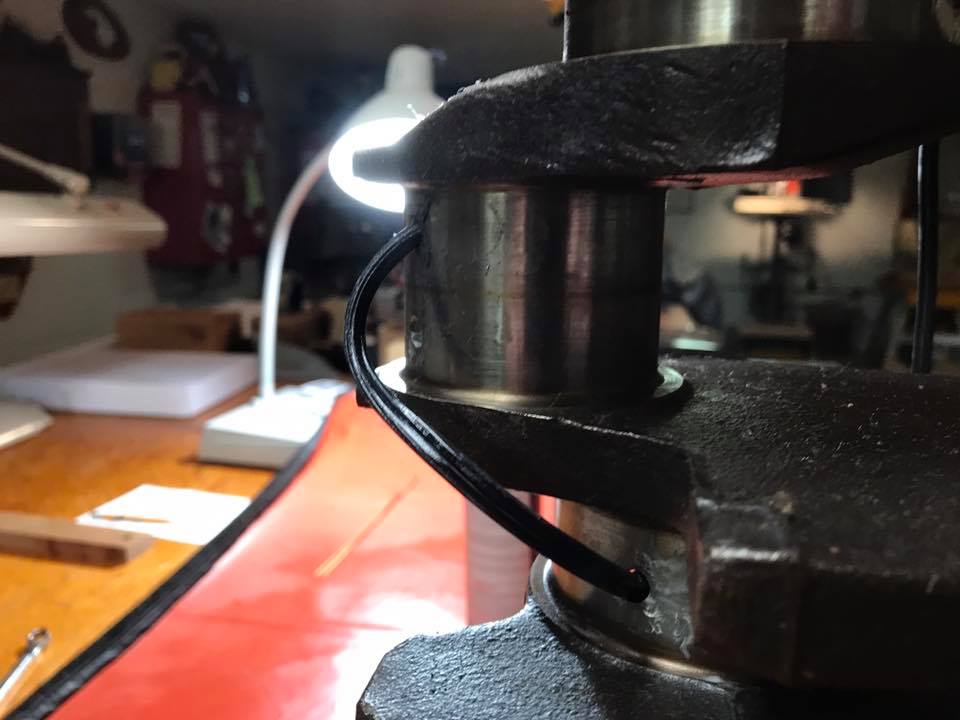
The crank has several cooling ports that run diagonally from one side to another. The ports are wide enough to fit the lamp cord, so I strung the wire in and out of the crank (using a little dab of grease to prevent it from getting stuck). If the crankshaft you use has ports that are too small, you can wrap the cord around the crank as you work your way to the light bulb at the top.
At the top, I worked the cord through the wooden dowel and up into the socket.
Step 9: Light It Up
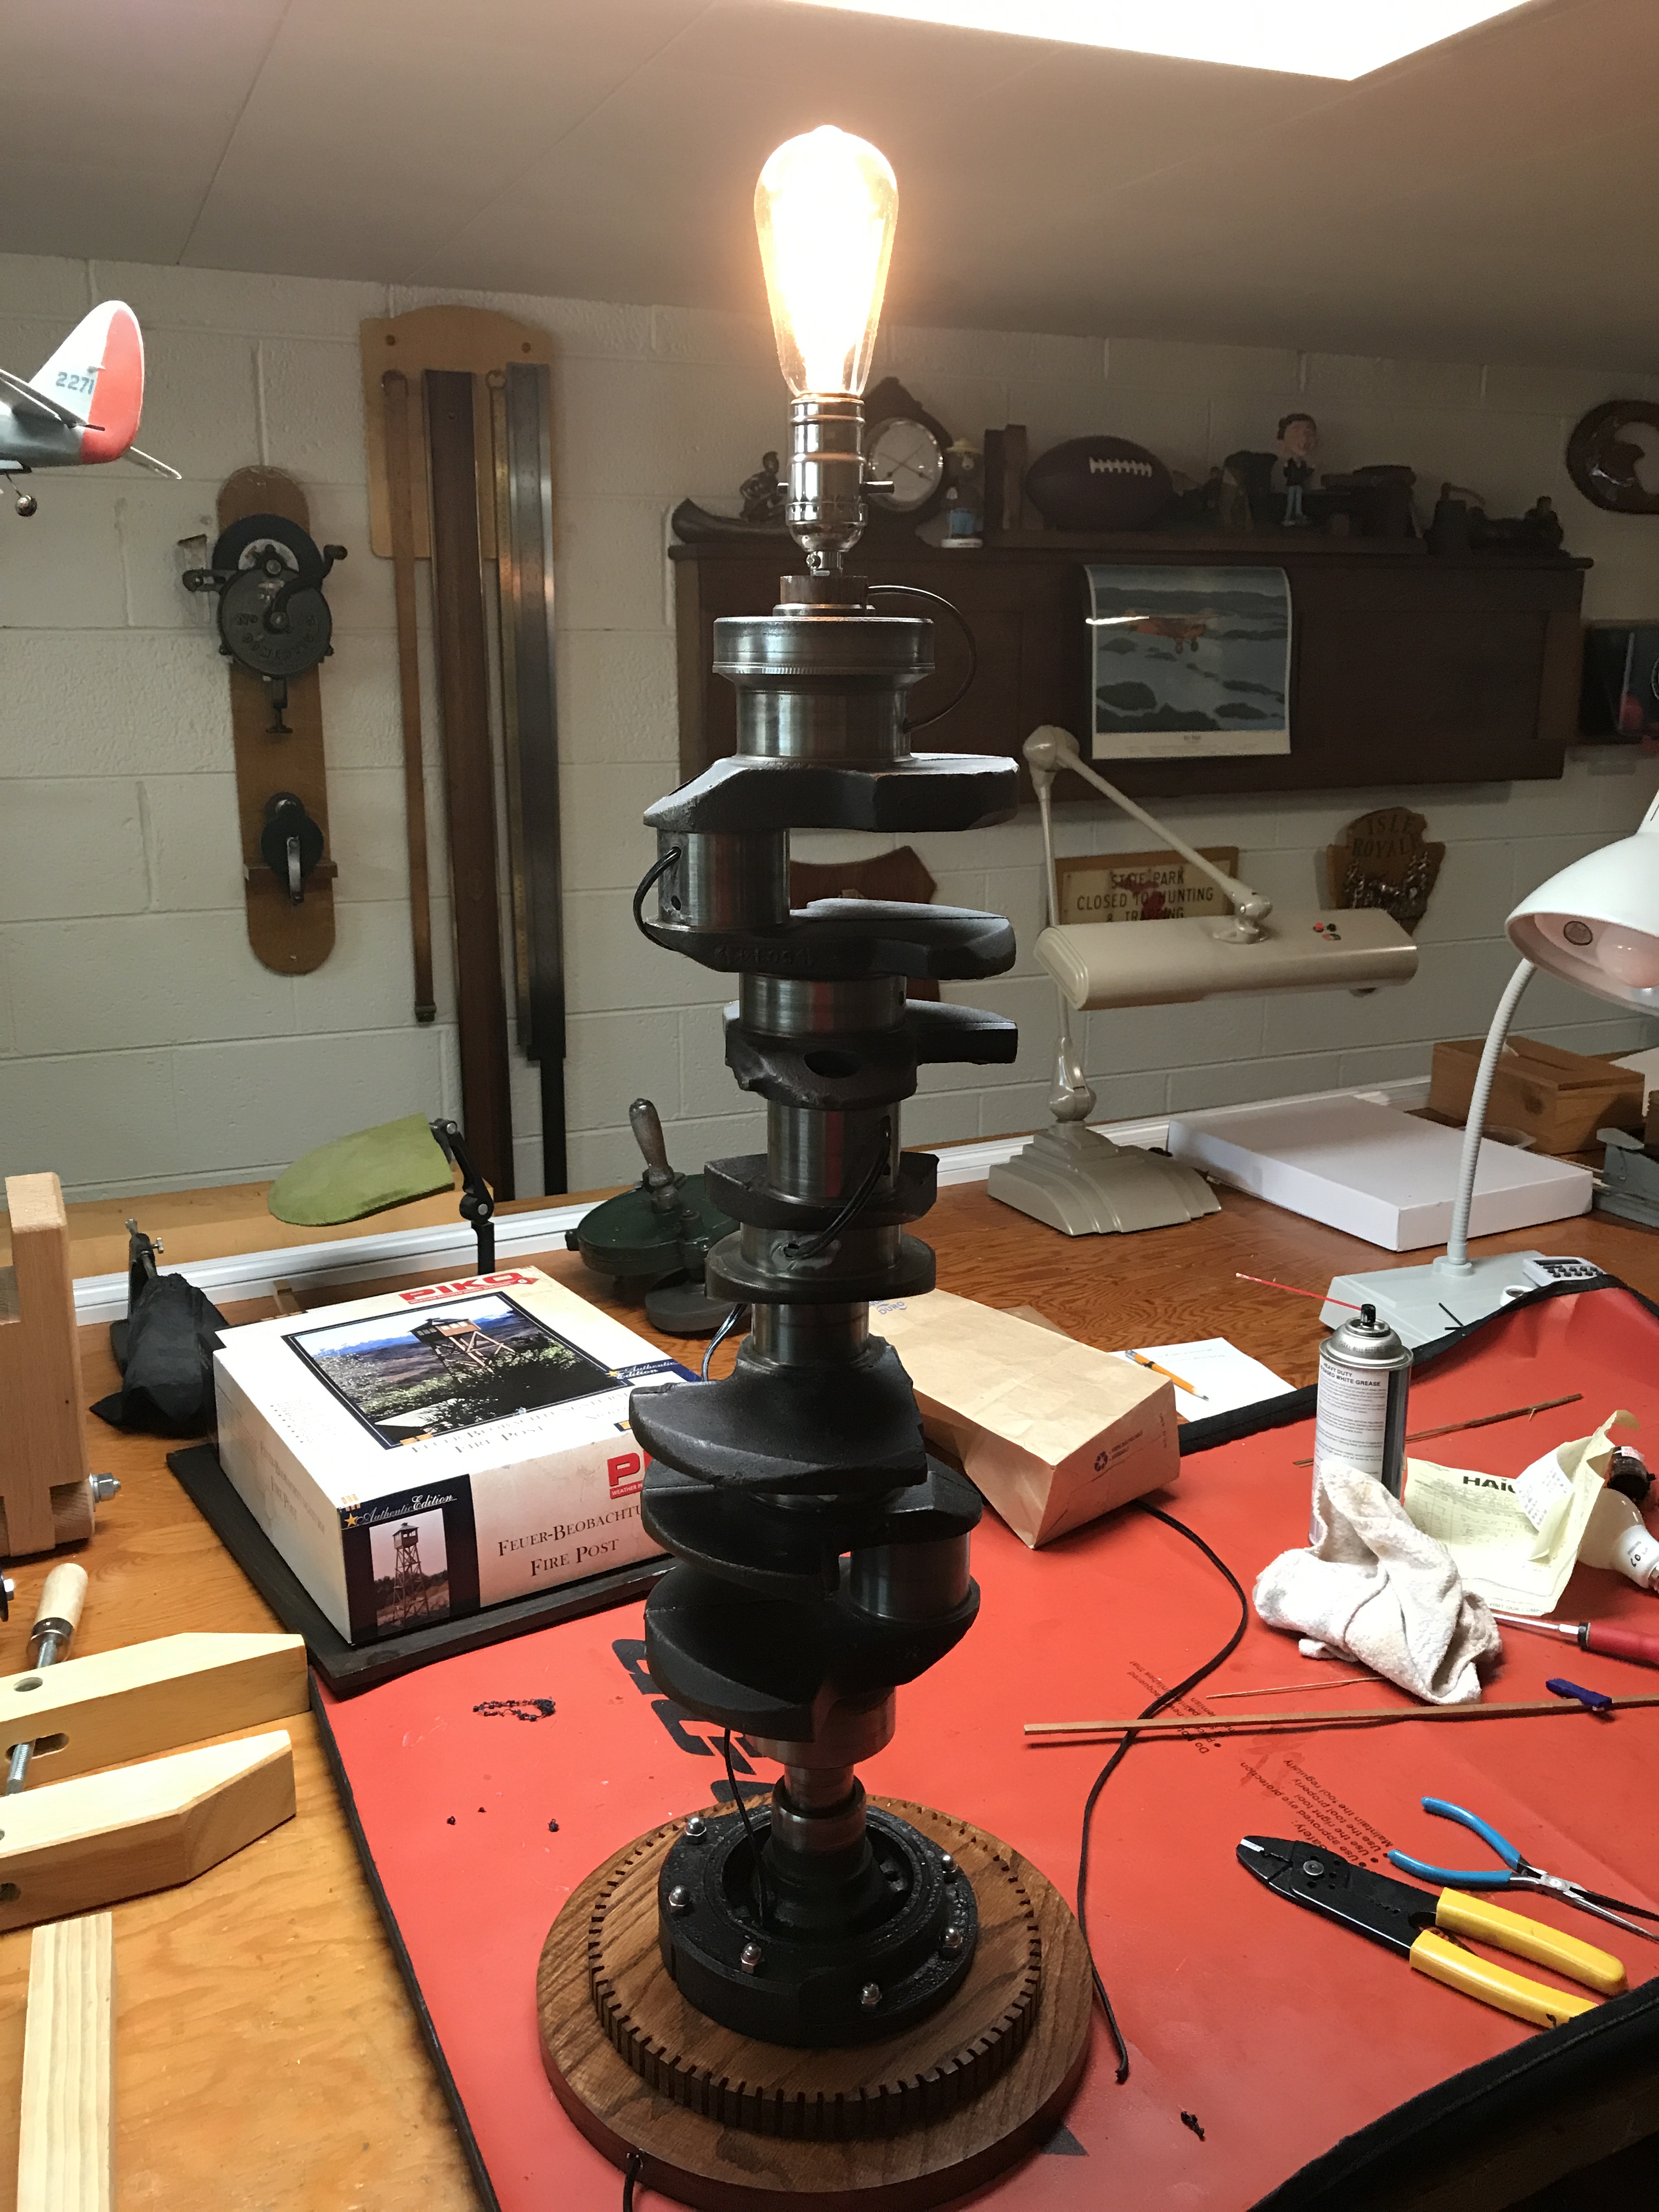
I cut the excess cord at the top, stripped the wires, and connected them to the socket. Then I attached an old-fashioned Edison-style light bulb and plugged this thing into an outlet.
The details will change according to the crankshaft and base you decide on, but the broad strokes will guide you along in creating a manly lamp that will provide light and virile inspiration for years to come.
_____________________________
Alexander Franz works in corporate finance for one of the Detroit Three automakers. He is the son and nephew of craftsmen, and hopes to one day match their skill level.