When your car isn’t starting up on the first turn of the key like it should, it tells you something isn’t quite right. Maybe you have a bad spark plug, maybe you’re out of gas, maybe your battery needs a charge or a change. You don’t just leave the problem undiagnosed and unresolved, though.
Yet we do that very thing when it comes to our lawn mowers. We’ll yank and yank on that starter cord until the machine barely sputters to life, and just keep doing that week after week, telling ourselves that’s just how lawn mowers are. If it’s not starting on the first couple pulls of the cord, though, something is a little off. Just as your car needs regular maintenance, so do your small engines in order to keep them running well for years and years.
Below I take you through how to care for your lawn mower to keep it working effectively and extend its lifespan. In the process, you’ll learn a little more about how it works, which is both useful and just plain interesting to know. Let’s get started.
Anatomy of a Lawn Mower
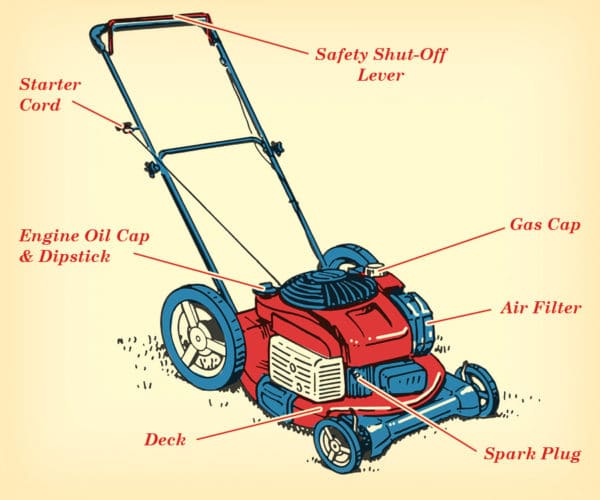
This is a rough idea of where things will be. Your lawn mower may differ slightly.
Before we get into caring for your lawn mower, you need to have a basic understanding of its anatomy. Luckily, it’s a fairly simple machine and is basically a smaller, less complicated version of a car.
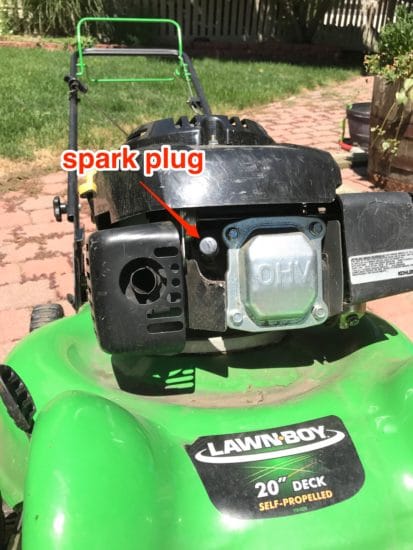
In the center of your mower is the engine, along with a gas tank, oil reservoir (except for in 2-stroke mowers, which aren’t as common these days — more on that below), and air filter. At the front or side of the engine, you’ll find the spark plug. Just as in a car, the spark plug is what ignites the fuel/air mixture that makes the engine run. This is all surrounded by a metal frame (called the “deck”) which houses the blade. From there, the handlebar extends back, along with the starter cord and safety shut-off lever.
For our purposes, that’s all you’ll need to know. It’s not a bad idea, though, to go through the owner’s manual of your machine just to ensure you have a good understanding of how it operates and its various parts.
2-Stroke vs 4-Stroke Mowers
One more quick note about mower engine types before moving on to specific maintenance tasks. You either have a 2-stroke or a 4-stroke engine on your machine. As a consumer, what you need to know is that 2-stroke engines provide more oomph, while also being smaller and lighter. This would seem like an advantage. Unfortunately, they’re also louder, spew out more pollutants, and are harder to start. They’ll also keep running when tipped over (unlike the 4-stroke variety), making them more dangerous for Average Joe Homeowner. When it comes to upkeep, 2-stroke mowers use a mix of oil and gas in the same reservoir. It can be a little confusing.
For all those reasons, while 2-stroke engines are still common in commercial and large mowers, the 4-stroke has come to dominate the consumer market in the last decade. The oil-related tips below are for 4-stroke engines; if you aren’t sure what yours is, simply check for an oil dipstick/fill tub. If there is one, you have a 4-stroke mower. Your gas cap will also tell you; if it’s a 2-stroke, it will have an oil-to-fuel ratio displayed. You can also, of course, consult your owner’s manual.
Before Doing Any Maintenance, Disconnect the Spark Plug
This is a 2-second task that ensures the mower won’t accidentally start up while you’re working on it. This shouldn’t ever happen anyway with a mower made in the last 20 years; there are a number of safeguards to prevent it from starting, such as the electric shut off bar on the handle. However, it provides peace of mind knowing that the mower absolutely cannot start with the spark plug disconnected.
Clean the Deck
Clean under the deck after each mow. Always tip the mower with the air filter side up (so that liquids don’t leak into it), and brush out grass with a broom, or a gloved hand if it’s really chunked on.
Give it a more thorough clean as needed — when grass or dirt is especially caked on under the deck. Use a wire brush, soap, and water and scrub away.
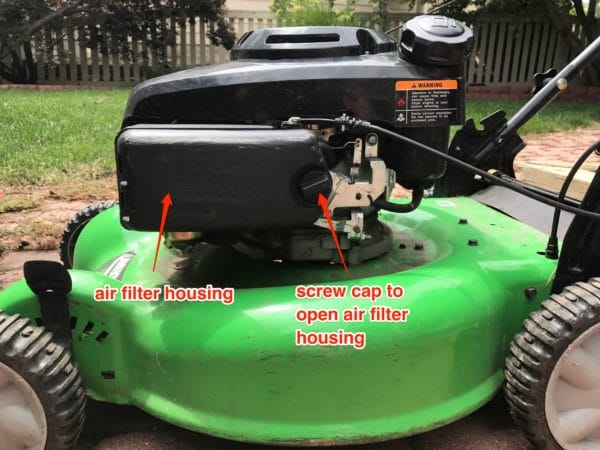
Clean/Replace Air Filter
A dirty air filter burns gas less efficiently and puts more strain on the engine. Your filter is either paper (and replaceable) or foam (and cleanable). Paper ones are cheap and should be replaced annually. It’s an easy task to do while winterizing — see below for info on that. Foam filters should be cleaned 1-2 times per season.
Your air filter will be easy to find. On the opposite side of the engine from the oil cap/dipstick, there will be some sort of housing for the filter. It will open with either a latch or a screw assembly. You’ll know if you have a foam filter because it will be made of, well, foam rather than paper.
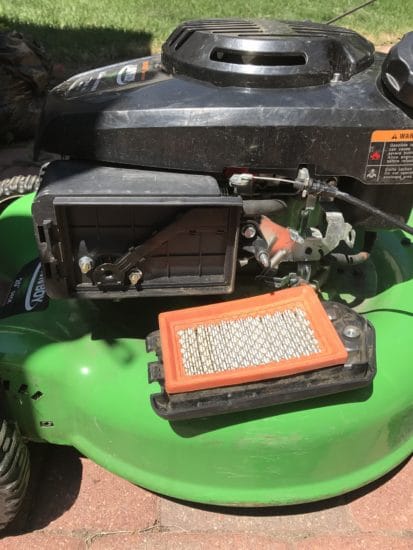
The orange part is the filter. The whole thing comes out and gets replaced.
Checking/Changing Your Mower Oil

Check your oil levels 1-2 times per mowing season. If it’s low, fill ‘er up. You check the oil just like you do your car. Twist the oil cap (usually yellow), pull the dipstick out, wipe the dipstick, and put it back in (screw it in all the way). Then pull it out once more and check the oil level and color.
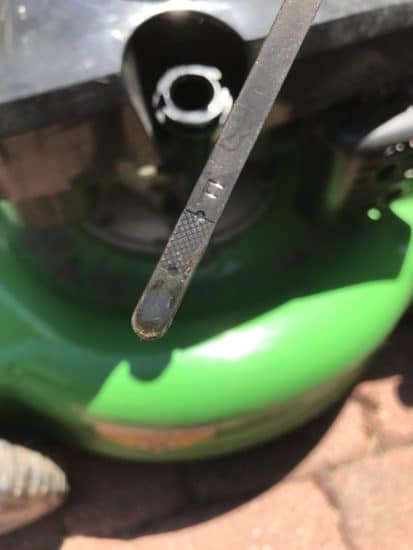
It’s hard to tell in this photo, but there’s an “L” (Low) at the bottom of that textured space.
With lawn mowers, the dipsticks usually have a small textured section where the oil level should be. It should be between mid-level and full. If it’s near “Low” or “Add,” or even below it altogether, add some oil for your model (for most mowers it’s SAE-30).
Beyond the oil level, you’re also checking the color. It should be sort of a golden-brown and free of sediment rather than black and thick/chunky. If it’s black, it means your oil is mucked up for any number of reasons, and should be changed.
Changing Your Lawn Mower Oil
This is where your owner’s manual comes in handy. Different mowers have different oil drain plug locations (if it has a drain plug at all). It’s typically either under the deck, or below and off to the side of the dipstick (in which case the mower will need to be tipped on its side to drain).
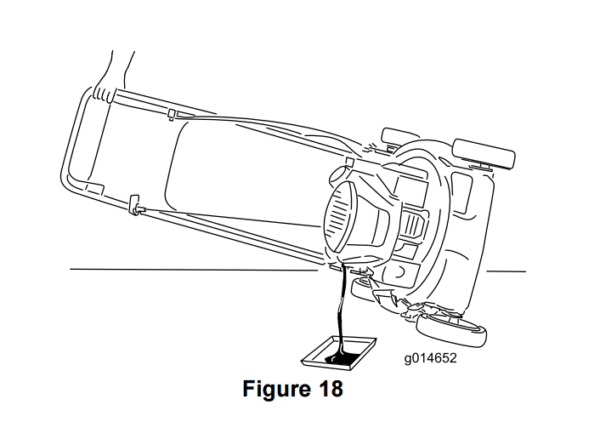
Per my mower’s manual, you’re just supposed to tip ‘er over and let the oil drain out of the fill tube. No drain plug on my model.
If there’s no plug, you just have the tip the mower over and let it drain into a container. Once empty, fill the oil reservoir back up.
If you aren’t comfortable doing this step yourself (or simply don’t want to), many local hardware stores will do so for a pretty reasonable price.
Winterize Your Mower
With just a few easy steps, you can ensure hassle-free startup in the spring so that you aren’t left hanging with extra long grass because your mower is in the shop.
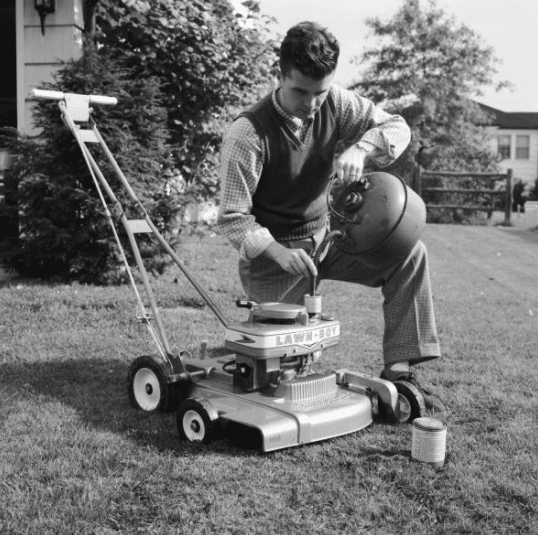
1. Empty the gas tank. A non-starting mower in the spring is most often the effect of gas being left in the tank without use over the course of many months. One repairman I talked with said that after not being in use, gas basically turns to varnish and mucks up the engine. You have two options for emptying the tank: run it until it’s dead (tie down the shut-off bar so you don’t have to hold it), or siphon it out into a container. If you have a lot of gas left, siphoning is the best bet so as to not waste the fuel. When done simply put the gas into your car’s tank (if it’s not mixed with oil), or dispose of it based on your locale’s hazardous waste guidelines. After siphoning, start the mower and let it run until it dies; there’s likely some fuel left in the lines which could gum things up over the cold season.
2. Disconnect the spark plug and give it a clean. Did you see all the dirt that was caked on the spark plug in the GIF above? Wipe it all clean.
3. Remove the blade for sharpening, and possibly oil drainage. Rocks, branches, mulch, and natural dulling happens over the course of a mowing season. You can sharpen your own blade with a certain amount of know-how, but my local Ace Hardware will do it for $7 at the beginning of the season, which is darn worth it to me!
Simply tip your mower (air filter up, remember) and use a socket wrench to take the blade off. It allows access to your oil plug — if your mower has one — and also makes it easy to get sharpened. If you’re sharpening yourself, you need it removed anyway. And if you’re having a hardware store do it, better to bring in just the blade versus the whole darn machine.
4. Drain and replace the oil. Use the instructions above.
Replace Spark Plug as Needed
Some folks recommend changing the spark plug annually since it’s a cheap and easy piece of maintenance, but unless your mower is starting a little slowly, there’s no need to change it. Every 2-3 years is perfectly fine, and even longer if your mower is starting without a problem.
You’ll need a special wrench to remove and replace the plug. Don’t worry, you can get one for under $10. This is another task that you could have a hardware store do with a mower tune up, but it’s a good thing to know, and sometimes just satisfying to do yourself.
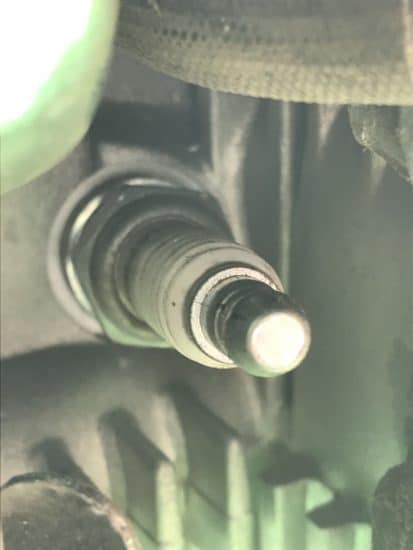
To do it yourself, disconnect the plug, and use your special spark plug wrench as you would a socket wrench. As you can see in the close-up image above, the spark plug is basically a large hex bolt. If the plug doesn’t move at all, lubricate it well, then try again.
The lawn mower is a real utility tool, and not very “sexy,” but, like every tool, it needs regular care and maintenance to keep it performing optimally. Follow the tips above, and your mower can make your lawn look like Wrigley Field, and last for many years to come.
Be sure to check out our guide on the 10 jobs to do to get your house and yard ready for summer.