For most folks in the developed world, getting a drink of safe, clean, palatable drinking water is as easy as turning on the tap.
Outside of the comfortable amenities of home, however, attaining potable water can get more complicated and require more effort.
Maybe you went backpacking with all the proper gear and simply didn’t allot the correct amount of water for the trip. Or you’re traveling in an undeveloped country and have been warned not to drink from the tap. Perhaps the SHTF and you’re trapped in a city without a clean water source (or less apocalyptically, you’re simply living in a town whose water source has been temporarily contaminated).
How would you procure clean drinking water in these circumstances?
The right methodology might be different for all these scenarios, as it depends on where you are, your budget, how long you need your filtering materials to last, etc.
The options for filtering and purifying water are in fact numerous, and unfortunately, some of the terminology related to them is also confusing, and not necessarily standardized (especially on the web).
So below I provide a crash course on water filtration and purification for camping, survival, and travel. I break down the consequences of drinking untreated water, the proper terminology to understand when researching and shopping filtration and purification methods, and the pros and cons of the methods themselves. Finally, I offer a short guide to best methods to use in various scenarios.
The Risk and Consequences of Drinking Contaminated Water
There are a number of bacteria and parasites that can be ingested and lead to illness through the drinking of untreated water.
How do these diseases get into water sources? In both the wild and in populated areas with poor sanitation practices, it’s often carried by humans and animals (and their waste) who hunt, live, bathe, defecate, and even die or get their remains thrown in lakes and rivers.
In the wilderness of the U.S., a primary waterborne illness is called giardiasis. It’s a protozoan parasite that can cause extreme cramping, and worst of all in any outdoors scenario, violent diarrhea.
Throughout the wilds of the world, other waterborne diseases include dysentery, cholera, and various other worms, viruses, and bacterial infections. The most common symptoms that arise from these illnesses are similar to giardiasis in that they’re largely intestinal issues. When you’re perhaps already dehydrated in a survival scenario or even just from backpacking for a few days straight, diarrhea will exacerbate the problem, and even put your life at risk.
Far better to treat any water you drink from the wild or from questionable sources rather than risk a debilitating illness. The only exception is if your life truly depends on getting hydrated. In that case, absolutely drink untreated water. As is often said in wilderness survival circles, doctors can treat giardiasis, but they can’t treat dead.
Does All Water Need to Be Treated?
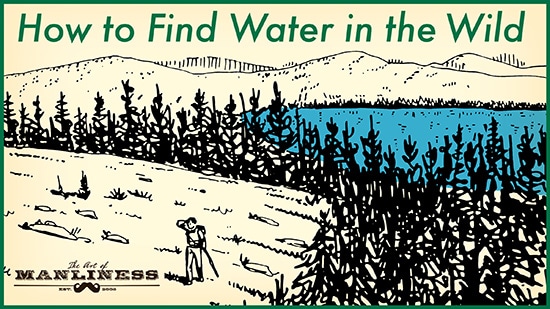
In the wild, rainwater you’ve collected in clean containers is generally safe, as is snow that you’ve melted. Water in the wilderness is also almost always safe if you’ve collected it via transpiration or a still (if the plant itself isn’t poisonous, of course). If you collect the water by any other means, though — from a stream or lake (flowing water is better than stagnant, but still not foolproof), dew, etc. — it should be filtered and/or purified; you never know what might be lurking in the ground or upstream from your collection spot.
Read more about how to safely find and collect water in the wilderness.
In urban areas, rainwater may not be safe to drink, as it traveled through polluted air. And if you’re traveling in a developing country where the safety of the tap/well water is questionable, you’ll want to stick to drinking bottled water (not always an option in rural areas), or consistently purify your water.
Purification vs Filtration
When it comes to finding and drinking water, the first thing you need to know is the difference between filtration and purification. They are not synonyms.
Water filtration is the elimination of debris, and some bacteria, by way of some type of cloth or mesh net — a sieve — through which the water flows.
Water purification is a chemical or UV process of rendering bacteria and other harmful agents inoperative. The chemicals (or heat) in these purification methods essentially deactivate the bad stuff, making it safe for consumption.
Sometimes water needs both of those processes; sometimes it only needs one. Knowing the difference, though, can truly save your life. If you’re backpacking in Africa and think you only need a filter, you could end up with a deadly disease in your system. So let’s get a little more into the differences between the two.
Water Filtration
Using a water filter, especially a commercially tested one (versus just the DIY backwoods variety), can indeed eliminate some bacteria. But not all. Filters can take care of protozoa and bacteria, but they can’t get rid of any viruses present in the water — those are simply too small for the mesh to catch.
Generally, for backpacking and survival purposes, water in the U.S. and Canada is rated as safe for filtration-only methods and devices; this is especially true for mountainous areas. When folks get sick while backpacking or camping and blame it on the water, it’s often found to actually be sanitation-related (not washing hands, not disposing of waste properly or far enough from campsite, etc.).
Filtering water also ensures the best flavor. Your H2O will taste natural and will be immediately drinkable, whereas some purification methods either alter the taste and/or take up to a few hours to make the water safe.
The bottom line is that filters work to rid the water of impurities — including dirt as well as microscopic bacteria — but aren’t completely effective in making the water safe to drink. If it’s all you have, you’ll likely be okay, but know that negative consequences are still possible.
Water Purification
Water purification makes H2O safe to drink by deactivating all harmful pathogens, including viruses. Purification doesn’t eliminate contaminants though. Dirty water that’s been purified is still dirty water, and probably needs filtering (that should happen first, actually).
Purification happens primarily through boiling, chemical agents, or UV light. It’s especially important when traveling outside first world countries, where viral infections are more common.
Let’s now take a look at the various filtration/purification methods out there.
Methods
Below you’ll find the most common methods for water filtration and purification in the wild, including some pros and cons of each.
DIY Filters
In general, you only want to use DIY filters when no other option is available. You certainly don’t want to go camping and only plan on using rocks, sand, and dirt to filter your water. These are for survival purposes only. If at all possible, it’s recommended that you still purify water (by either boiling or adding tablets/chemicals) after filtering it with these methods.
I’ve listed them from most effective at top, to least effective at bottom.
Wood and Tubing.
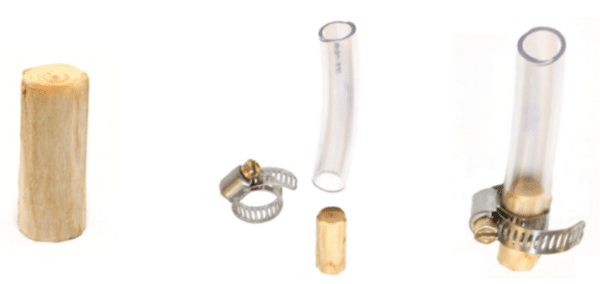
While this diagram includes a clamp, in wilderness survival scenarios, you’re not likely to have that available. Wood and tubing (or other materials) will do the trick.
The best DIY water filtration system out there is one made from a small piece of wood and tubing. In fact, if you use sapwood (the soft outer layers of a tree) or a small, green branch, you can actually eliminate 99% of bacteria (but still not viruses). To make this filter, cut a small piece of sapwood (a couple inches long by an inch or so wide), and wrap it tightly with some sort of plastic tubing if available. You’re going to be using the branch as a filter, pouring water onto one end, and letting it drip out the other into a container, so the tubing functions to ensure that untreated water isn’t running down the side and into your receptacle. Improvise other wrapping devices if you don’t have plastic tubing — cordage, t-shirt/cloth, the plastic from a water bottle, etc. Then slowly pour small amounts of water onto the end of the branch and let it filter out the other end. Beware that this is a slow method, but you’ll be able to produce up to 4 liters of filtered drinking water per day, which is more than enough for even a couple people.
Rock/Sand Layer Cake. The classic wilderness DIY filtration method is to layer various materials in a hollow log or bag, and let water drip down from the top, through the layers, out through a small hole in the bottom, and into a clean container.
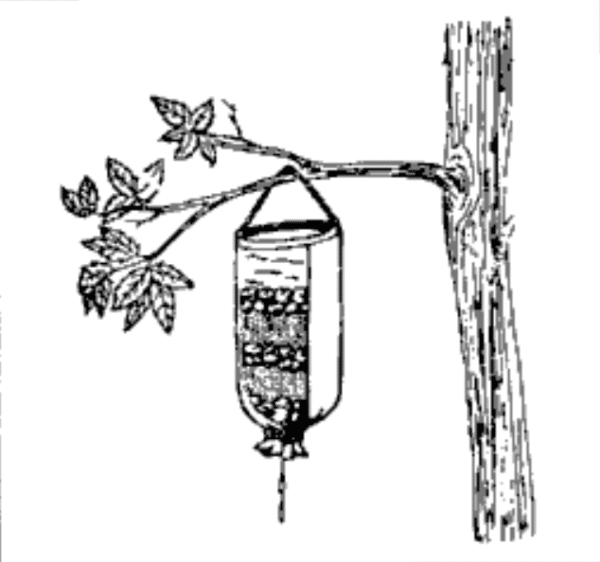
From FM 21-76, the Army’s survival manual.
If these items are in a bag, or perhaps a tarp or piece of cloth, ensure the bottom is tied off, but has a small hole for water to drip through. Start by putting in a layer of finer materials like sand, cloth, small pebbles, etc. Then add some larger rocks and bits of charcoal (if you made a fire). Then, start over with another fine layer, and coarse layer atop that. It will look like a layer cake when you’re finished. This will eliminate impurities in the water, and some larger bacteria, but certainly not all of them.
Shirt/Cloth. Filtering water through a piece of cloth alone will eliminate debris and dirt, but not much else. Still, it’s effective if that’s what you’re trying to do and if you can purify it afterwards.
Container. If nothing else, place muddy/dirty water into a container and let it stand for 12 hours or so. In most cases, the dirt and other sediment will fall to the bottom, and the clear water will remain on top. This obviously does absolutely nothing to get rid of harmful pathogens, but at least makes the water palatable.
Commercial Filters
Survival Straws. Survival straws, LifeStraw being the most recognizable, have burst onto the market in the last 5 years or so. The idea is that you can drink water right through the straw (or water bottle with straw attached) and it’ll be safe because of the various filters contained within. The majority of straws on the market can eliminate bacteria and protozoa, but not viruses. They generally have no purifying element. Most do, however, have a carbon filter, which will eliminate off tastes and odors. Just be sure to check the specs, based on your needs, before purchasing. Don’t, for instance, bring one to Africa, assuming you can just drink safely from the rivers. Not a good idea.
Straws can be expensive, but the cost per liter of filtered water remains very low (most are good for up to 700-1,000 liters) compared to chemical treatments.
Pump/Gravity Filter. The name here is misleading, as many of these commercial filters also act to purify the water. Many utilize a ceramic filter to eliminate larger pathogens, as well as silver to destroy viruses. These pump filters operate quickly, filtering and purifying up to a quart per minute, but require a power source (either your arm, or in some cases, a battery).
Gravity filters operate more like IV bags; they’re slower, but require no batteries or human operation. With any commercial pump or other filter, again just check the specs. If it mentions a purifying element, you’re good to go for any situation. If not, just know it won’t eliminate all risk.
These commercial filters are often bigger and bulkier than other options, so will take up more space in a backpack or survival kit. While they can be an expensive up-front purchase, they’ll last a very long time.
Boiling
Boiling water is the standard backwoods purification treatment for water. According to the EPA, one minute of a rolling boil will kill all of the bad stuff, including viruses. (If at high altitude — above 5,000 feet — increase the time to 3 minutes.) Any metal or glass container will do, but if you don’t have that available, you can heat rocks in a fire and place them into your receptacle.
One downside of boiling your water is that it obviously requires a fire and therefore fuel, which in some cases isn’t possible (although it’s more possible if you read our article on how to start a fire without matches). It also leads to evaporation and the loss of some water volume, which should be taken into account in situations where every drop may be precious.
Chemical (Iodine/Chlorine/Bleach)
There are two popular chemical methods for treating water that utilize drops or tablets to disinfect and get rid of the bad stuff: iodine and chlorine. Bleach is a third option for chemical purification, generally in more urban environs since it’s usually just found in the home versus being carried as a wilderness survival item.
Iodine. Use a 2% tincture, and apply 5 drops per quart of water. If the water is cloudy, add 10 drops. Let sit for 30 minutes before drinking. Iodine comes in a small, very portable bottle, and also has other uses like treating cuts and warts. This is definitely an item to have in your emergency kit or bug-out bag.
Iodine will lead to an off taste, and isn’t safe for pregnant women or those with shellfish allergies. Children are also often averse to iodine because of the taste; know that ahead of time if backpacking or camping. Iodine is generally the cheaper of the chemical methods, and works quicker.
There are also specialized iodine tablets you can buy that are made for the sake of outdoors folks.
Chlorine. Generally comes in the form of tablets, which you just drop into a liter of water, and let the chemicals do their work. After about 4 hours, your water will be safe to drink and free of all harmful pathogens.
Chlorine’s cons are that it has a longer waiting period, and is a little more expensive per use than other methods. On the pro side, most of chlorine dissipates in that 4-hour timeframe, meaning the water’s taste isn’t as affected. It also has a longer shelf life.
Bleach. In urban emergency scenarios, bleach can be used to purify water. Most bleaches use a form of liquid chlorine called sodium hypochlorite. As just mentioned above, chlorine is a water purification agent, so it makes sense that bleach could be used.
Household varieties will generally contain 5-8% sodium hypochlorite — be sure to check the label before using, and if it’s higher than that don’t use it. Using a dropper, add 2 drops per quart, and let stand 30 minutes before drinking.
UV/Solar
SODIS. Solar water disinfection (SODIS) relies on the power of the sun to make your water safe. Believe it or not, if you have a clear water bottle, you can simply leave it in direct sunlight for ~12 hours (24-48 on cloudy days), and celestial UV rays will kill most (not all) bacteria and microorganisms. Some experts say to leave water exposed for a full day no matter what, just to be extra safe. It all depends on your need. Since this particular UV method doesn’t necessarily kill all bacteria/viruses, it’s best used for survival purposes only, or in areas known to have safe(ish) water.
UV Devices. There are various devices out there which create UV light artificially to get rid of bacteria and even viruses. Some are hand-cranked while others are battery-operated. Keep in mind these are not filtration devices, so larger particles or debris in the water will not be eliminated, and some of those larger particles can hide pathogens in them. For this reason, it’s best to filter the water first when using the UV method. As with pumps and filters, these devices are larger/heavier than some other options.
Bottom Line: What’s the Best Method for Various Scenarios?
For hiking/backpacking in first world countries: As noted above, groundwater in places like the U.S. and Canada is almost assuredly free of viruses. Because of this, commercial filtration systems, even those that don’t necessarily purify (like survival straws), will almost always do the trick just fine. Your chances of catching a virus in these environments is very small.
Filters can be larger and heavier than other methods though, so chemical treatments will also work, and are especially popular for folks who are backpacking or doing long through-hikes (like the Appalachian Trail).
For hiking/backpacking/traveling internationally: When traveling outside of first-world areas, you always want to purify, in addition to filtering (if needed). This means tablets, UV devices, or filters that include a purifying element.
For your bug-out/survival bags: In a bug-out or urban survival scenario, Creek Stewart, our resident survival expert, recommends having both a filter and purification tablets, while keeping boiling as an option when time and fuel allows for it.
For wilderness survival scenarios: For whatever reason, you’re stranded in the wilderness, need to consume water to stay hydrated, and don’t have commercial filtering or purification options available. If you have enough water and fuel at your disposal, you first option should be boiling. If you can’t spare the evaporation or can’t get a fire going, create a wood/tubing filter. And if you can’t do that, a layered filter of natural materials will be your best bet to ward off illness.
Always remember, filtering simply improves palatability and removes impurities, while purifying ensures that what you’re drinking is free of harmful disease.
Finally, as already mentioned but bears repeating, it’s always best to drink untreated water rather than to die in the wilderness!