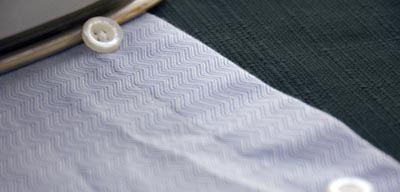
I can’t count the number of times I’ve seen a man who’s wearing what would be a very dapper get-up….except it’s ruined by wrinkly clothes. I see this especially with young, single professional men who probably don’t have mom or a wife to iron their clothes for them and never learned this basic life skill for themselves.
The fact is a lot of grown men don’t know how to iron a shirt. It’s nothing to be ashamed of if you don’t know how. Growing up, dear old mom probably ironed your dress shirts whenever you needed one and now your wife does this chore. But a man needs to be self-sufficient. He shouldn’t have to rely on somebody else to ensure that he looks presentable. He’s in charge of that. If an unexpected interview or date comes up, a man knows how to get ready and out the door looking like a million bucks.
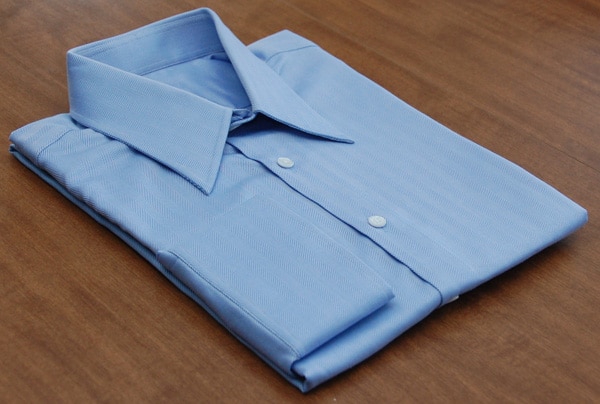
Details matter when it comes to your appearance and making a good first impression. Wrinkles draw the eye of those you meet and make you look sloppy and out-of-sorts. Having well-pressed clothing shows the world that you’re a man of discipline and order, a man who has his stuff together and understands that the details matter. And a crisp shirt really pulls together a handsome outfit. Throw on a well-ironed shirt, and you get a bit of confident pep in your step; it just feels good.
Ironing isn’t hard when you get the hang of it. You can get a shirt done in less than 5 minutes. And boom–you’re ready to take on the world.
Today we’re going to give you the ins and outs of fast, effective ironing. If you don’t really know how to iron a dress shirt, here’s your primer. And if you’re already pretty adept at this chore, you’ll probably find some great tips you never thought of before. So let’s get started by talking about the tools of the trade.
The 6 Tools of Effective Ironing
Tool #1: The Iron
How do you identify a quality iron?
A well built soleplate – To play on words, this is the soul of the iron. You want something that is solid, smooth, and clean if buying used. You’ll find soleplates made from solid steel, titanium coated, and cast iron with aluminum, to name three solid options. Avoid new irons under $20, as this is where low cost manufacturers most often skimp on the product to keeps costs low. A poor quality soleplate will not clean well and may have uneven heat distribution–which leads to shirts being damaged.
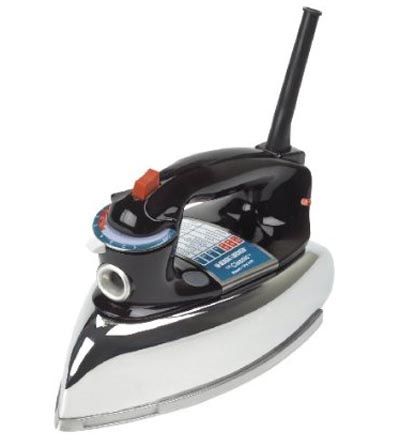
High heat capability – Most consumer irons range in power consumption from 420 watts (small travel irons) to 1800 watts (higher end models above $100). The power consumption plays into the amount of heat produced by the iron, although there isn’t always a direct relationship as the size of the soleplate needing to be heated factors in as well. But generally speaking, a 1800 watt iron is going to be hotter than a 1200 watt one, and it will heat up faster.
Why the need for heat? Certain fabrics, cotton and linen being two of them, require high heat to reform their shape. A hotter iron can cut ironing time in half, vs. one that forces you to pass and remain on the same part of the garment for 45 seconds. Also, steam production relies on the soleplate’s temperature and higher temps produce steadier steam.
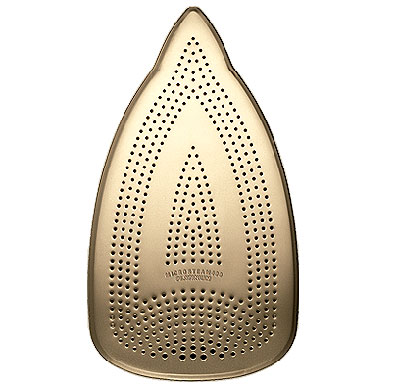
Steam delivery system – You want steam as it breathes life into fabrics and the hot moisture enables the toughest wrinkles to smooth out with minimal work by more evenly distributing the heat through the garment fibers. Steam irons under $20 often have their steam component built in as an afterthought and sputter and spit out water when you don’t want it. Higher end models have 300+ holes that deliver a clean, uniform mist.
Depending on your needs you’ll want the best steam delivery system you can budget. Why? A good steam iron can be used indirectly on wools and other more delicate fabrics and save you thousands a year in pressing and dry cleaning costs in addition to what I mentioned above.
Size and Weight – Size and weight do become issues for those who deal with arthritis or are sensitive to weight differences of a few pounds. Thus expensive irons made from lightweight space-age materials are not necessarily better because they cost more–they simply are being made for a different customer. So don’t always equate price with quality.
Special Note – Travel Irons
For the sharp dressed road warrior a travel iron is a wise investment. Although hotels normally have an iron and board available for guest use, this isn’t always the case, especially at hotels that are either budget or are trying to encourage use of their expensive in-house cleaning services.
Having your own iron enables you to use a device you’re familiar with and prepare your clothing on your schedule as you see fit. No ironing board? Grab a towel and throw it on a flat surface–it will do the job.
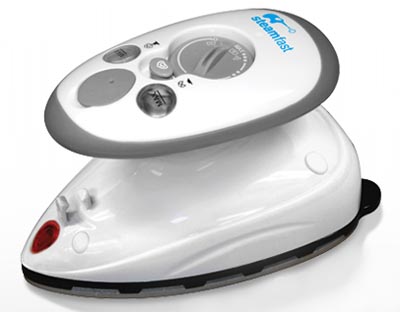
Lightweight, small, easy to carry and dependable are the keys to a good travel iron.
Personally I recommend Steamfast’s compact travel iron. It is incredibly small, lightweight, hot, produces an decent amount of steam, and is value priced. However what impressed me most was the great customer service I recently received from this American business. I was having mechanical problems (or so I thought–turns out I didn’t know how to use it properly) and thought it was going to be a hassle to exchange it as I had waited 8 months to report the problem. Instead, I spoke with a very nice customer service rep who resolved my issue and within minutes shipped me a new one–no questions asked. You have to love that!
Tool # 2: The Ironing Board
You need something that’s sturdy and has a top that you’re comfortable ironing on. I advise you see what’s available for free as many people have an old one lying around–and then spend the money on a nice cover and pad. You can also put a piece of aluminum foil under the ironing board cover–the idea here is to reflect the iron’s heat back on itself so you’re actually ironing from both sides at once. Be careful though as it will increase the speed in which you can burn the clothing.
Tool #3: Spray Bottle
Do not re-use a container that housed a cleaning agent. You’ll use this spray bottle to disperse water evenly over your shirt before ironing in the case your iron is not equipped with a steam function or when you’re ironing in bulk (as I will show you). It’s also handy for when you’re ironing a wrinkle–give the spot a spray and then iron out the wrinkle seconds later.
Tool #4: Water
You want to use water free of small dirt and high concentrations of calcium and magnesium, both common in hard water. Long term use can lead to iron damage and leave marks on dress shirt fabrics that are hard to remove. However, you do not need to use distilled water as some mineral presence is good as it acts as a wetting agent and helps water better vaporize when it contacts the soleplate. Drinking water is perfect for most irons.
If this doesn’t motivate you to iron, I don’t know what will. Picture courtesy of artist Darel Seo.
Tool #5: A Light-Colored Cotton Towel
A towel can be used as a ironing board pad, rolled and used inside sleeves as a makeshift sleeve-board, or simply to clean up excess water sprayed on the shirt.
Tool #6: Spray Starch (Optional)
I remember in the Marines using cans of spray starch in an effort to get the perfect “crisp” look; however, just as often I would overdue it and be dealing with flakes due to over starching or not letting it set in.
To use starch, understand it is best used in moderation and with a temperature setting of 6 or below (the highest setting can cause flaking). Too much and you can make a normally breathable cotton shirt feel like a synthetic plastic bag and cause more wrinkles when worn!
FYI – a man can make his own starch spray by dissolving one tablespoon of cornstarch in two cups water. Using a spray bottle (preferably not the water one–clearly mark it “spray starch”) you can then LIGHTLY mist the fabric a minute before ironing.
How to Iron a Shirt
For these instructions I assume you are ironing a batch of five (5) 100% cotton dress shirts with an iron setting of five to six (depending on your iron). If you’re seeking a super crisp look, you’ll want to first turn the shirt inside out and iron the inside and then iron the outside of the shirt. This will add another two minutes onto the process, but will give you better results, especially on thicker cotton fabrics. If you use the aluminum foil trick though, you can skip this.
Preparation – Read the shirt’s label. Really, you need to understand what type of fabric the shirt is made from before ironing it or you could possibly destroy it. Most shirts are made from cotton or cotton blends and can withstand high temps, although polyester shirt fabrics are more fragile to heat. If you’re unsure, start with a low setting such as 3 and then move up until the shirt starts to respond to the iron’s heat. Note: Silk and wool shirts are not covered here. Although it is possible to clean them yourself, you need to know what you’re doing.
You want the shirts to be moist (not soaking wet). This will enable you to dry iron without having to worry about your iron’s steam function. Ideally you have recently pulled the shirts from the washing machine; if they are already dry, however, just take them and thoroughly mist them with the spray bottle. Once finished, place them in a plastic bag to better diffuse the moisture and prevent evaporation.
Next set up the ironing board near a power outlet that is close to the closet where you’ll be hanging everything immediately after ironing. Ensure the iron has water in it and then plug it in, set to the lowest heat setting you’ll need. Store all of your ironing equipment together, that way you’re never looking for anything when you need it quickly.
Within 5 minutes the iron should be ready and all the shirts moistened. Pull the lightest weight shirt from the bag first, making sure it is evenly wet. If not, spray on a bit more water.
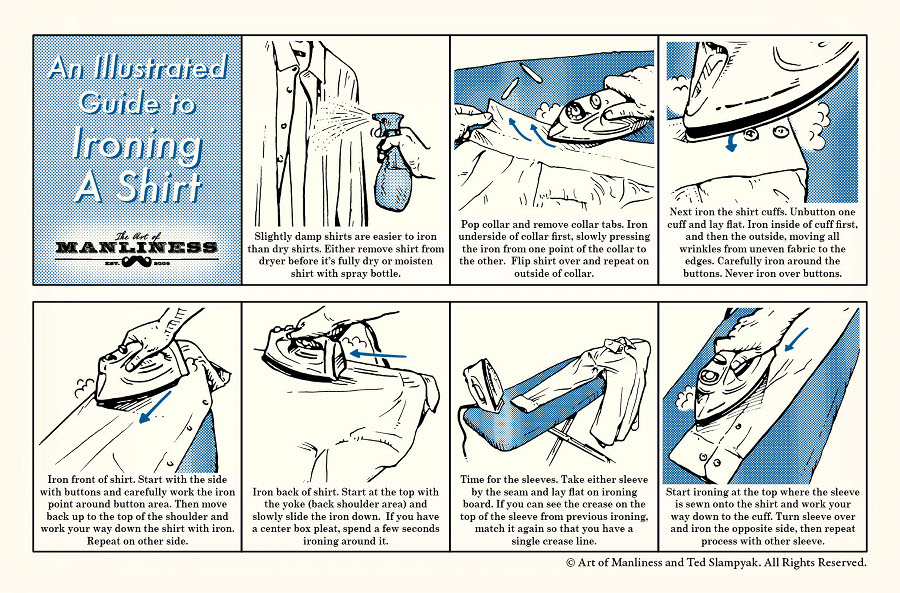
1. Iron the Collar First
Always start by ironing your dress shirt collar. This is the most visible part of a shirt as it frames the face, especially when worn with a suit or sport jacket. In a pinch and when wearing a jacket, you can get away with ironing only your collar, the front area right below it, and your cuffs. Just don’t take off your jacket!
To iron the shirt collar, pop it up and start with the underside, slowly pressing the iron from one point to the other. Ensure that it is thoroughly moist before starting, and if any wrinkles appear, press them to the bottom where they’ll be less visible. Next, flip the shirt over and repeat this process on the outside of the collar.
2. Next Iron the Cuffs
As mentioned above, I iron the cuffs next as they receive a lot of attention when worn properly with a jacket.
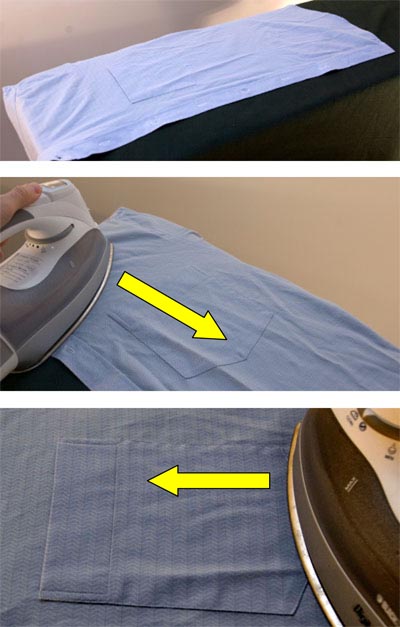
To iron a shirt cuff, first unbutton it (to include the gauntlet button) and lay it out flat. First iron the inside of the cuff, and next the outside, moving all wrinkles from uneven fabric to the edges. Carefully iron around the buttons, and even on the backside. Never iron over buttons (unless you place them over a towel or something with give) as they can leave a mark. For French cuffs, open them fully and iron as above. I recommend you not press the edges of a French cuff–it steals the life and body from a smooth fold.
3. Ironing the Shirt Front
Start with the side that has buttons and carefully work the iron point around the button area (never over the buttons).
Then move back up to the top of the shoulder and work your way down the shirt with the iron. Repeat on the other side, and if you have a placket, press the material under it with the iron point and then over the top. It’s worth spending a bit more time on the front placket and areas near the collar as they receive a high percentage of visual attention.
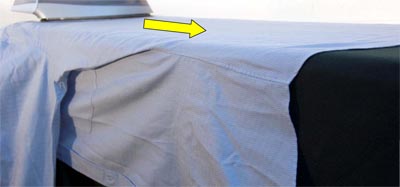
4. Iron the Back of the Shirt
Laying the shirt flat on the board, I like to position one of the sleeve heads into the square edge of the ironing board. You then have half the back in prime position to be ironed, and only need to slide the shirt over to complete the other half. Start at the top with the yoke (back shoulder area) and slowly slide the iron down. If you have a center box pleat, you’ll have to spend a few seconds ironing around it–I prefer not to iron back in the pleat, as the time required for an area you don’t want to highlight isn’t worth the effort.
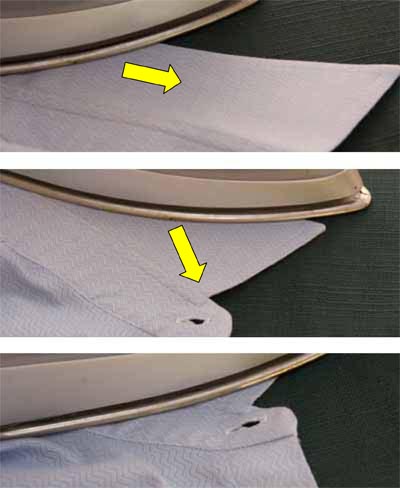
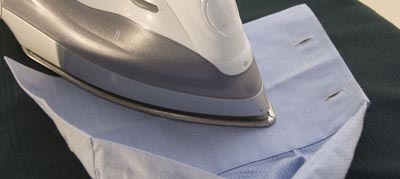
5. Iron the Sleeves
I choose to iron sleeves last as of all the parts of the shirt, they can be ironed in the widest variety of ways and for most men are the trickiest part of the shirt. Problems arise from the fact that unless you have a sleeve board, you’ll be ironing two layers of fabric. Thus the key to ironing sleeves is to be sure the fabric is flat and smooth BEFORE you apply the iron.
Take either sleeve by the seam and lay the whole sleeve (and most of the shirt) flat on the ironing board. If you can see the creases on the top of the sleeve from previous ironing, match it again so that you have a single crease line. Start ironing at the top where the sleeve is sewn onto the shirt and work your way down to the cuff. Turn the sleeve over and iron, then repeat the process with the other sleeve. If you don’t have a sleeve board and would rather your shirt sleeve not have a crease, insert a rolled-up towel into the sleeve. This will allow you to iron it without leaving a crease mark.
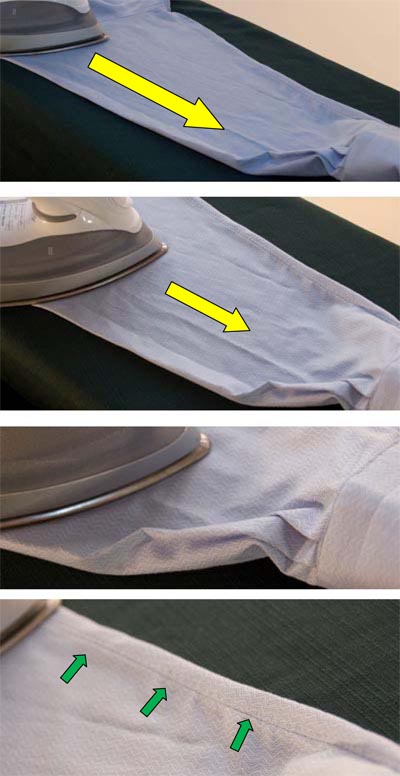
The bottom picture shows you the shirt sleeve seam – use this as a guide when laying the sleeve flat.
6. Inspect & Hang
Inspect the shirt and spot iron where necessary. Finally, place the shirt on a hanger and in your closet.
Three Warnings
- If you are not sure of the shirt’s fiber type, err on the side of caution and iron it with a lower setting. You can always increase the temperature…but you cannot fix heat damaged fabric.
- Iron around buttons, never over them. Even if there is fabric laying over the button, as in the case of a pocket with under-buttons or a dress shirt with a hidden button down collar. You can create a permanent impression that will ruin the look of the shirt. Be sure to remove shirt stays as well.
- Never iron a dirty shirt–you’ll set the stains, and it will be very difficult if not impossible to remove them.
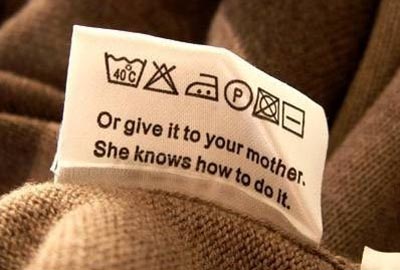
If all else fails call your mother.
Clean Your Iron’s Water Reservoirs
If you use tap water in your iron, you’ll eventually have a build-up of mineral deposits. This will be most noticeable when your steam output comes to a crawl. To clean the reservoir, pour a solution of 1 part water, 1 part white vinegar into the water reservoir. Heat the iron normally and let it steam for a few minutes before unplugging and placing it soleplate down on a heat resistant dish that has room for the draining water. An hour later drain and repeat with water–repeat the process if needs be. Finally, rinse and refill with bottled drinking water or non-hard tap water.
Final Quick Ironing Tips
- If you’re looking for supplies and want quality equipment that will last decades, shop where your tailors and dry cleaners shop. North Carolina’s B&G Lieberman is a great supplier of all things tailor or cleaner-related; I called them just the other day, and their 86 year old founder still answers the phone! You’ll find anything from quality buttons to suit brushes to industrial strength steam irons through them.
- Iron your shirts in batches. Ironing a shirt only takes a few minutes, but half of that time is taken up with preparation–getting the ironing board set up, the iron filled and hot, etc. So use your time more effectively by ironing all your shirts in one batch instead of whenever you need one.
- If you’re ironing a large number of shirts or other articles of clothing, start with the garments needing the lowest temperature. Then move to the garments (cotton and linens) that require the highest temperatures. The reasoning is that it takes an iron longer to cool off than heat up, and it decreases the likelihood of damage to your clothing.
- If you dry your shirts in a clothing dryer, pull them out before they are fully dry. Better yet, don’t even place them in a dryer and instead put them on a wood hanger and iron them right out from the washing machine. No need to moisten or use any steam.
- If you literally have no time to iron then at least throw the shirt in the dryer (assuming you’ve dried it like this before) while you throw on the rest of your clothing. Five minutes tumbling in the warm air will help to loosen some of the worst wrinkles.
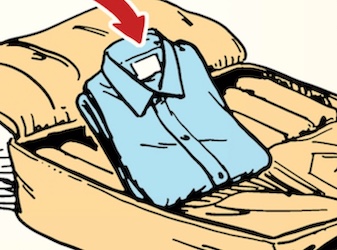
- If you’re going to pack your dress shirts for a week’s worth of travel, don’t waste your time ironing the shirts beforehand. Pack them normally and allot 15 minutes upon arrival to iron them when you arrive in your hotel room.
- Anytime you are using a questionable iron that may leave marks, turn the shirt inside out and iron the backside only. It won’t give the shirt as crisp a look, but the difference is negligible and any marks will be invisible once the shirt is turned back out correctly.
- Pay attention to the condition of the ironing board cover and pad – if it looks like it could leave any type of mark or you can feel metal underneath, cover it with a cotton towel or look for another board.
- Make sure your iron has an auto-shutoff. Although most modern household irons do, some of the older models floating around do not. You want the peace of mind knowing that even if you forgot to turn off the iron this morning you’re not going to start a fire.
- To produce steam, make sure you are using the iron at its highest setting. If you are using it at anything below the middle setting, water will often drip or trail. If you need to iron on low and need moisture, this is where the spray bottle really comes in handy. If you don’t need moisture, make sure to set the adjustable steam to “off” and don’t press the steam blast button.
- Always empty the water from your iron while the iron is hot. This will reduce the moisture that remains in the water compartment. Doing this will also ensure you unplug the iron before leaving the house.
Watch the Video

Do you have any tips on ironing a dress shirt to add? Share them with us in the comments!
Written by
Antonio Centeno
President, A Tailored Suit Custom Clothier
Founder, Real Men Real Style