We’ve all seen it before—the pocket knife that you couldn’t cut warm butter with on a hot July afternoon. It’s a little rusty, the joints are gunked up with who-knows-what, and the only thing it’s good for is opening letters. Almost as bad (or worse depending on your viewpoint) are the kitchen knives that can’t cut tomatoes, or anything remotely tough without repeated sawing.There’s no reason it has to be this way. I think sharpening edged tools is one of the more useful outdoor skills, and it has a glorious payoff in the home as well. The good news is that it’s no longer an art practiced exclusively by mountain men who eat only bear meat. The old days of nothing but Arkansas stones and a little luck are over. It’s really not hard at all; you just need the right equipment.
Let’s start with knives.
Sharpening Knives
The essential sharpening process isn’t rocket science. With an abrasive material, you remove a small amount of metal to restore a clean, sharp edge, and you remove this metal using a low-friction environment so heat build-up doesn’t destroy the temper of your blade.
This isn’t meant to be a piece on metallurgy. There are people way geekier than I who can give you a lesson on the finer points of the hundreds of different alloys with their various properties. It’s just about sharpening stuff.
My preference in a good knife is a high carbon content. Super-high carbon content knives are almost always not stainless, but will discolor over time to a dull gray. I happen to think they look beautiful, but that’s my opinion. They do rust if they are kept damp, but a little oil and a little care keeps them from rusting. Goat cheese will darken your knife immediately, so if you want to get a good patina on the blade, just slice off a hunk for your bagel.
Better knife manufacturers use a stainless steel with a higher carbon content. These are better called “stains less” steel, as they will rust if not properly cared for, but they’re easier to maintain than a pure carbon steel. Knife companies like Benchmade and Grohmann use a stainless steel with a carbon content that is very high, so the knife blade will last. Less expensive knives (such as low-end Wal-Mart pocket knives) are low carbon content stainless and will not last under typical use, but then they’re hoping you’ll lose the knife before it breaks. Most people do.
Techniques
Sharpening in years past was difficult, as it necessitated keeping the proper angle on the knife blade so that you had a clean, consistent, flat edge, rather than a rolled edge that dulled quickly. One tended, without any sort of guide, to rock the blade and create an inefficient cutting edge. A master carpenter could free-hand an angle like a machine, but most of us can’t.
 Tools to keep this from happening are now common. One of the more popular sharpening tools is the Spyderco Triangle Sharpener (and others of its type). It works on the principle that while the human eye has a hard time eyeballing a 21 degree angle, pretty much everyone knows what a straight, right angle looks like. By angling the sharpening media, the guesswork and much of the imprecision is removed, and all you have to do is move the knife down the media in a cutting motion toward the base, alternating sides. If you follow the directions, you can shave with the blade of your knife when you’re finished.
 I had never tested the angle of the Triangle Sharpener. I used a level to get a good reference for the bevel gauge, and referenced off that (I know it doesn’t look plumb…I promise it was). As you can see from the picture, the angle of the sharpener is just over 20 degrees. That’s a good angle for most tasks.
 I often carry a Triangle Sharpener (it’s wee) when traveling to visit friends. I can usually sharpen every knife in the house in less than an hour or two, and they’re always grateful. It’s relaxing, fun, Zen-like work, requiring little skill but a fair amount of concentration.
 Another approach is to lock down the angle using a guide. One such type is the DMT (Diamond Materials Technology) sharpening system, which uses a clamp-on guide to make sure you keep a consistent angle. You can choose an angle depending on the type of edge you want. The lower the angle, the sharper you can make an edge, but it is a less durable edge. Scalpels can be used for surgery, but they’ll dull in seconds if you try to cut something other than flesh. A meat cleaver wants a higher angle, because you want a durable edge, even if it’s not razor sharp.

The first picture’s a little cluttered, so I added a visual cue so you can spot the angle more easily.
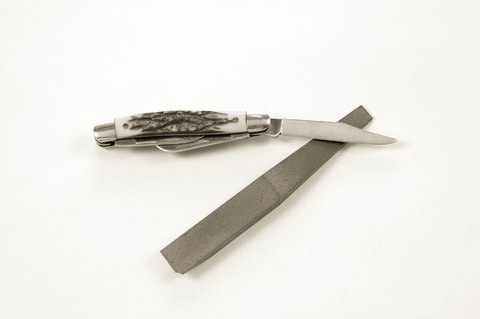
There are times when you must free-hand things. In the case of the venerable crooked knife, the curvature of the blade makes it impossible to do the sharpening with a guide of any sort. It requires a little practice, but as you can see, it’s doable and it works. I just use one of the ceramic rods from the sharpener.

What sort of edge do you need?
A razor, fillet knife or X-Acto generally wants an angle under 17 or so. Chef knives or other precision knives often center around 20 degrees, more or less. Survival knives are usually over 25, because they want to be able to hack as well as cut. Over 30 degrees you’ll see machetes and cleavers. For most knives, I choose around 20 degrees. It’s a good compromise. I’ll go slightly smaller in a blade for skinning, slightly higher for knives that’ll get more everyday use.
Axes and Other Potentially Sharp Things
Axes and hatchets are a little different than knives, as usually there is a lot more metal to deal with, and the angle of the edge is higher–more like a cleaver.
A good axe has the same quality steel (though not the same alloy) as a good knife. But don’t try to make an axe razor sharp. If you sharpen an axe with a knife blade angle, it will be extremely sharp for about ten strokes. The first few chops will take off that edge, and your careful sharpening will have become a waste of time. Axes and hatchets need a little blunter edge, so they’ll hold up to the tremendous forces put on them. The one exception to this rule is when you do it for fun. I have cut soft bread with a double-bit axe that could shave a whisker off a mouse, so I know it’s possible. I have pictures, I have proof. It’s also fun to shave with an axe as a proof-of-concept. I’ve done it once, but stopped short around my nose and ears as I like them very much and want to keep them.
If an axe has been abused and you don’t cut but rather bruise the wood, it’s best to start with a good file, and take slow, careful strokes to reestablish the proper angle and to remove nicks from the edge. Rapid filing doesn’t work any better, and it can trash your files. More on that later.
Once you’ve reestablished a nice clean edge, I prefer a tool from DMT that contains a two-faced file-shaped diamond stone that has two grits, a coarser grit and a medium grit (the black and blue-handled one). It is the perfect tool for sharpening an axe, and in a pinch, dressing up your knife that you didn’t discover was dull until the middle of the trip.
Axe Sharpening Techniques
 Here is a wood splitter with an abused edge–big chips. Before I can really sharpen it, I need to establish a new clean edge. It might seem weird to file an edge flat before trying to sharpen it, but it’s necessary. The next step is to establish an angle. 30 degrees or so works for most axes. Like the Triangle Sharpener, it’s easier for a person to see a right angle. What I do is set the piece so that the angle needed is parallel to the ground. Then I start with the file work. Here I’m using a splitting wedge that I rescued from an unmarked grave after the power company left it in the yard at least a decade ago. I used a level to make sure the face I wanted to cut was parallel to the ground.
 A file is a precision tool. You can get a file for $5.00 at Harbor Freight (don’t), but a good file costs more and is worth it. Like a good knife, a good file needs care and should be treated well. A file only cuts in one direction, and that’s on the stroke away from you as you push. Dragging the file back and forth isn’t good for the file, and you have less precision.
As you stroke away from you, the file should feel smooth and not be jumpy. If you feel something that feels like it’s caught between your work and the file, something is. Stop and clean your file with a file card or small wire brush. If you look at the surface of the edge you’re filing, it should be smooth. If your work looks like your windshield when a maple tree seed gets caught in the wiper, you’re messing up your nice, smooth surface. You really want to see a long, flat face, not several bevels.
 This is pretty good…but there are a few flaws to point out. On the edge closest to the bottom of the picture you’ll see a little facet that shouldn’t be there, caused by a moment of inattention. Not fatal, but I wanted you to see what it looks like wrong. Second, you’ll see some scoring in the edge parallel to the bottom of the picture. That’s caused by a bad file, a dirty file, or both. Easily cleaned up by using a diamond stone, but it takes more time the deeper the scoring. I used an old, abused file. Time to make some strikers.
Once the edge and angle is established, finish the work with a DMT Duo-Fold. There are four grits commonly used, as seen in the picture.
 Red and green are fine and superfine; blue and black are medium and coarse. They fold up on themselves nicely and take very little room.
If a blade or other tool has been abused (it happens a lot with cheap axes and splitting wedges), after sharpening a tool I’ll protect it with a compound I create myself. This is a secret formula, with carefully-hidden ingredients. It’s a good thing no one knows about my 9:1 ratio of linseed oil to beeswax, melted and mixed and applied to metal then wiped and buffed a little with an old t-shirt.

Other Tools
I know that it’s not strictly an outdoor thing, but there are other tools that benefit from a frequent dressing. My garden tools have a little dressier edge than the neighbors, and they notice my hoes work better, my shovels cut through roots a little easier, and my hedge trimmers cut cleanly. It’s not hard, but it just takes some time.
 For the homesteader building a log cabin, I’d consider a DMT Duo-fold stone (as mentioned above) as a must-have in your toolbox. It will take a drawknife from deadly dull to razor sharp with ten minutes and a little elbow grease.
About Safety
All things considered, a sharper blade in any tool is safer. Less pressure and effort is required, and a sharp blade is more predictable in its behavior. True, you have to pay a little more attention to what you’re doing, but the payoff is in less work and more time to play.
In the book Seven Habits of Highly Effective People, Stephen R. Covey talks about the principle of sharpening your saw. He claims that ten minutes spent sharpening saves twice or three times that in work time and effort. He’s speaking less literally than I am, since he’s talking about taking personal time to recharge your batteries and renew your spirit. Still, if it weren’t a true principle, it wouldn’t make a very effective metaphor, would it?
Bottom line is, use a sharp tool and take your time. As my blacksmith friends say, “The tool works at both ends.” Sure, you’re shaping your world with your knife or axe, but you’re also shaping yourself. Take the time to enjoy the process.