Your feet are your most basic means of transportation. But if you’re not someone who walks very far distances every day, you’ve probably given very little thought to the sensitive mechanisms of this “vehicle,” nor know much about how to keep them running smoothly when they’re really taxed.
But if you ever do have to hoof it over a long distance, you’ll quickly come to see how essential it is to know how to keep your feet in tip-top shape; the health of your dogs can mean the difference between an enjoyable outing and a terrible one, and even between life and death.
The military has long understood how crucial foot health is to the success of their operations; the winning of battles has sometimes come down to which force was more mobile and could march more effectively. As 1912’s The Soldier’s Foot and the Military Shoe explains, foot injuries and pain not only slow infantrymen down, but can also be a massive hindrance to morale:
“The effect of badly fitting shoes upon the psychology of war is very great. Even where the soldier is able to continue the march, the discomfort produced at every step soon reduces buoyancy of spirit, causes mental irritability and materially diminishes fighting capacity. As the attention and interest of the soldier is focused upon his own personal condition and withdrawn from matters relating to the success of the military enterprise as a whole, the mental force which inspires the command to military achievement is dissipated and lost.”
What’s true for military operations is true for long hikes as well. Blisters, calluses, corns, and the like can quickly turn what might have been a rejuvenating trek through the wilderness into an excruciating death march. It’s hard to enjoy the scenery and take in the landscape when every step you take puts you in agonizing pain.
So whether you’re a rucker or a hiker, how to take care of your feet is a skill every man should know. By following the tips we’ll outline below, you’ll be able to trek over hill and dale while keeping the means of your locomotion tuned up, and feeling hardy and vigorous every step of the way.
Wear Well-Fitted, Broken In Boots
Taking care of your feet on a hike starts well before you ever hit the trail. The right pair of boots — well-fitted and broken in — are crucial to keeping your dew-beaters healthy and happy mile after mile.
The key to proper boot fit is ensuring that the boot’s heel sits tightly to the rear of the foot, while giving the toes some wiggle room up front. If your foot is sliding around too much, either front to back or side to side, you’ll have friction, which leads to blisters. If your boots are too tight, your toes will be curled and possibly smashed, especially on downward sections of the trail. That’s a recipe for foot pain.
The best way to get boots that fit well is to head to your outdoors shop and get some help from the shoe department. Avoid big box stores or buying online, where you’re just going to grab a pair and call it good; go somewhere where they know what they’re talking about. (I’ve always had great service at REI, but a local place will also likely offer the kind of one-on-one customer service you need.) A couple pro tips to help you out: 1) Don’t try on shoes until the afternoon, after you’ve been on your feet most the day. Your feet swell when hiking, just as they do throughout the course of the day, and you want to mimic those conditions as much as possible. 2) Wear the socks you’ll be wearing on your hike when you try boots on (more on socks below).
After you have the boots, you’ll need to break them in. You don’t want your first venture with them to be on your 10-mile hike. Start by wearing them while doing chores around the house, running errands, taking walks in the neighborhood, etc. When your feet hurt in those first few days, take them off, let your feet rest, and put them on again the next day until they hurt again. With a little bit of time, you’ll be able to wear them all day without any pain and you’ll be ready to take them out on your next adventure.
Even when your boots are broken in, there still might be spots, especially on long excursions, where they rub against your feet in funny places. Take note of those hot spots on practice walks so you can mitigate them before undertaking a high-mileage hike (more on how to do that below).
Lace Your Boots Properly
You can nullify the benefits of your good pair of boots by not lacing or tying them correctly. While every foot, and boot, is different, the general idea with hiking and rucking is to keep your heel firmly to the back of the boot while not cutting off circulation to your toes and in-step.
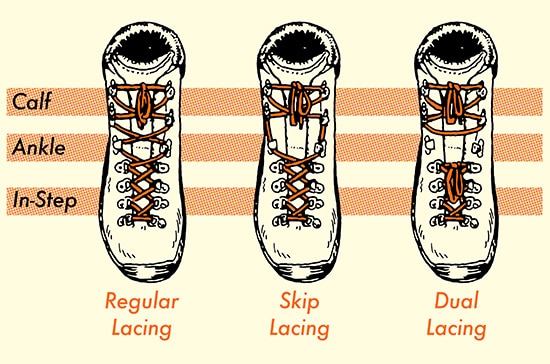
Three methods of lacing based on Major Joe Martin’s methodology. He prefers the dual lacing system. Skip lacing is similar to the what’s shown in the video below.
You can do this by actually lacing the in-step differently than the ankle/heel. In his book Get Selected for Special Forces, Major Joe Martin recommends a unique method of doing this in which he cuts his boot laces where the foot starts to curve upward so that he has two sections to have control of. The in-step portion is tied tautly, but not so tight that it cuts off circulation. Then you can do the ankle portion basically as loose or as tight as you want, depending on what works for your feet, and not worry about your in-step being affected.
That method is admittedly easier with military-style boots that go well up the calf. With hiking boots, you don’t necessarily have enough lacing to do that. So hikers have devised a method of having two sections of lacing which doesn’t require the laces actually being cut. It’s much easier explained visually, so watch the short video below:
Clip Your Toenails
One overlooked but absolutely crucial piece of advice for hiking foot care is to clip your toenails before heading out. If they’re too long, your well-fitted boots will do no good, because they’ll still be pressing into your nails, which are pressing into your toes, causing discomfort at best, and at worst bleeding or nails falling off.
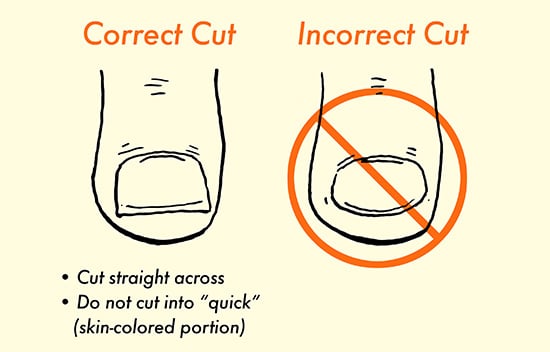
Major Martin recommends a straight cut rather than the usual slightly curved cut. A straight cut, he argues, lowers your chances of in-grown toenails, as well as reduces general friction between toenail and skin. Don’t cut them too short; cutting into the quick (the skin-colored portion of the nail) creates even higher chances of in-grown nails and infection. Make sure to use a clipper made specifically for toenails (rather than fingernails); they cut straighter.
After clipping, also file your nails as shown below; this reduces friction against socks and shoes.
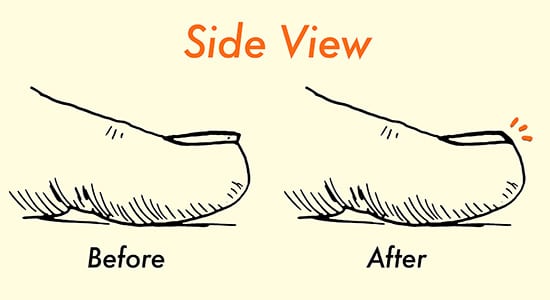
Rather than leaving an outward protruding nail, file it so it won’t rub against your shoes.
Apply Powders/Creams/Tapes
The next step in taking care of your feet will require some experimentation, and getting to know your own body. Some hikers and ruckers swear by a variety of creams and powders, while others simply don’t need them. You’ll need to try some of them for yourself, and even mix and match, to see what works for you.
A few options:
- Antiperspirant Spray (like Arrid XX). It will theoretically keep your feet from sweating, which reduces moisture, which will help prevent blisters. If your feet sweat heavily, an antiperspirant spray might be the way to go.
- Foot Powder (like Gold Bond). Another option for keeping your feet friction-free is to put some powder into your socks before you put them on. The powder coats your feet and toes and keeps the rough skin of your toes from rubbing against each other and causing blisters.
- Moisturizing Creams/Balms/Lubricants (like Vaseline, Bag Balm, BodyGlide). Some hikers prefer to actually moisturize or oil their feet before a hike. As with the other options, the idea is to eliminate any friction. If your feet are well lubed, the rubbing won’t cause hot spots. In the world of active hikers/runners, Hydropel and BodyGlide LP get the most hype. Check out this article comparing them. The downside of course is a feeling of slippery feet in your boots.
- Tapes (like Moleskin, Duct Tape, Leukotape). There are two approaches to using tapes on your feet. One is to pre-tape before you hike where you know your boots might rub or where you’ve had problems on your feet before. The other is to tape your feet mid-hike when you feel a hot spot, or as triage when you get a blister (more on triaging below). It’s quite effective for both uses, and can really reduce your chances of blistering, as well as ease discomfort if you’re too late.
Wear the Right Socks
Most hardcore hikers/ruckers — those who do long thru-hikes or marches — recommend a two-sock system for keeping your feet happy. The first sock is a thin, skin-tight, moisture-wicking synthetic variety (Fox River makes a good pair). Then, you put on a wool or wool-mix sock that’s made as active wear (I’ve had great luck with both Smartwool and Darn Tough).
Major Martin follows this methodology and explains why it works, as well as throws in an extra wrinkle for added protection:
“The purpose of the first (inner) sock is to reduce friction by fitting tightly on your foot and to reduce moisture by wicking it away from your foot to your second (outer) sock. Wear the socks INSIDE OUT. The stitching in the toes of the socks can rub against your toenails, and over distance, this can cause severe pain and toenail loss.
The purpose of the second (outer) sock is to: reduce friction by serving as a cushion between your foot and the boot; and to reduce moisture by absorbing it from the first sock … These should also be worn INSIDE OUT.
Another way the dual sock system reduces friction is by allowing any friction to occur between your inner and outer socks, instead of between your foot and your sock.”
Avoid 100% cotton socks at all costs. There’s a reason runners and hikers have adopted the phrase “cotton is rotten.” It absorbs and collects sweat, but dries very slowly. This means that when they get wet, they stay wet, and you have soggy socks in your boots all day. There’s also no insulation with cotton, so those dogs aren’t breathing. Cotton socks create the perfect environment for blisters, so stay away.
You also want to make sure to have extra sets of socks with you on your hike. Change them whenever you feel hot spots or blisters, and some folks recommend pre-emptively changing them every 4-6 miles no matter what. When you change socks, clip the dirty/sweaty ones to your pack to dry them out.
Triage Hot Spots and Blisters
You’ve followed all the tips above, but after miles of trekking you inevitably feel some discomfort in your boots and need to do some mid-hike triage. Sometimes, no matter what you do, you’re going to get a hot spot or blister that pops up. That’s just how it goes when you’re hoofing it for long distances. Let’s look at some steps you can take to mitigate these problems.
Hot spots. A hot spot is your body’s way of telling you that a blister is coming unless you do something about it. It feels like a niggling burning on your foot, but isn’t really actively painful like a blister is. When you feel this, you’ll want to stop and take care of it. Your fellow hikers may be annoyed at first because they want to push through and tough it out, but you’ll have the last laugh when you don’t have any blisters.
Take off your shoes, and if you’ve brought an extra pair of socks, change into them now. If not, take your socks off and dry your feet (and socks) as much as is possible in a short break. Beyond that, re-tie your boots to make sure your toes aren’t doing any rubbing, re-apply powder/cream, tape up, and of course remove any debris that may have found its way into your boots.
If your hot spot has turned into a full-blown blister…
Blisters. These are painful pockets of fluid (water and pus) under the skin which occur when there is significant friction between layers of skin. So, as we’ve discussed throughout, in order to exponentially reduce the chance of blisters, you need to eliminate the possibility of friction.
If a blister rears its ugly head on the trail, you have a few options depending on its size and if it’s popped or not. If it’s small, unbroken, and not very painful, apply a cream or lubricant, tape it, and leave it mostly alone.
If the blister is larger, and already broken, clean it and bandage (or tape) it as best you can. Don’t apply tape directly to the blister; if the band-aid is big enough you don’t have to worry about that, otherwise use gauze or an extra piece of fabric to cover it first, then tape. If the skin is dirty and/or torn, carefully cut it away. Otherwise, leave it in place to help prevent infection.
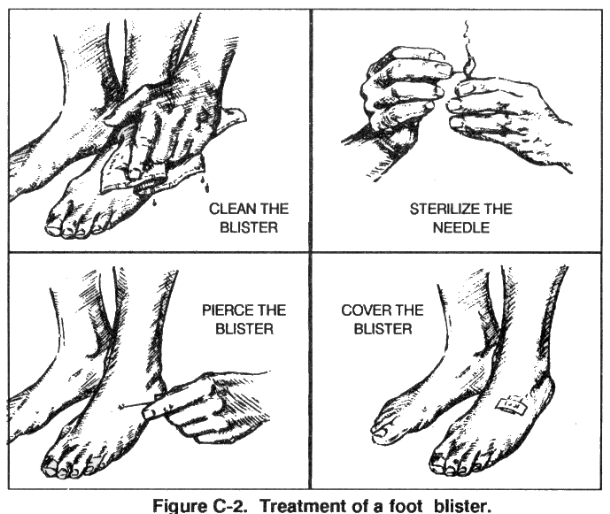
If the blister is large and not broken, you’ll want to drain it by pricking it with a needle (or small pocket knife if that’s your only option). Be sure your implement is as disinfected as possible. Then apply gauze if you have it, and bandage it.
One common folk remedy that some hikers swear by is using superglue to treat a broken blister. Apply a small dab on the loose skin to keep it attached solidly to the foot. It’s not such a crazy solution; doctors frequently use the stuff when stitches aren’t the best option. Be prepared for some burning.
As with hot spots, also change your socks and re-tie your boots in hopes of preventing the exacerbation of current blisters and the creation of new ones. If you’re on a thru-hike or multi-day venture, you’ll want to wash and dry your feet, wash and dry your socks, and liberally apply any powders or creams you may favor. Then, of course, pre-tape the area before you start hiking again.
Ultimately, the best way to condition feet against blisters is to simply toughen them up through training. Hike, hike, and then hike some more!
Listen to our podcast with Michael Easter all about rucking: