For the traveling modern man, snow is an inconvenience. We brush it off our cars, blow it off our driveways, and plow it off our roads; we jump in our vehicles and away we go, a little more careful and ten minutes late for work.
For more primitive cultures, snow was and is a major impediment to travel, and men have been strapping snowshoes to their feet to make traversing it easier for millennia . Even though we now have snow machines to escort us over the icy landscape, snowshoes are still in use by hunters, trappers, and anyone who lives where it snows and vehicles aren’t an option (either permanently or whilst in the middle of the occasional snowpocalypse). Heck, some of us still do it for fun and exercise. While there are new models of snowshoes made with carbon fiber and unbreakable strapping, there’s something to be said for finding and repairing vintage snowshoes instead.
Why Go With Vintage Snowshoes?
Aren’t there modern shoes with lots of cool features like Super-Tuff Snowshoeium™ crampons and a scientifically-developed Framex 2000™? Yes, there are modern shoes, and they have their place. Consolidated snow, frozen crust, and steep hills can make modern shoes very appealing. I have several pairs, one of which lives in my truck in the winter. It’s another way to keep myself prepared if the truck slides off the road into a ditch and I need to walk to town.
That said, I still believe that traditional shoes offer superior performance in most settings. Most of the shoes I build are Ojibway (Chippewa) and Cree styles, the shoes native to my home in the Upper Midwest. They’re pointy at both ends, so when walking through a prairie, the “bow” of the shoe pushes aside any grass or brush that sticks up above the snow. And we have a lot of prairies here.
There are two primary advantages to traditional wooden-framed shoes: first, flotation is superior due to the larger effective surface area, and second, there are no moving parts but you. Traditional shoes are quieter because the hinge is basically the ball of your foot.

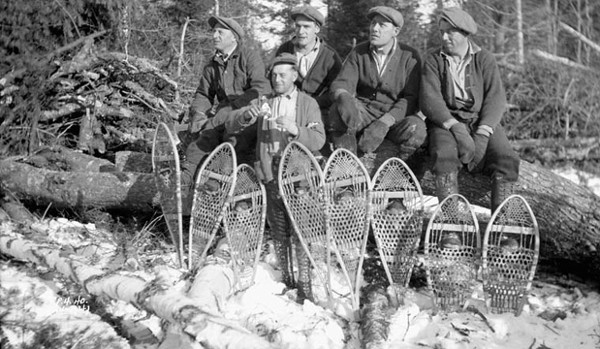
Crossing the prairie in 30 inches of snow.
I won’t bother to point out aesthetics. That’s like pointing out that Ferraris are beautiful as well as fast.
If I’ve convinced you and you want your own pair, there are a lot of snowshoes out there in antique shops, swap meets, and barn sales, particularly in northern climes. Most of them are decorative rather than practical, but you can use the criteria below to determine whether or not a set of snowshoes is worth repairing.
Evaluating a Pair of Vintage Snowshoes
There are three basic categories of snowshoes I see regularly:
Wallhangers.
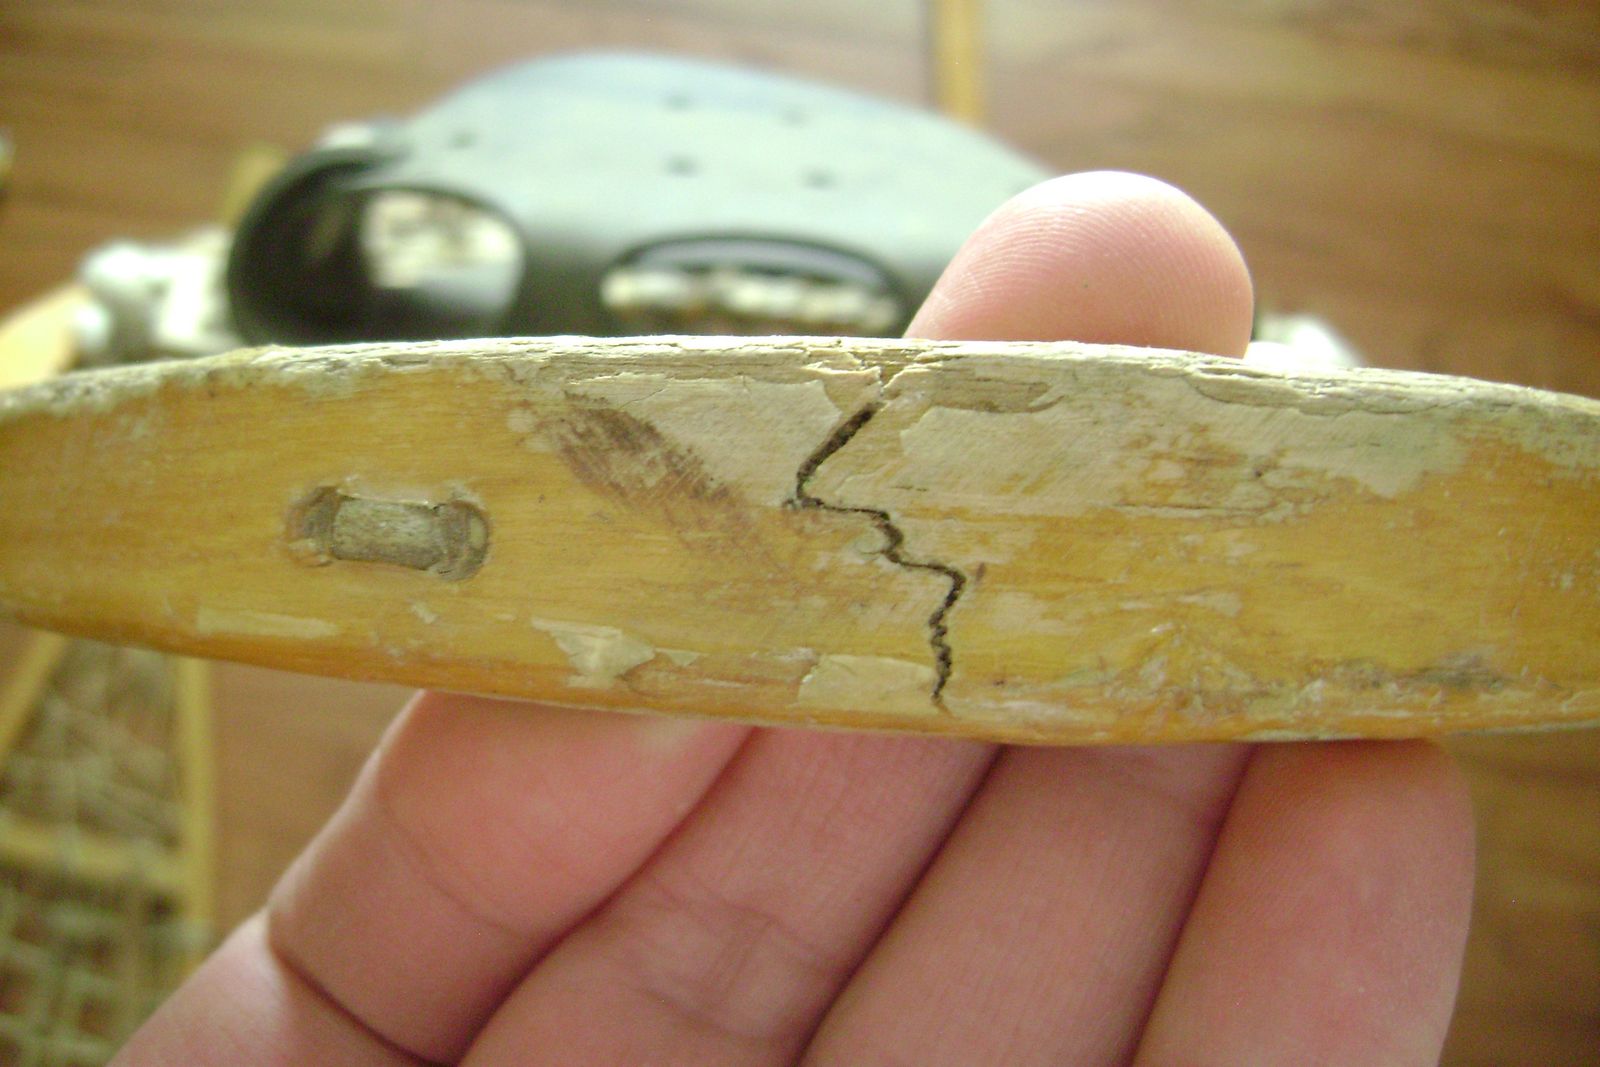
This frame is toast. Wallhanger.
These are beautiful old shoes that have a patina that won’t quit, stemming from a century of aging in someone’s barn or attic. The problem is they have a crack or cracks in the frame, which usually renders them unusable as snowshoes; the backbone is broken, and no amount of surgery will bring them back to life. No splint, biscuit joint, or other reinforcement will work, as the frame flexes so much it would just break again.
They are, however, still useful, and you will see them grace many a northern Wisconsin bar, next to the velvet painting of a ten-point buck. They are to remain forever as objects of beauty.
Repairers. These are shoes with small breaks here and there in the lacing, but none that are structural. One can either tie off the broken bit or replace that strand, but more often than not the breaks aren’t all that big of a deal, and what the shoe really needs is a good scrub with a soft bristle brush to remove dust and dirt, as well as several coats of good spar varnish. The bindings may also need to be repaired or replaced.
Restorers.
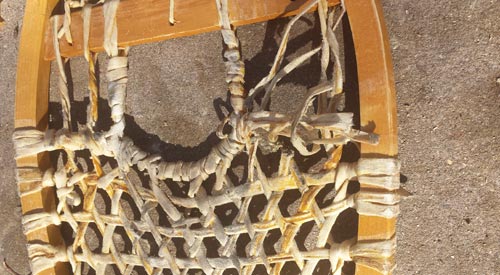
Frame is intact, but the rawhide needs help. The toe cord was rodent-damaged.
These are shoes with intact frames, but for a variety of reasons, some of the lacing is too far gone to save. You can splice in new lacing in some circumstances, but for the most part it would spoil the aesthetics, and it wouldn’t be a workmanlike repair. In this case it requires a replacement of the area of the shoe that is damaged.
Most shoes have three areas of concern: the tip (or toe), the tail, and the footbed (the middle part where your foot goes, hence the name). A tip or tail can have a few breaks here and there and you can repair them, but if the frame is the backbone, the footbed is the heart.
Every traditional shoe has a toe cord, a strong multiple-strand structure that runs from side to side. This is the structure to which your bindings are attached, and where the ball of your foot rests. Depending on the size of the lacing I use, my toe cords are four to six strands wound with another to tie them together; they’re by far the strongest part of my shoes.
If the toe cord is compromised, cut, broken, or nibbled through by mice, the footbed is toast, since the toe cord is a structural member of the shoe. You can’t just replace the toe cord since it’s integrated into the footbed. So if you want to use them again, restoration is the only way.
Whether or not it’s worth restoring is often a highly emotional thing. The cost of reweaving a footbed may come close to exceeding the value of the shoes, but if they were your grandfather’s (as many of my restorations are), there is little discussion about what it costs. If that’s the case, how do you go about re-lacing?
Re-Lacing a Pair of Snowshoes

Newly-laced footbed. It will lighten and shrink as it dries.
A gentleman called me last fall and asked if I would take a look at his shoes and give an honest opinion on their value and repairability. I asked how he came to have them, and sure enough, they were his wife’s grandfather’s pair; the snowshoes obviously were not particularly young. There were no labels or markings on them, which is not uncommon. While there were many well-known manufacturers at the turn of the last century, there were also many small wooden boat shops that already steamed wood to make their canoes and rowboats, and made shoes to keep busy in the winter.
The bad news was that the toe cord was chewed all the way through and they hadn’t been maintained. I asked him if they were to be used, and he emphatically answered in the affirmative. I quoted him a reasonable price and he was delighted. I was less delighted because it meant working with rawhide, a notoriously tough material. But he was a sweet old man and his wife would be surprised and delighted.
The recipe for rawhide is to take a box of linguini and boil it in essence of cow bladder until it makes a smell that would scare a buzzard off a week-old roadkill. Okay, that’s not the actual recipe, but it sure seems like it. Rawhide comes from a supplier in Canada, stiff as a board and not at all smelly. Once soaked in warm water for an hour or so, the smell will get you evicted from the basement laundry room by an understanding-but-not-that-
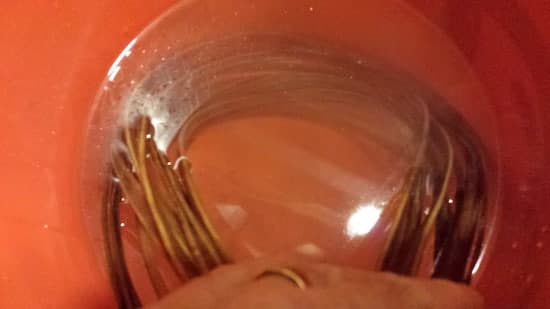
Rawhide soaking. Oh, the smell. It would gag a goat at 50 paces.
The first thing I did was take pictures of the old footbed so as to replicate it as best I could. The next step was to take a pair of tin snips and cut away all the old lacing and get down to the frame. The stations where the old lacing used to be are usually evident so I just make sure I re-lace over those stations.
Snowshoes are not woven, they are laced. There is no warp or weft, since it’s not a two-axis pattern like cloth. Three directions are involved: horizontals (straight back and forth 90 degrees to the centerline of the shoe), left verticals, and right verticals. The rules are simple: Left verticals (top left down) always go over horizontals and under right verticals (right top down). Horizontals always go under left verticals and over right verticals. Right verticals always go under horizontals and over left verticals. This creates a triangular pattern that is strong and, when sitting next to other triangles, creates a Star of David pattern with a hole in the middle that lets snow fall back through the lacing.
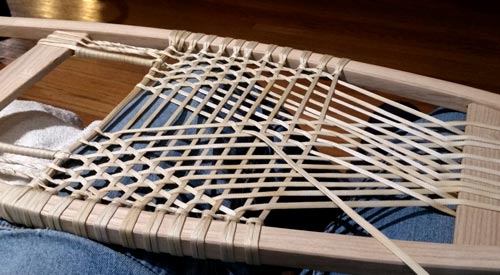
The pattern of the footbed, 3/16″ nylon lacing. This example is lacing on a new shoe I made because it’s easier to see, but the principle is the same.
The lacing is tied around the frame using a girth hitch, the same hitch used to fasten a saddle to a horse’s girth. After making the girth hitch I pull the lacing tight and move on to the next station, passing over or under the various horizontals or left or right verticals.
Once the lacing is completed and tied off, I set it aside to dry. Rawhide shrinks pretty dramatically as it dries and it tightens the lacing, making the shoe stronger. Contrariwise, when it gets wet (like when walking out on the snow), it stretches, so the varnish coating the rawhide is critical. When I see shoes that need repair or rebuilding, 99% of the time the varnish has worn off, flaked off, or degraded by exposure to the sun’s ultraviolet radiation. Once this happens the rawhide is much more likely to be damaged.
Be generous with the varnish — you can’t apply too much of it.
So an ounce of varnish is worth a pound of rawhide.
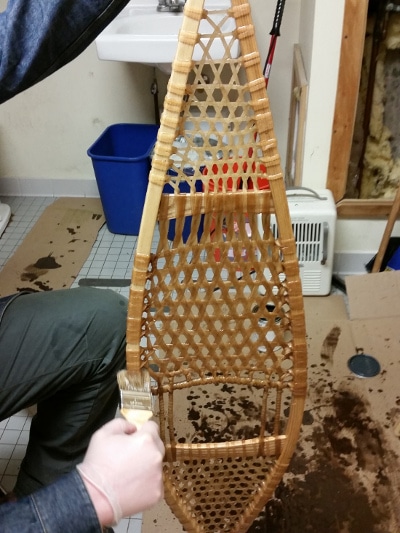
Carefully brush the shoe with your brush and vacuum off the dust. Put down a piece of plastic or shower curtain and glop the varnish on the lacing and frame. This is not the time for finesse, it’s the time for volume. As varnish drips through the frame onto the plastic, pick up the drips and re-apply them to the shoe. Hang them over your plastic and brush off the big drips. You’ll need at least two or three coats. I like to do them 24 hours apart so they’re dry, but there’s still a chemical bond between layers.
Conclusion

The first pair I ever built 26 years ago.
Much like home construction, it’s often simpler to build than restore or repair. Snowshoe kits are available commercially and classes on snowshoe building are offered at craft schools and nature centers.
Before you do that, however, I must tell you how satisfying it is to lace snowshoes. It’s a meditative process, and I have spent many nights lacing shoes alongside my knitting wife, sitting in front of the fireplace. Functional art? Well, they’re lovely to look at for sure, but loveliest strapped to your boots in two feet of new snow on a moonlit night.
Resources
Snowshoe kits are available at Country Ways at www.snowshoe.com.
Snowshoe classes are available all over in the northern states. Google it.
One popular class in the Upper Midwest is at North House Folk School in Grand Marais, Minnesota. The class covers every aspect from steam bending the frames to lacing. Visit www.northhouse.org to learn more!