
I was in Chicago at a networking event three years ago and found myself with a problem.
The dress shirt I was wearing had apparently “shrank” in the neck as I couldn’t get it to button-up all the way to the top. Although I could normally skip the tie, this event was more formal and going without neckwear was not an option. What was a man to do?
With 30 minutes to spare, I went to the hotel lobby and asked for an emergency sewing kit. 5 minutes later I was cutting off the offending button and within 5 more minutes had moved it 3/4 of an inch. It was still a bit tight, but the shirt buttoned much more easily, and I made it through the event without a problem.
So the question today is: do you know how to sew on a button? You might think that sewing is “girly stuff,” and rely on your mom or wife to replace your buttons for you. But you never know when you’re going to be on your own and need this skill in a pinch; knowing how to sew on a button is a small way of making yourself more self-sufficient.
If you don’t know how to sew a button, but want to learn — below I’ll explain how to professionally sew on a button in 5 simple steps.
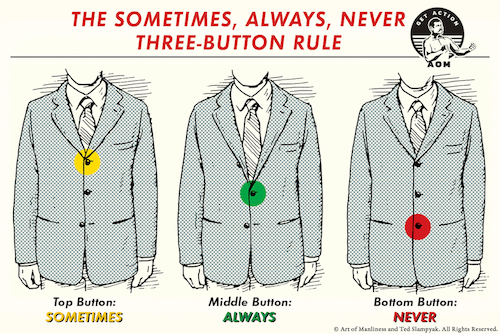
FYI – if you’d like more quick style fixes read through this classic AOM article.
Tools You’ll Need:
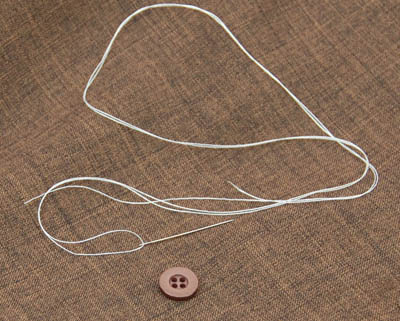
- Needle (2 if possible) – any basic sewing needle will do, the slimmer the better.
- Thread - you’ll need about 12″ to do the whole process. If you double your threads over (a bit stronger and easier to knot), use 24″. Try to use a thread that matches the garment color, but in a pinch, black or navy are unobjectionable.
- Button – the original, if possible, otherwise simply use what you can find. Most shirts will have a spare set of buttons sewn on the inside of the bottom front. Note: some buttons have two holes, others have four. The method here is for a four-hole button, but can be adapted to two-hole buttons as well.
- Cutting tool - Scissors, knife, or something sharp to cut the excess thread. You can use your teeth in a pinch.
If you’re traveling and don’t have the above supplies, ask the front desk at your hotel for an emergency sewing kit. They’ll very often have one to give you. But because you never know where and when one of your buttons will pop off, I recommend always packing your own emergency sewing kits in your bag and car, as I explain below:
How to Sew on a Button
Take off the garment if possible, although in my story above I simply performed the procedure in front of a public restroom mirror. If working on your front trouser button, find a bathroom stall.

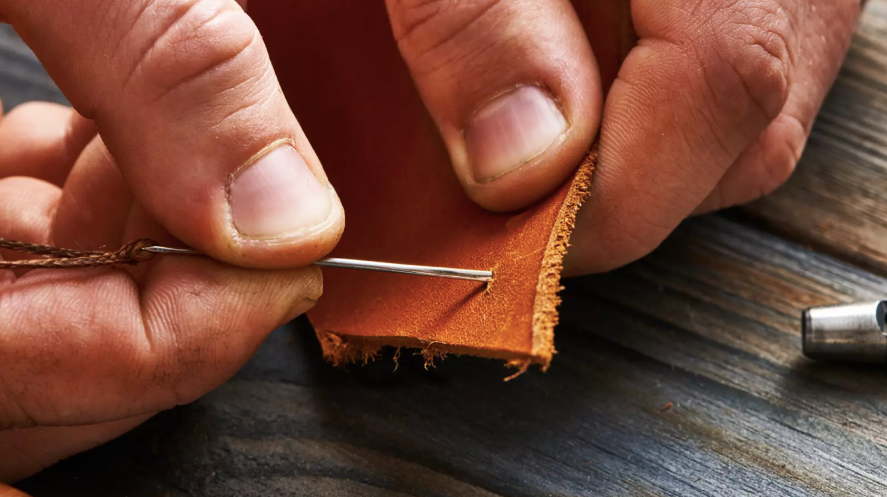
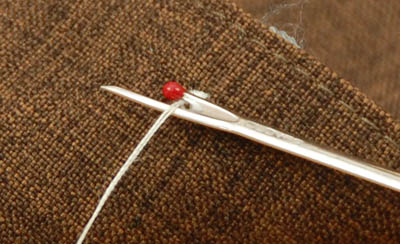
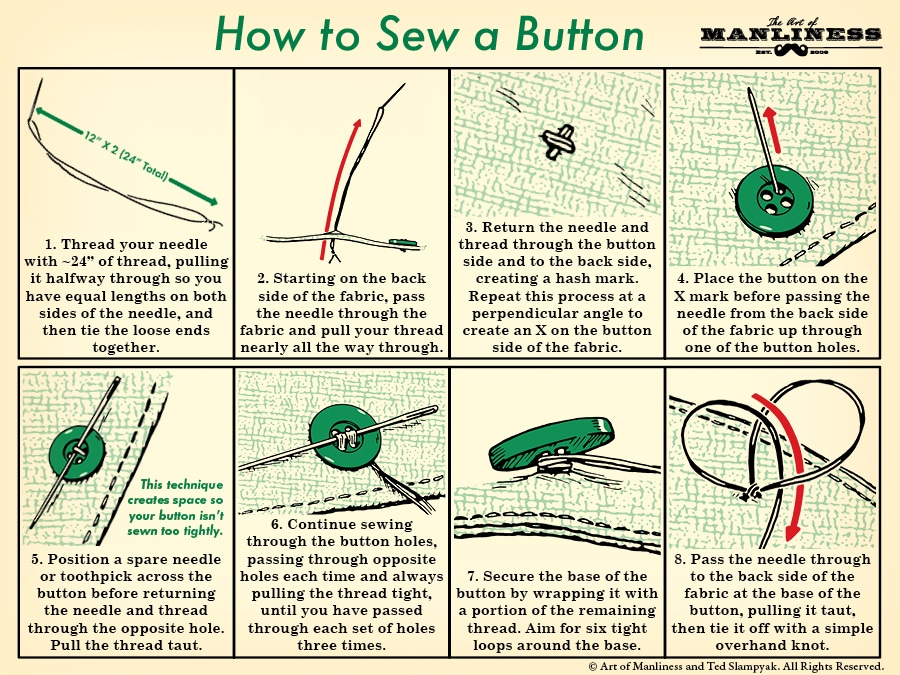
Step 1: Thread the Needle & Knot the End
How much thread do you have? If you have 24 inches go ahead and “double over,” which means sliding the thread through the eye of the needle and then doubling it over until you have equal amounts on either side. You want at least 12 inches to work with. A doubled-over thread can just have the ends knotted together in a basic square knot, or you can use the same method as a single end.

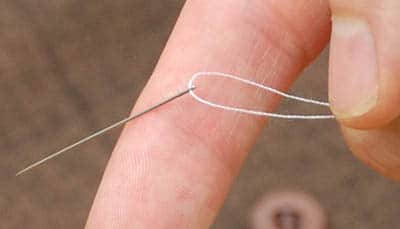
If you have less than 24 inches of thread, you’ll have to use a single thread. Slip a bit of slack through to tie it off with. An inch or two should be plenty of slack, but use as much as you need — you’ll pull it all back in the next step. To tie off the back end of a single thread, you can either tie a few small overhand knots, or you can just wrap the thread around your forefinger several times. Roll the loops into a tight bundle with your thumb, then slip the whole bundle off your finger. Grip the bundled loops with one hand and tug the long end of the thread tight with the other. This should pull the loose bundle into a tight knot.
In either method, once the knot is tied it’ll be used as the first anchor to help keep the thread from coming loose.
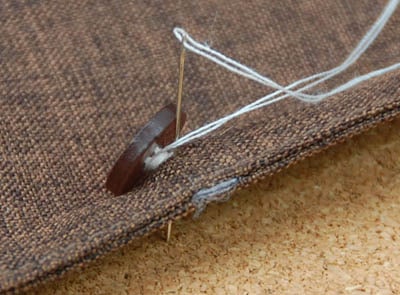
Step 2: Create Anchor “X” Point

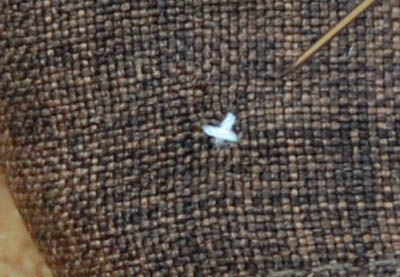
Starting at the back end of the fabric, run the needle through to the front where the button is going to be needed. Run the thread through to the back, and then again back to the front. You want to create a small “X” where the button will be centered. This X is also the reinforced anchor for the thread to ensure it doesn’t loosen during stress.
Step 3: Position the Button

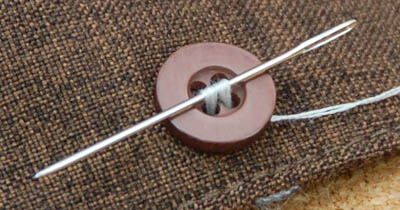
Put the button on the anchor “X” and begin sewing by pushing the needle from the back to the front through the first button hole. At this point you want to add the spacer (a second needle or a toothpick, pin, or small stick can be used).
Push the needle up from the underside of the garment and through one of the holes on the button. Pull the thread all the way through until the knot snugs against the underside of the fabric. Use a fingertip to keep the button in its place.

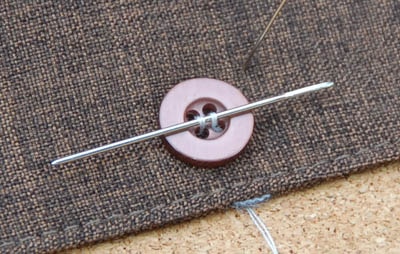
Turn the needle around and push it back down through the hole opposite the one you came up from. Push it all the way through and tug the thread tight. You should be left with a single small line of thread across the button, connecting the two holes.
You’ll repeat this process for six passes, three for each set of holes on the button.

Step 4: Create the Shank
On your last repetition of the previous step, come back up through the fabric but not through the button. Come up like you were going to go through the usual hole in the button, but turn the needle aside and bring it out from underneath the button.

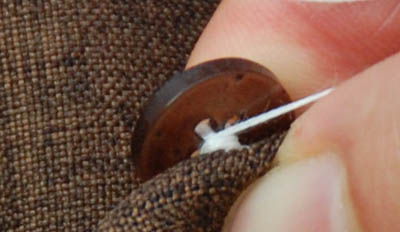
Use the needle to wrap your thread around the threads beneath the button. Make six loops around the bridges of thread that connect the button to the fabric, behind the button itself.
Pull tight and then dive the needle back into the base to be tied off on the other side of the fabric.

Step 5: Tie It Off
Make a small knot on the back side of the fabric. You can use the needle to guide the thread through a knot or you can snip the thread off the needle and tie the knot in the slack with your fingers, but either way you want it snug up against the back of the fabric.

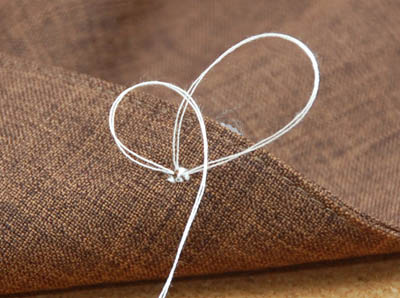
Probably the easiest knot to tie off is a simple overhand loop tied with the needle still attached. Pin the thread down right against the back of the fabric, under the button, then make a little circle in the thread just beyond your fingertip and pass the needle through the circle. Tighten it down and then cut off the excess fabric.

These directions can be used on shirt buttons, suit buttons, or trouser buttons. Hopefully you can put this to good use!
If you would like to watch this in video form, here is a short 4 minute video explanation:
Written By:
Antonio Centeno
Founder – Real Men Real Style
Creator of the internet’s most comprehensive style video library
Got a button sewing tip or a quick repair story? Share it with us in the comments!


{ 57 comments… read them below or add one }
These instructions are great. Another method to try if you’re not using the spacer, or if you have to sew the button on a garment while you’re wearing it: scotch tape the button onto the fabric in the right spot, sew through the tape and peel it off when the button is secure. Best trick my mother the seamstress ever taught me.
This is one of the most basic skills a man can know, yet sadly so few men ever learn it. My father is a tailor, and he had us learn basic sewing skills like this as small children. It has come in handy time and time again; every man who cares about his clothes should know the fundamentals of sewing like this. Good article.
One of the coolest things I did on a date was to sew a button back on my own shirt. I forget how it came off but I asked my date if she happened to have a needle and some thread and I took care of the problem in a matter of minutes. I’m sure she wasn’t impressed with what I look like without my shirt on but my skill with a needle and thread held her attention quite well.
Very cool post. I used to do a lot of camping and fishing, usually in old army surplus gear. I wish I knew this at the time. Busting buttons in the wilderness is a pain.
I guess I’ve been doing this wrong for years. That explains why my buttons don’t ever stay on my coat after I’ve re-affixed them.
I’ll make sure to keep this in mind for my next button sewing attempt. Thanks!
If I need white thread, often I’ll use dental floss (as my mother taught me years ago) as it is pretty strong and works great.
Another comment about buttons in general – I have noticed that on my jackets (my suit jacket and my leather coat) that when they are brand new, the buttons start falling off in short order. The thread mass connecting them to the fabric starts growing longer and longer until it detaches completely. I don’t know what it is about how they fasten them on, but they just don’t stay put. I’ve had to re-attach the buttons on both jackets, and once I did it myself they gave me (almost) no more trouble.
I don’t understand – in which direction did you move the button on your dress shirt? I can’t imagine there being 3/4 of any inch room in any useful direction!
Well it seems I’ve been sewing on buttons the wrong way for years! I didn’t know about the ‘x’, or double-threading, or using a second needle as a spacer.
Thanks for this post, very useful.
Good article!
I’m a classical musician, and in my cage there’s always needles, threads and buttons, it has happened more than once that your shirt has lost a button and you don’t notice until right before the performance.
No man should ever consider any job that needs doing to be a “woman’s” job. Sewing, cooking, cleaning, etc. A real man does what needs to be done.
Great instructions! Growing up, my mom made sure all the boys could sew a button or mend a sock and dad made sure the girls knew how to change a tire!
Perfect timing, I had a cracked button on a polo. Found a suitable replacement now I’m all better. Thanks!!
I second the perfect timing comment. Cheers.
I hope modern gentlemen can come to embrace sewing. My great grandmother taught my grandfather to sew very well. He taught my father who then taught me.
I also do Rev War reenacting and we all do our own sewing. Often we sit around the fire in the evenings and do field repairs while passing a bottle of rum around, which is actually historically accurate.
There is nothing girly about gettin’ s**t done!
Another useful tip: Don’t overdo it!
If a button has popped off it seems smart to sew it on ‘extra hard’ by using a lot of thread or super strong thread (dental floss, fishing line etc).
This is wrong thinking. While you want the job to be robust, you also want the point of failure to be the thread. Under stress SOMEthing has to give. If that something is the thread, you just sew the button back on again. However, if the button snaps or the fabric tears you have a bigger problem. I’ve seen both happen due to ‘overenthusiastic’ stitchery.
This is true for seams repairs as well. Do a good solid job, but don’t make the threadwork stronger than the surrounding material.
Happy Stitching!
Thank you. I would leave more of a comment, but I’ve got to get busy saving some garments from banishment in the misfit clothes section of my closet!
I have a better way. I hand my shirt to my wife and say, “Can you please fix this?” :)
It is amazing the lack of basic skills that so many have today.
Nice post! You would be amazed at how many people who don’t know how to complete this task. My mom taught me how to do this a long time ago and I’m forever grateful.
Thanks heaps… I fixed 2 suits and a shirt this weekend, awesome post!
Great article! I spent 20 years “on the road” in sales and always had a sewing kit with me. A tip that served me well. Buy a roll of white (if you can find it) and a roll of black carpet thread. I think they make that stuff out of tensile steel! A button sewed on with it will never fail.
Sewing a button was one of the many skills I learned in Marine Corps boot camp. Anything taught to you by a Marine Corps drill instructor in a professional environment is by definition manly.
Good article, but your pictures only show the thread going through the button in parallel lines, rather than doing a more typical ‘x’ pattern through the button. Is there a reason?
The second video ends with a picture of a button stitched with in X format. Is one way better than the other?
BTW, the timing couldn’t have been better. My wife went overseas for a couple of months and left me to fend for myself!
It’s great to see a post like this where so many guys will see it. And it warms my little heart to see so many comments about how it’s not girly — it’s just a necessary chore that needs to get done! To me sewing is second nature, like throwing a ball is to a man, but it’s all about what we’ve been taught to do.
Also, if I may add to Step 5: make sure you knot the thread at least 3 times or all your work may come undone.
Great article. FYI if you have a regular dry cleaner they will repair or replace your buttons as part of the service. They have a special sewing machine that puts shirt buttons on in about two seconds.
I learned sewing (and cooking) at an early age. I was staying long term in a hotel in Iowa for business reasons. I got to be friends with much of the hotel staff. I had asked for a sewing kit earlier one week when I had popped a button off of a dress shirt. A couple of days later I was passing through the lobby when one of the young ladies at the counter was bemoaning the fact that it was cold and two buttons had come off her favorite coat. I offered to sew them back on for her so she could go out on the town. I find it ironic that many youngsters today have no idea how to do basic things like this.
Its very useful for those who can’t sew the bottons of the shirts…… Nice article… very relevant pictures
That video was painfully slow to watch but helpful.
Well, today I learned that I have been sewing buttons wrong for quite a while.
Having a Tailoress for a Grandmother I got lots of instruction on how to look after my clothes.
One Tip – Gran always used ‘dental floss’ for buttons that where going to cop some wear and tear. it is tough as.
this is cool a button off of my shirt fell off.Where can i get this stuff separately for cheap but still good quality.I don;t wont to buy a whole set just what i need.A needle , and black thread
That is an OK way to do it, although very amateurish. That’ll save your day and is a good skill to have. However, you shouldn’t use knots when sewing on shirt buttons – or any other buttons, as a matter of fact. Nevertheless, there’s also a right way to do it. And please, do a cross over the button – that way the buttons shall last longer.
http://www.customshirt1.com/ProperlySewButton.html
I do lots of alteration tailoring and – for starters – re-sew all the shirt buttons, unless they’ve been handsewn (and thus the shirt is rather expensive). It only takes a couple of minutes per button (the fifteen minutes, as mentioned in the guide, is overestimated, although it might take that long for a beginner).
Next, when your jacket or coat button falls, try to do a braided shank on it. It’s a lot more beautiful thing than the basic twisted one your jacket came with – even you’d be the only one to know it.
Antonio,
I am as fastidious about writing as you are about dress and grooming. ” . . . had shrank” should be ” . . . had shrunk.”
years ago, having a cub scout group , I taught knots ,etc, but also taught basic sewing,,buttons.. fix a seam . I thought I would get phone calls from parents, did not..I hope these boys ,now men , remembered …..I also taught them how to make breakfast……….
Good article!
I’m a classical musician, and in my cage there’s always needles, threads and buttons, it has happened more than once that your shirt has lost a button and you don’t notice until right before the performance.
I don’t understand – in which direction did you move the button on your dress shirt? I can’t imagine there being 3/4 of any inch room in any useful direction!
Very cool post. I used to do a lot of camping and fishing, usually in old army surplus gear. I wish I knew this at the time. Busting buttons in the wilderness is a pain.
Thanks for showing a better way to do it than I’ve been using. Hint. Get a bottle of colourless nail varnish and put a dab on tthe threads of buttons on new clothes, both inside and out. Half a drop is plenty. Cannot be seen and it prevents the threads from coming loose,.
I make the shank of the button by tying 3 to 6 sheep-shank or macrame knots around the shank. This makes a more stable and slimmer shank than simply wrapping, then wrap the thread a half-rotation and push the needle through the shank. go the opposite way and repeat. Put the thread to the back of the garment and snip.
While some may not consider sewing a button to be manly, they should know the Army issues every soldier a sewing kit with new buttons and thread to replace buttons on our uniforms. Buttons are practical and fixing things is manly.
I may not be a man but I certainly found this extremely helpful. I have never been much of a girly girl and my mum never really taught me much about it, so useful for fixing up the buttons on my new work pants!
Thank you for a great information
I am trying to find if there is a tool for when you machine a button on it raises it so its not tight thank you Elizabeth
Thank you! I’ve been sewing my own buttons for a while but always wondered why the never came out quite right. This explains it well.
I am female but never learned any home skills because I come from a background where womens’ work in the home is taken for granted and my Dad used my Mom as slave labor. I wish I would have realized that skills like sewing, cooking, etc. are “survival” skills. I am paying to be taught how to sew now. These are the best instructions I’ve run across for sewing a button. Thank you.
THANK YOU!
THANK YOU!
THANK YOU!
Finally, sewing a button explained. I’ve got a tin filled with buttons that have popped off. Now if I can just match them to the right shirt. Thanks
I wish I would have realized that skills like sewing, cooking, etc. are “survival” skills. I am paying to be taught how to sew now. These are the best instructions I’ve run across for sewing a button. Thank you.
It is really useful. My mom taught me how to sew a button as a child, but in a different way:)
Sadly I think lots of men nowadays lost this skill or would turn to their wifes for that job that they think fundamental. I think this is useful when your wife is not around or you are travelling. Very good article, thanks for sharing that.
I used to work in alterations and one small method of speeding up this process is, instead of just ‘doubling’ the thread we, how to say it, doubled it twice. I’m not even sure if there’s a technical name for it. What I mean is, double your thread before putting it through the needles eye. This will require using more thread of course. I never measure 24″ specifically, I just eye ball it.
By doubling the thread beforehand, once you essentially pull two ends of the thread through the needle eye, you will have four strands rather than just two. I hope that makes sense. =)
I cheat! I use instant glue also known as super glue, when the shirt or coat is brand new, before the thread can loosen. Just a mere dollop on the threads at front of button.
Use constraint, not too much glue, just wet the threads, else you may glue the back of button to shirt. Try it on an old knock-about shirt first for proper technique.
Thank you – I never knew about the “spacer needle”!
I might even have a suggestion to improve it: I grabbed a medium-sized safety pin that had the same diameter shank as the needles, but it won’t fall out in between the 1st and 6th loops… ;0)
If you can, it makes a MUCH neater and firmer holding stitch if you pass the thread through beeswax before you begin stitching.
I was looking for ideas to put the space under a button for my wool/cashmere coat and never thought of spacing from the top of the button. Thank you kindly!
I could have used this skill 20 years ago. I think I’ll give it a shot.
An alternative to knotting the thread (a “no-no” for button sewing) is to fold the thread in half and thread the two loose ends through the eye of the needle (with a loop at the other end. From the back of the garment, pull the thread through the fabric, through the button, back through the fabric and through the loop of the thread. This will anchor the thread and doesn’t leave that little knot to irritate the skin.
Found your post while talking to a friend who was trying to coerce me to sew buttons for her. I sent her this link (and also pinned it to by Sewing Board on Pinterest)! Thank you.