Editor’s Note: This is a guest article by Marine Corps veteran and paramedic Charles Patterson.
If you’ve been reading articles from the Art of Manliness for any length of time, it’s likely that you’ve stumbled upon at least one article that has referenced the need for a first aid kit. Whether it was the Altoids tin first aid kit, keeping a first aid kit in your car, or a list of backpacking items, it has long been established that a first aid kit is an essential piece of gear for at home and on the go. There are a multitude of pre-built first aid kits on the market, available everywhere from your local pharmacy to Amazon, and ranging from a few bucks for no more than a pack of various Band-Aids and antibiotic ointments to several-hundred-dollar high-end specialized kits for the survivalist, tactical, and professional first responder markets.
While you may be able to find one of these pre-made kits that suit your needs, they present their own set of problems including, but certainly not limited to, low quality products, unnecessary items, and a lack of (or poor) organization that makes finding what you need when you need it cumbersome at best.
Sometimes, you just have to do it yourself. As a paramedic, husband, and father of five beautiful children, I have tried several off-the-shelf first aid kits and found none that fit the bill. If you find yourself in this predicament, I’ve put together this comprehensive guide to help you create a practical first aid kit of your own that fits your individual needs. In this guide we’ll cover a few topics to help you narrow down the needs of your first aid kit, items I recommend keeping in any kit, the kits that I’ve made as a reference, and the importance of training so that you actually know how to use your supplies.
General Considerations for Your First Aid Kit
The first step in building your own kit is to think about what or who you’re using this kit for. A first aid kit for a single man in the city to take on trips to the gun range will be very different than what a family of six living in the country keeps for problems around the house.
Perform a Risk Analysis
For many people, it can be difficult to consider all the possibilities that you need to be prepared for. So, before you begin buying medical supplies and bags for your first aid kit, perform a risk analysis on your life to help direct your thoughts.
Consider what medical and injury risks you have throughout all aspects of your life and how much risk is involved. You may be able to do a quick mental evaluation here, or you might want to use a written scored system of your own to identify and rate these risks.
There are many systems in use in the military and other agencies, corporations, and businesses to identify and mitigate risk. One possible method you might try is to make a few simple lists of your own. Write down all the risks or hazards in your home for yourself, your spouse, children, or others that live with you. Examples in a home may include anything from paper cuts while sorting bills to burns while cooking dinner. Do the same for your garage, your workplace, your vehicle, and your hobbies.
Once you have a list, apply a score of 1-5 to each item, 1 being least likely to occur and 5 being very likely. The items on your list that score the highest are things you may want to consider preparing for when it comes time to building a first aid kit.
If you have a medical condition that can lead to a potentially life-threatening problem, make the appropriate risk assessment. As an example, if you or a family member is diabetic, carrying oral glucose in the event of a low blood sugar (hypoglycemic) episode can be a lifesaver. The same thing should be considered if you have a life-threatening allergy. Benadryl and an Epi-Pen might be the difference between life and death for you.
Whether you do a quick mental evaluation of your overall risk or a more detailed and planned written analysis, this assessment can help identify the important elements for your first aid kit.
The Who, What, When, Where, Why, and How of Your Kit
There are other questions to ask yourself when performing your risk analysis outside of a simple “What is the risk and how likely is it to occur?” questionnaire. I’ve mentioned a couple of these ideas already, but there are more to consider:
Who are you building it for? Are you single and live alone? Do you have a wife? Kids? Or do you care for your elderly grandmother? The size and contents of your kit will vary based on these answers.
What kinds of activities do you do or expect to use this kit for and what possible medical or trauma risks are involved? Is this a general first aid kit, or a specialized kit based on your hobbies or job? If you work in an office building at a desk or other low-impact, low-risk profession, your kit may not include as much in the way of trauma. If you work in construction, in a garage, in electrical work, on an oil rig, etc. you may consider supplies for traumatic injuries including blood loss, broken bones, and burns. If you’re building a kit to take hunting or to the gun range, you should consider items to treat gunshot wounds, heavy bleeding, or impaled objects.
Where do you plan on keeping this kit? In your house? Car? A backpack or purse or bug-out bag? Your garage or workshop? You can keep a larger first aid kit with more items in your home or the trunk of your car than you can in your glovebox or backpack, and the risks that you and your family must consider at your house are different than when you leave the comfort of your home.
Consider where you live, work, or play in relation to the nearest medical facility, fire department, or EMS station. I live in a suburb of the Dallas/Fort Worth metroplex. There is, quite literally, a fire department, urgent care, or hospital no more than 5-10 minutes away from where I live and most places I go. If there is any major medical or traumatic emergency that happens to me or my family while we are going about our typical routines, we can receive care very quickly. We don’t need to sustain ourselves for very long.
As an example of the other end of that spectrum, my brother lives about 10 minutes outside a very small town (pop. <100) with limited to no medical resources. The nearest medical facility is about 30 minutes away, with limited resources when it comes to life-threatening emergencies. Sound familiar? You might want to prepare for caring for yourself or your family for a longer period of time. A lot can happen in a 30-minute drive to a small medical center or while waiting for an ambulance, and time is life.
If you’re building a kit for a bug-out bag in case of an apocalyptic event, you may need to care for yourself without the hope of medical treatment. Plan accordingly.
Why do you want to have a first aid kit in the first place? Maybe the last time you got hurt you found yourself at the hospital or urgent care for an otherwise treatable-at-home injury. Or perhaps you or a family member has a pre-existing medical condition and you need to be prepared for medical emergencies that are specific to that condition.
No matter the reason, understanding your own motivations for building a first aid kit will help give you direction.
How prepared do you WANT to be? Your first aid kit can be as simple or as complex as you want it to be. If you want to be prepared to handle things that are most likely to happen, your kit should only contain enough supplies for those things that you’re concerned about. If you want to have a bag that contains enough supplies to handle almost any pre-hospital situation, go for it. That bag won’t fit in your glovebox, but it could make a great “just in case” kit for at home.
Building Your First Aid Kit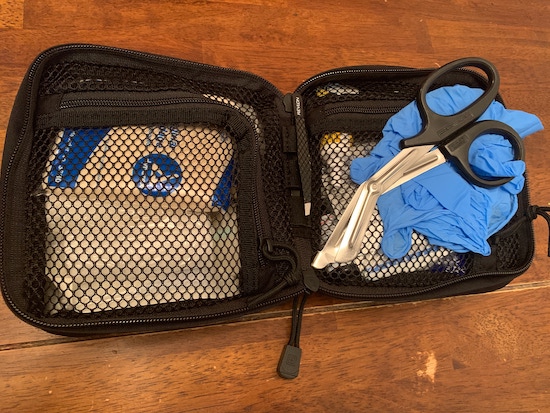
Putting the “Kit” in First Aid Kit
Once you’ve come up with an idea of what you want out of your kit, you should consider what kind of pouch/bag/box you’re going to use to contain it. There are many items on the market available for this purpose, ranging from small soft-shell zippered cases to larger tackle or tool boxes.
When building first aid kits for our family, I decided I wanted something for our cars that would fit nicely in a glovebox or center console. This obviously limited the size that I could work with, and I wanted something durable but not rigid. I looked at several different offerings from “tactical” equipment companies including 5.11 Tactical, Maxpedition, Orca Tactical, Condor, and Magpul (if you do a simple web search for “medic pouch” you’ll find a never-ending list of options to choose from). They all have pouches or cases specifically geared toward creating a “medic pouch” using durable fabrics and a variety of zippered pockets, loops, and Velcro fasteners.
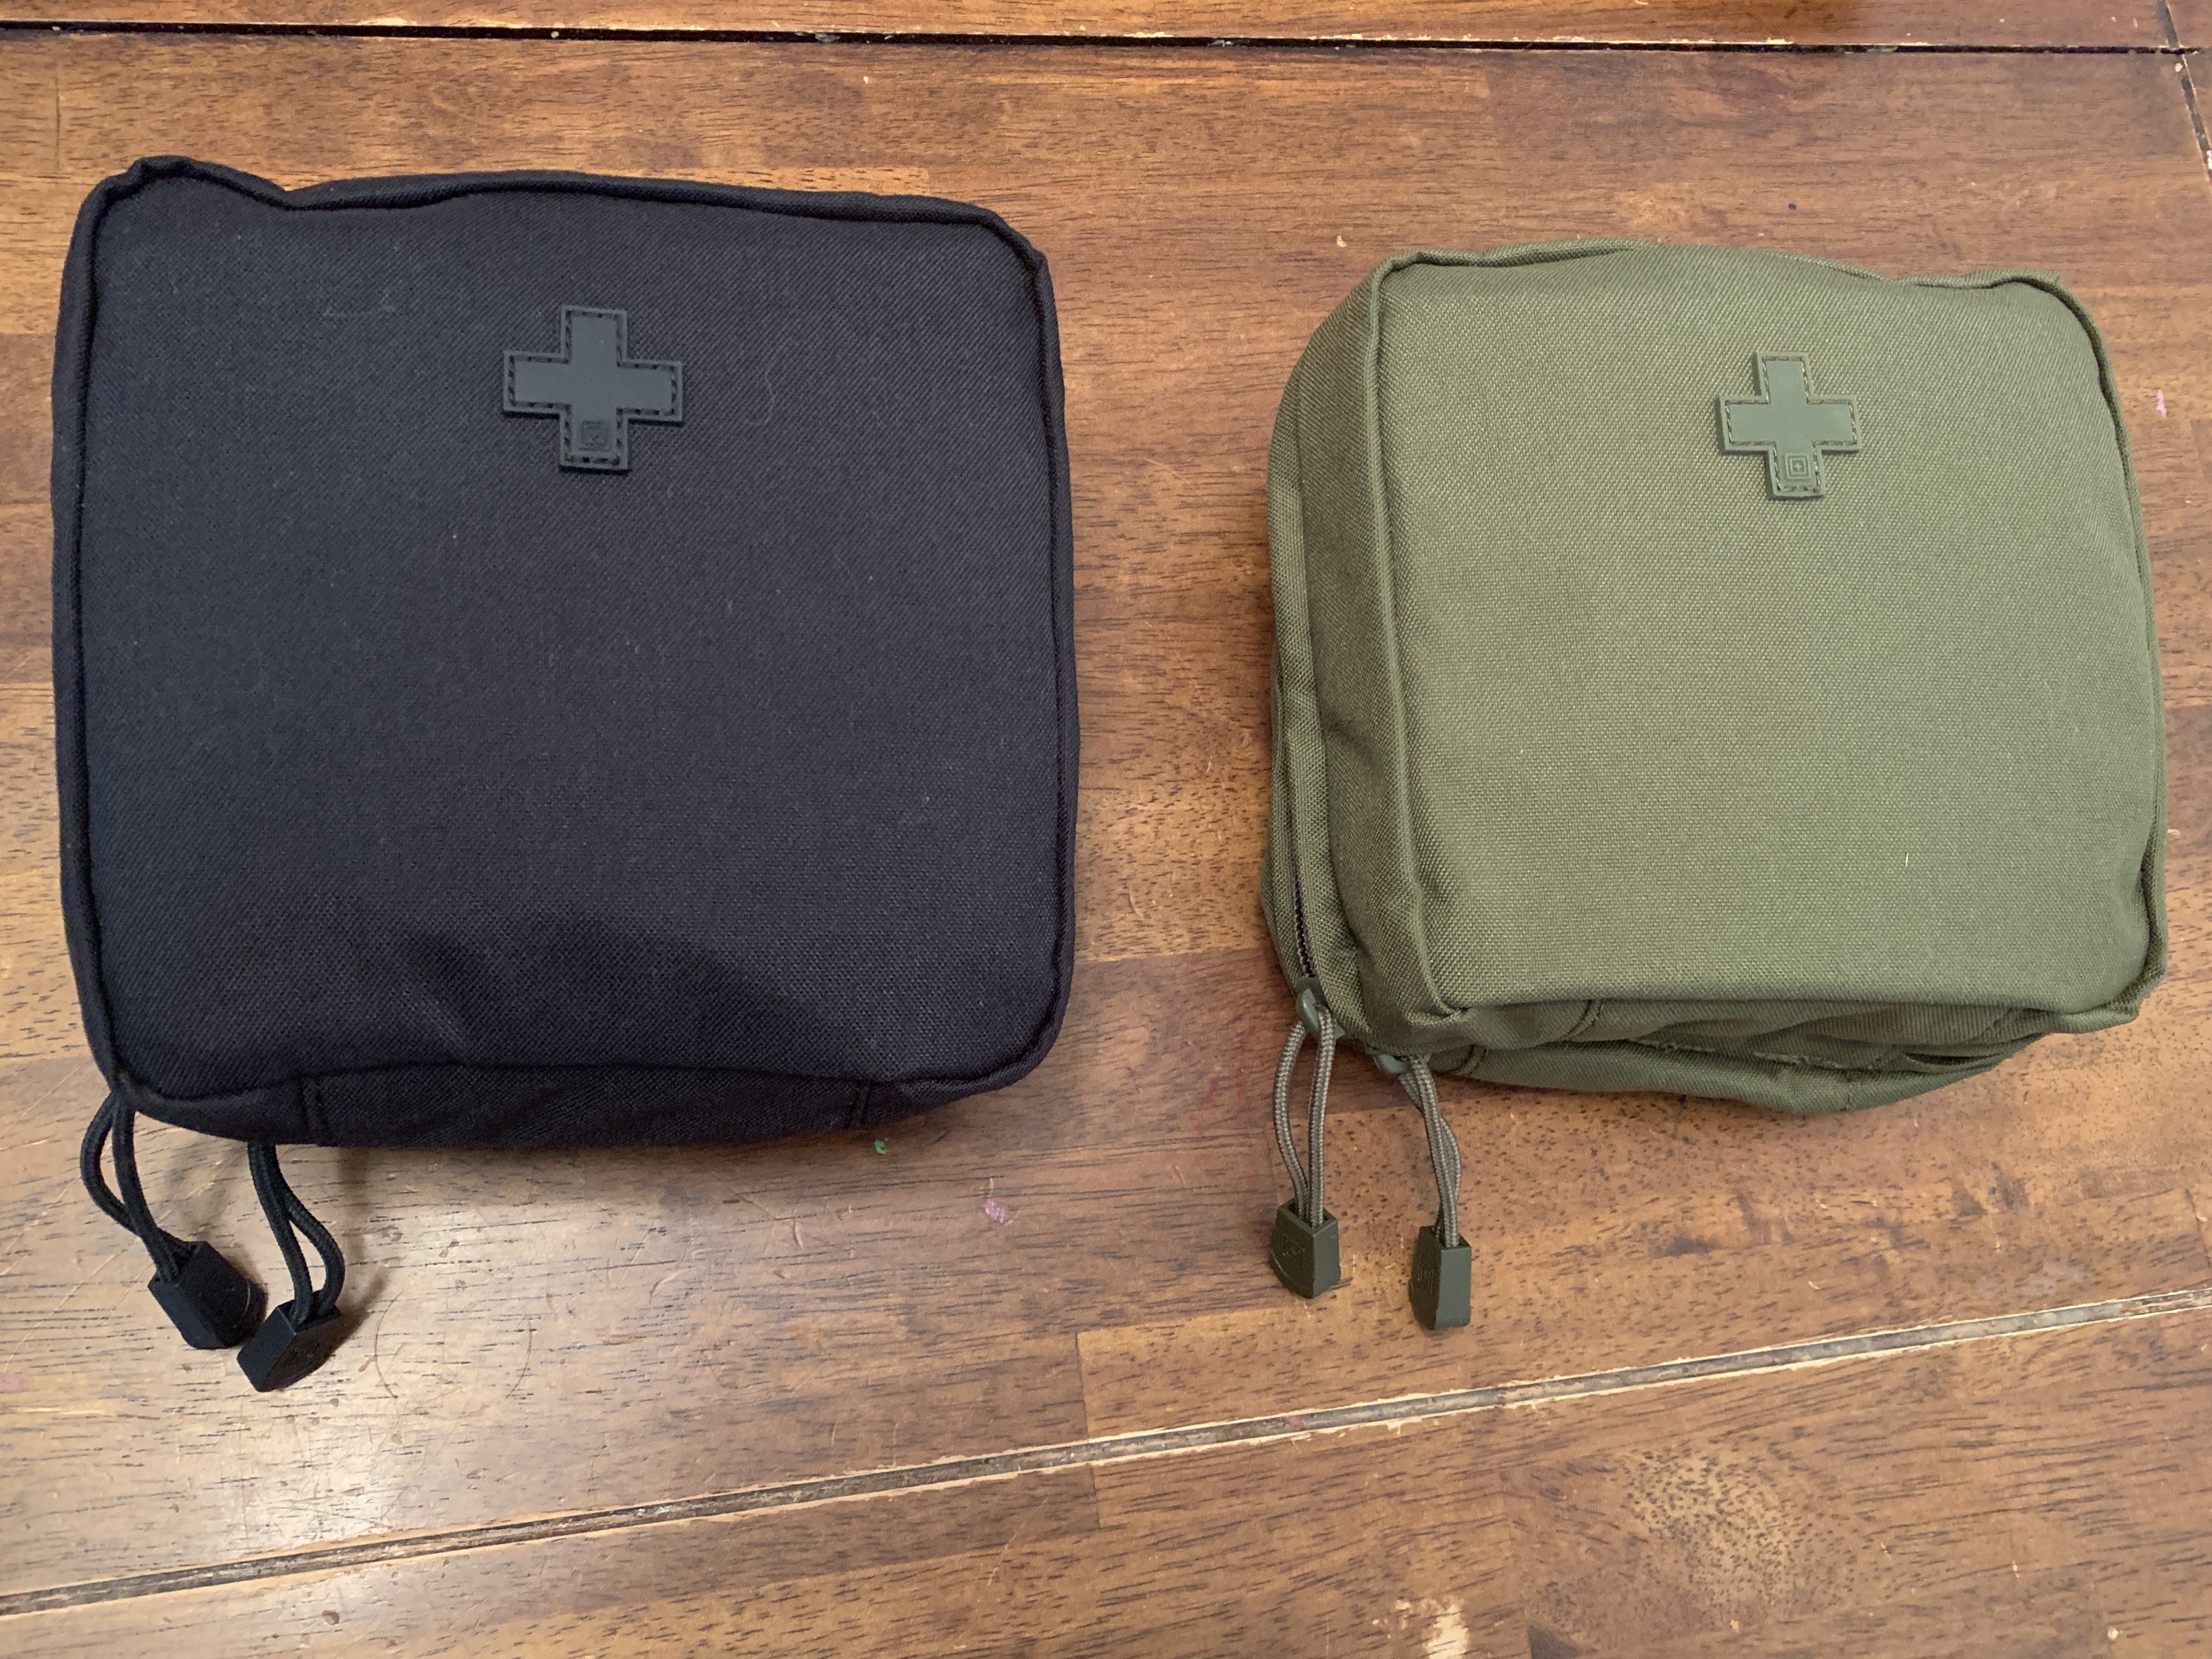
Eventually I settled on 5.11’s 6×6 Med Pouch which simply includes two zippered pockets which worked great for my purposes. I highly recommend it.
There are, of course, plenty of other offerings to look at. Galls, a resource for military, police, fire, and EMS gear, has a good variety of quality medical bags to choose from that work great for homemade kits of all sizes ranging from small kits like mine to larger EMS-type “jump” bags that can fit everything you’d ever need (and everything you’ll never use).
If you decide to go the tackle or tool box route for your first aid kit, you won’t need to worry about searching for a “first aid” specific box. The Walmart outdoors section or most hardware stores should have what you need.
When putting your kit together, consider your organization. It’s a good idea to keep things organized and labeled in such a way that anybody could open it and find what they need, especially if someone is using your own kit to help you! Organize related items together (Band-Aids, butterfly closures, and antibiotic ointment; 4×4 gauze pads and rolled gauze; triangular bandages with SAM splints, etc.). If you have multiple pockets where the contents are obscured, consider labeling them (Bleeding Control, Band-Aids, etc.) so you or others spend less time digging and more time helping. Organization can be as simple as a few zip-loc bags and/or rubber bands.
Basic First Aid Items
Regardless of the specific purpose of your kit, there are a few basic items I believe should be included in most every kit:
- Wound cleaning agent: A small cut can be a big problem if it gets infected. While soap and water is the best way to cleanse wounds and prevent infection, if you’re using a first aid kit for the job, chances are you’re not near a sink. So something as simple as antiseptic wipes for minor injuries is very important to keep in your kit. If you’re keeping a larger first aid kit, a small bottle of hydrogen peroxide or Hibiclens are great options, too. Isopropyl alcohol or alcohol wipes are okay but can have a heck of a sting. If you’ve never experienced this yourself, just trust me. For kids, antiseptic wipes or hydrogen peroxide are best.
- Band-Aids: Obvious choice if you ask me, and especially true if you have children. Every parent knows the “healing power” of Band-Aids on small kids. Keep a handful of these in your kit. Bonus points for knuckle and fingertip Band-Aids. I’d also opt for the fabric Band-Aids which hold stronger and longer. Consider waterproof as well depending on your needs.
- Butterfly closures: If you have a cut (we call it a laceration or lac for short) that’s a bit deep, you might see the wound gaping open. Not only does this leave the deeper layers of tissue open to infection but it could make the laceration even worse as it pulls. Use butterfly closures to keep the edges together. Then use some gauze and pressure to control bleeding while you seek medical care. If you find yourself using these, you may need stitches.
- Antibiotic ointment: This could be individual packets of antibiotic ointment or a tube of Neosporin. Either way, preventing infection is important.
- Nitrile exam gloves: The main purpose of using gloves when providing first aid is to prevent coming in contact with someone else’s blood or other body fluids that can end up causing harm to you. Blood-borne pathogens are a very real and serious risk. You may not be concerned about that when it’s your own kid, but if you’re helping someone else, don’t let your good deed shorten your life expectancy. You never know what people around you are carrying. And let’s be honest, getting someone else’s blood or other fluids on you is just gross. Additionally, a clean pair of gloves to cover your dirty hands can add to infection control for your “patient.”
- Gauze: Don’t hope that you have Kleenex or paper towels nearby for bleeding control. You’ll need some gauze for that. While you can find a variety of different types of gauze, the basics are 4×4 gauze pads and rolled gauze. Slap a few 4x4s on top of a bleeding wound, hold pressure, and beat feet to an ER. Rolled gauze wrapped tight can be used as a pressure dressing or just to secure the gauze. Once you’ve put some gauze on and held pressure, don’t let go to see if it’s still bleeding. Just keep holding on.
- Triangular bandages: These are one of the most universal items in your first aid kit. A couple of these can be used for anything from a sling and a swathe to temporarily treat an upper extremity fracture (broken collar bone, broken upper or lower arm) to splinting a foot or ankle fracture by tying a pillow tightly around the foot, or even with makeshift rigid splints to tie around a broken leg. A triangular bandage can also be used just about anywhere as a pressure dressing if you have a bleed that won’t stop. Your first aid kit should not be without a couple of these.
- Burn treatment: Burns can happen anywhere. From your kid touching a hot stove, to removing the radiator cap on an overheating engine, you need to be prepared for a burn. Treating is basically done by stopping the burn — cool it off somehow — and wrapping the burned area with sterile gauze/dressing. For my kit I opted for simple burn gel packets that can be placed on a burn before wrapping it. There are also several fancy burn dressings on the market you can take a look at to find what suits your needs.
- Over-the-counter (OTC) medication: Consider having a small amount of OTC medication available in your first aid kit. Ibuprofen (Motrin, Advil) and acetaminophen (Tylenol, Paracetamol) are great for pain relief and reducing a fever. Ibuprofen also helps reduce inflammation which can be helpful with some injuries. Diphenhydramine (Benadryl) can be used in case of mild allergic reactions (for severe reactions, Benadryl should still be used, but it may not be enough). Aspirin (Bayer) can be kept on hand in the event of a possible heart attack, if that’s something you want to be prepared for. As I mentioned earlier, this could also include oral glucose and an Epi-Pen (Rx generally required) based on your needs. If you take any medications, take note of how much you took and when you took them. *A quick note about medications: While many OTC medications have great benefit, you should always talk to your doctor before using any medications that haven’t been prescribed to you. This guide does not replace medical advice, I am not your doctor, and you should not take this as instruction to take any medications. I’d also advise against providing any medication, OTC or otherwise, to anyone outside of you or your family. There are a lot of risks involved with doing so. Interactions between these medications and some prescription medications can be harmful, allergic reactions to OTC medications do exist which can cause further harm (up to and including death), and taking too much of any medicine or taking it too frequently presents its own set of problems. Consult your doctor, read the warning labels, pay attention to and follow the dosing and recommended frequency, and check expiration dates of all medications prior to taking them. The importance of this cannot be overstated.
My First Aid Kit
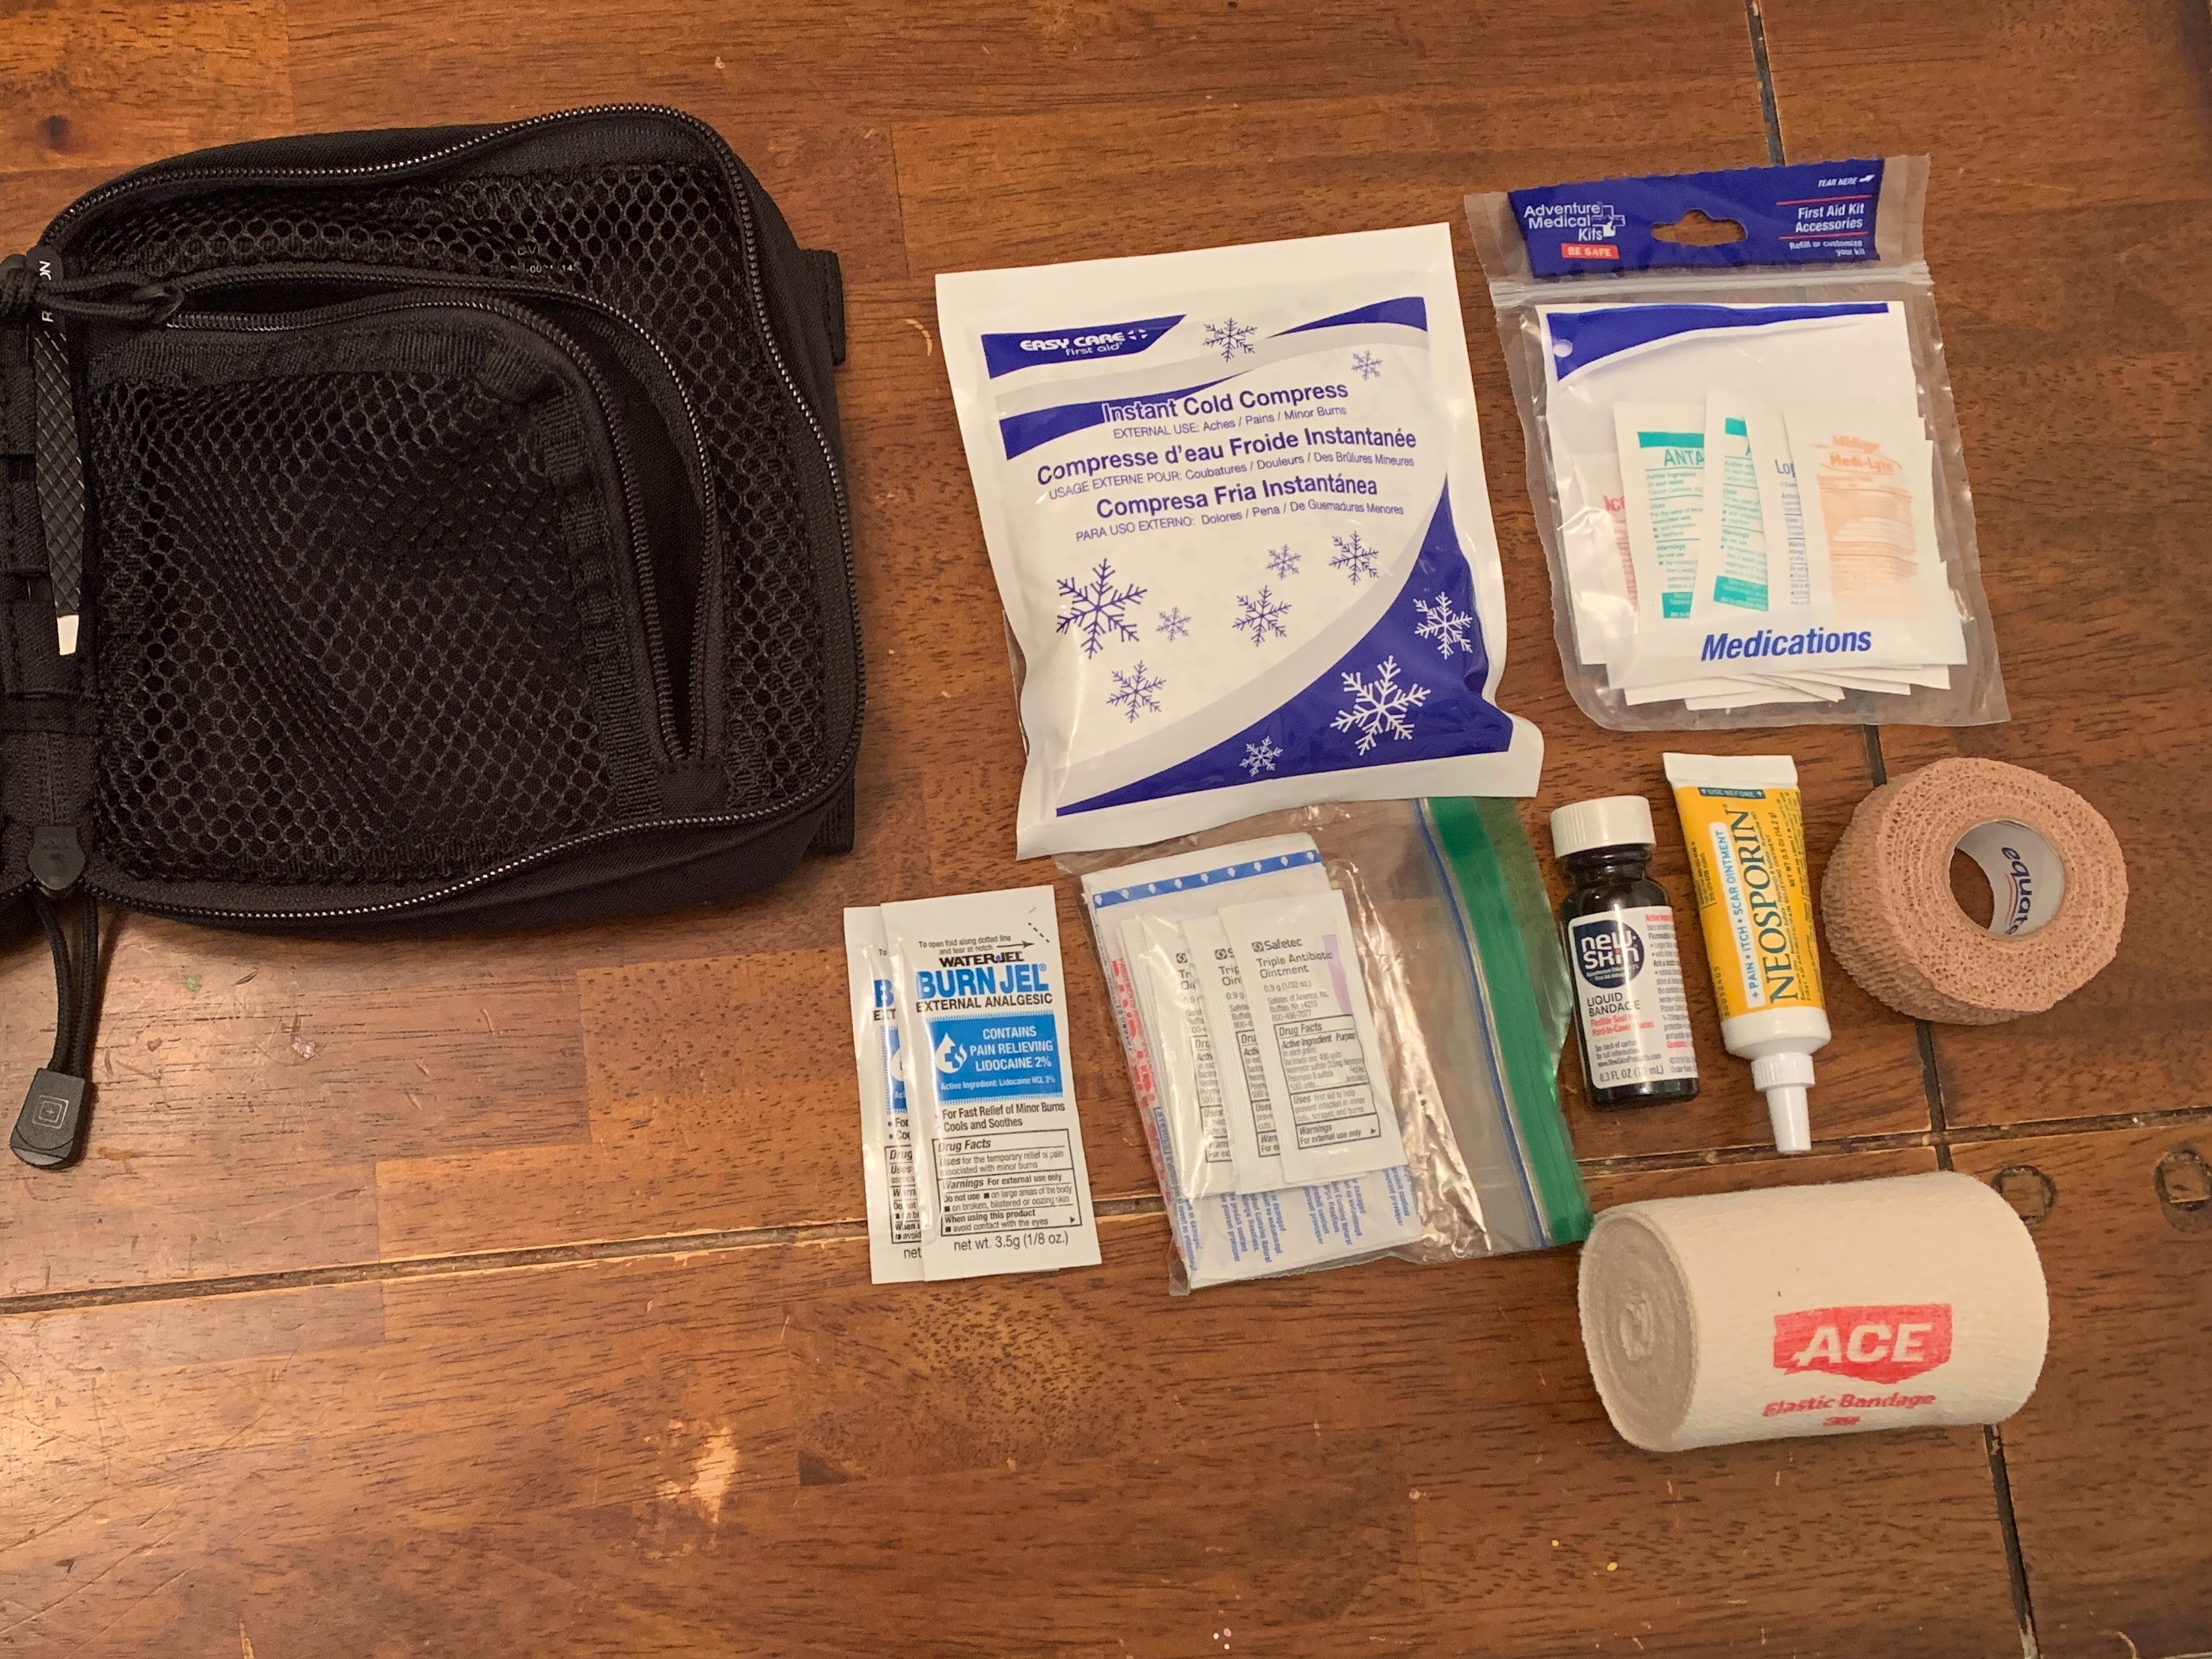
Below you’ll find a list of the contents of my first aid kits. If you’re not sure where to begin, you can use this as a starting point. As you put your kit together and use it, don’t be afraid to tweak the actual contents and quantity from what you started with.
As I mentioned before, the purpose of my kit is to treat minor problems until I can get help. It’s not a blowout kit or major trauma kit — it’s not meant for major injuries or medical problems. It’s enough for scrapes and dings, twisted ankles, and other minor injuries.
Trauma Pocket
- (6) 4×4 gauze pads (link)
- (4) 3″x4″ nonstick dressings (link)
- (2) triangular bandages (link)
- (3) 3″ rolled gauze (link)
- 1″ surgical tape (link)
First Aid Pocket
- (4-6) fabric Band-Aids (link)
- (2) knuckle Band-Aids (link)
- (2) fingertip Band-Aids (link)
- (4) butterfly closures (link)
- (5) antibiotic ointment packets (link)
- (4) antiseptic wipes (link)
(Above items kept in a separate snack size zip-loc bag.)
- loperamide HCI 2mg (anti-diarrheal) (link)
- electrolyte tablets (package of 2) (link)
- antihistamine (Benadryl) 25mg (link)
- ibuprofen 200mg (2 packages of 2) (link)
- acetaminophen 500mg (package of 2) (link)
- antacid 420mg (package of 2) (link)
(Meds kept in a separate zip-loc bag, purchased as one pack from REI.)
- 3″ ACE bandage (great for wrapping sprained ankles, securing a splint, or as a pressure dressing) (link)
- 1″ Coban (self-adhering elastic bandage, good for buddy taping broken fingers/toes and securing bandages and a number of other applications) (link)
- liquid bandage (great for small, hard-to-bandage cuts) (link)
- 5oz tube Neosporin (I use one that also has an anti-itch property) (link)
- burn gel packet (link)
- cold compress pack (link)
- tweezer (link)
Additional Items
- (2) pair of nitrile gloves (link)
- trauma shears (cut away clothing or cut bandages to size, or anything else you might need scissors for) (link)
Where do you find the items listed above? I’d avoid drugstores/pharmacies because the products there can be inferior in quality and overpriced. Galls.com, that I mentioned earlier, is where I purchased most of the supplies for my first aid kits. You can save money shopping through there, by buying in bulk, and then making multiple kits, if desired. Many items can be purchased at WalMart, Amazon (see the links above), and outdoor stores like REI.
If you’re on a tight budget, always shop around for the best deals, but be wary of inferior products. If you’re not sure on quality, try ordering as small of an amount as you can and test it before you buy in bulk. For other specialty products such as tourniquets, Israeli battle dressings, Quick-clot, etc., it pays to do your research and shop around. While there are a lot of good products and sellers on the market, there is always someone looking to take advantage of the survivalist/preparedness folks. Shop smart.
The Importance of Training
More important than simply having a first aid kit is training. All the first aid kits in the world won’t do you any good if you haven’t received any training to treat yourself or others.
While it takes next to no training to rinse off a wound and apply a Band-Aid, a basic understanding of anatomy and different injuries will make all the difference in your ability to treat an injury or medical emergency. You don’t need to spend thousands of dollars for an EMS cert or join the Army as a combat medic. There are many training options for the “layperson” or everyday citizen.
Organizations such as the American Heart Association and Red Cross offer training courses for CPR, AED, and First Aid. There are also first aid courses designed around trauma and blood loss prevention that are available for anyone with zero experience and up to seasoned medics. If you want to take it a step further, there are also courses that can certify you as a “first responder” or “emergency medical responder” with some states giving a state license/certification as well. In Texas this is called an Emergency Care Attendant.
If you’re unable to find any businesses around you or any courses online that meet your needs, consider reaching out to local hospitals and fire or police departments. Many of these organizations offer community outreach programs including CPR and First Aid training. If not, they can at least point you in the right direction. I’ve never been to a Fire Department that wasn’t willing to answer questions and provide help to anyone looking for it.
Once you have a kit, you need to practice with the items you have (this is another reason buying supplies in bulk is helpful!). Knowing what to do is worthless if you don’t know how to do it. Get out there and practice assessing, bandaging, splinting, etc. If you have a spouse and/or child that is old enough, teach them how to use the contents of your first aid kit. Not only so they can help themselves, but so they can help you if you end up becoming the patient.
And sorry guys, I’m afraid action movies and hospital shows don’t count as training. Please don’t stab anyone in the throat with a ballpoint pen if they stop breathing.
Final Notes
I hope this guide has been helpful in developing your own first aid kit! As I wrap this up, I have just a couple more things for you to consider:
- Know when to call EMS or go to a hospital. A first aid kit is not definitive care. It can be helpful to temporarily stabilize an injury or illness, but it is called FIRST aid for a reason. Know when you are out of your depth and when it’s time to get further care. There may also be times where your first aid kit is worthless. Don’t waste precious time digging through your kit when you should be calling for help.
- Consider keeping a list of health-related information about yourself or family in your kit or wallet. This is especially important if you take prescription medications regularly, have any significant medical or surgical history, or any allergies. This list can be helpful if you are incapacitated and there’s nobody around who knows this information about you. It’s also helpful if you have multiple medications that are difficult to remember when you go to the ER. As a paramedic, I always appreciate when a patient has a list that they can give me so I can immediately and quickly review pertinent information while caring for them. I’d recommend including the following information:
- Full name and date of birth
- Height and weight (weight especially is important as many medications are dosed based on weight)
- Emergency contact information, including relationship (you might consider having multiple emergency contacts; only listing your wife, for example, doesn’t help if you are both incapacitated in a car accident)
- Blood type
- List of prescription medications, amounts (mg, mcg, etc.), times taken (once a day, twice a day, as needed, etc.), and reason for taking the medication (pain, diabetes, depression); include any OTC medications you take regularly (such as a daily baby aspirin) and supplements/vitamins that you take regularly
- List of all allergies (bee stings, drug allergies, food allergies) and your reactions to those allergens (rash, shortness of breath, etc.)
- List of all medical conditions and past medical history (high blood pressure, diabetes, previous heart attacks or strokes)
- List of previous surgeries or major procedures (such as coronary artery stents) and approximate date (month and year) of those surgeries and procedures. This may seem like a long list if all of these bullet points apply to you, but the information is very helpful to emergency responders and ER staff. You can easily print all this out in small enough font that it can be folded and placed in your wallet and/or first aid kit.
- I would caution you against carrying or using anything you don’t know how to use or use properly (unless it really is the apocalypse; then you do you, boo). Remember, there’s a big difference between first aid and advanced life support. Initiating treatment outside the typical first aid scope of a layperson without appropriate training and certification can cause further injury and death and open you up to lawsuits. Nobody wants that.
- Lastly, don’t limit yourself to just one first aid kit! Once you’ve created one, it can be very easy to make a couple more to cover all your bases, especially if you bought any of your supplies in bulk. Having multiple kits in different locations will only add to your preparedness and increase your antifragility.
_____________________________________
Charles Patterson is a husband to a beautiful wife and father of five wonderful children. After serving as a linguist in the Marine Corps and earning a degree in Music Production after discharge, Charles found his true passion as a paramedic. When the work is done and the chores are finished, he enjoys cycling, mountain biking, shooting guns, frisbee golf with his family, and playing guitar.