Editor’s note: This is a guest article from Will Whitson.
Is there any household appliance more underrated than the common garbage disposal? It comes standard in almost every house or apartment on the market. It’s generally out of sight and out of mind until your orange rinds, potato shavings, or leftovers start sending murky water back up the drain. With the flick of a switch, this kitchen workhorse goes to town, gets the job done, and leaves the sink clean and clear. It’s a modern marvel . . . until it stops working, that is.
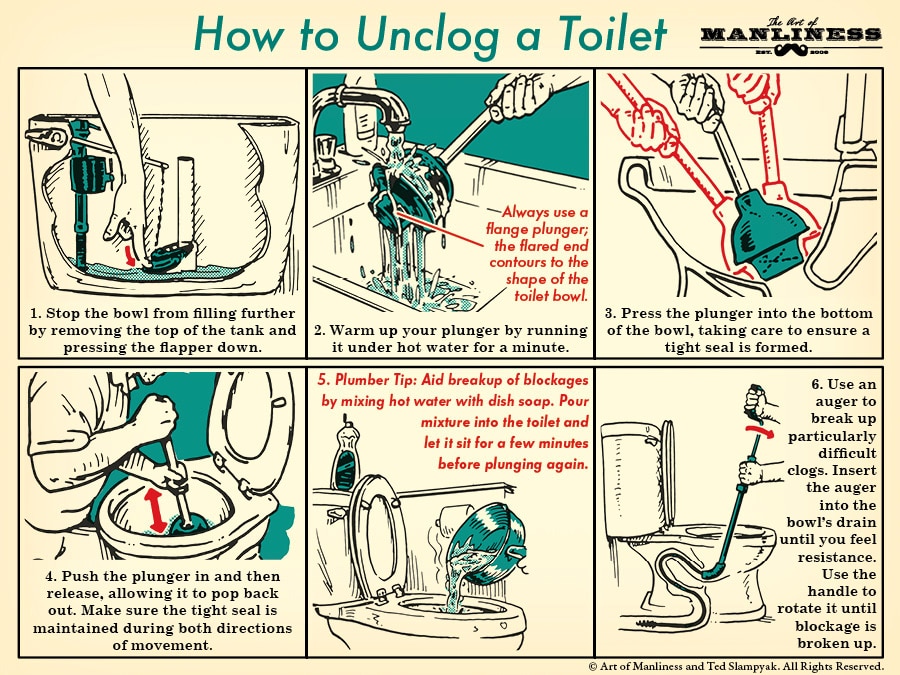
There are few annoyances worse than turning on a garbage disposal, expecting the roar of industrial steel tearing through your refuse, and being met with either an nasty grinding sound or the dull, electric hum of failure. That disposal under your sink can be intimidating to fix if you’ve never dealt with one before. Just as we showed you the best way to unclog a toilet, there are a few quick steps that can solve the majority of your disposal woes.
First though, let’s look at some common items you don’t want to put down the drain.
An Ounce of Prevention: What NOT to Put Down the Drain
The best method for unclogging your garbage disposal is naturally to not get it clogged in the first place!
There are a number of known culprits that tend to more easily muck up this household device. There’s the obvious non-food stuff like bottle caps, small toys (from unknowing kids), the occasional small utensil that can find its way into the drain without your knowing, etc. But there are a handful of food-related saboteurs that may not be so obvious. All the below items should remain out of your disposal to the best of your ability (that is, if small amounts of these things slip in, it’s not a huge deal, but don’t make it a habit):
- Bones/seafood shells (from steaks, chicken, turkey, lobster, oysters, etc.)
- Coffee grounds (they condense into a thick, gooey mess)
- Oatmeal, pasta, rice — anything that expands in water (small amounts are okay, but don’t put entire dishes of the stuff through the disposal)
- Nuts (how do you think peanut butter is made?)
- Onion skins (can avoid the blades and end up in your plumbing in their entirety)
- Egg shells (more about the thin membrane inside the shells, which can do the same thing as the onion skins above)
- Fibrous vegetables (celery, pumpkin, squash, etc.)
- Potato peels (see onion skins and egg shells above)
- Fruit pits/peels
- Paint (can adhere to your disposal/piping, eventually causing hard-to-remedy buildups)
Should any of the above items manage to clog up your disposal, put on your DIY hat, and proceed to the below steps to get things fixed up in a jiffy.
How to Unclog Your Garbage Disposal
IMPORTANT — Before You Begin DIY-ing
While fixing and removing an obstruction is fairly straightforward, there are a few safety steps and common rules you want to follow to avoid an embarrassing call to the plumber, or a terrifying trip to the ER.
- Shut off the power! If you’re like me, you get flashbacks to Final Destination 2 any time you have to work with the disposal. Either unplug it, or if you can’t do that, switch off the circuit breaker providing electricity to the disposal. Far better to be safe than sorry!
- Don’t try to remove the disposal from your sink. While it may have to be removed if it’s a serious clog, don’t take it apart unless you absolutely have to. You risk damaging the waterproof seal between the drain and the actual machine. Plus, when you’re working in a confined space, removing it is a whole lot easier than putting it back together.
- Shut off the water supply if you’re going to have to remove any pipes. You don’t want to accidentally make things worse by unintentionally stopping for a drink of water midway through repairs. Make sure there’s no risk of soaking your kitchen.
What You’ll Need
- Rubber or latex gloves (it’s gonna get gross)
- Garbage bag for dirty or removed items
- Plastic tub to catch any water that may drain out
- Wire brush or pipe cleaner
- Disposal jam or ¼” Allen wrench
- Screwdriver
Step 1: Go in From the Top
After you’ve taken the precaution of cutting the power, put on some gloves and carefully use your fingers to feel around in the disposal. If you’ve been hearing a grinding sound when you turn it on, something large may be obstructing the blades (like a whiskey stone from the adult beverage you enjoyed the night before), and fixing the problem may be as simple as pulling it out.
If you’re still getting just an electric hum, it may be something smaller in between the blades or deeper down the drain. Proceed to the next step.
Step 2: Attack From Below!
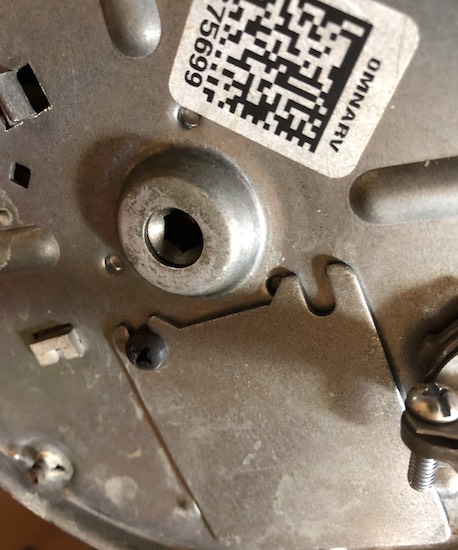
Manual crank.
The easiest way to remove an obstruction is to manually operate the disposal. At the very bottom of the machine is a small, hexagonal indention. Using a universal jam wrench (or an Allen wrench to save a few dollars), turn the blades back and forth, maybe even doing a few full rotations of the blades.
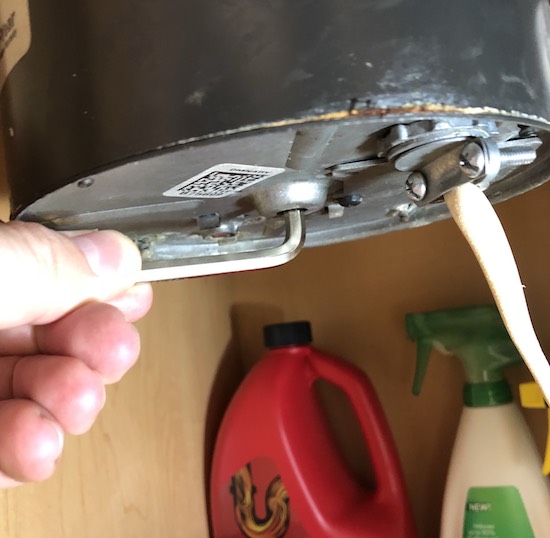
Operating the manual crank.
If there’s an obstruction, you’ll likely be able to hear it as you turn the blades. A few rotations tend to loosen whatever is blocking the motor, and you can then reach back into the sink and pull it out. In my case, it was a half dozen aquarium rocks my well-meaning daughter had rinsed out of Scuba Steve’s tank.
Note that some models may have a reversing switch that accomplishes the same action.
Step 3: Still No Luck? Time to Disconnect Piping
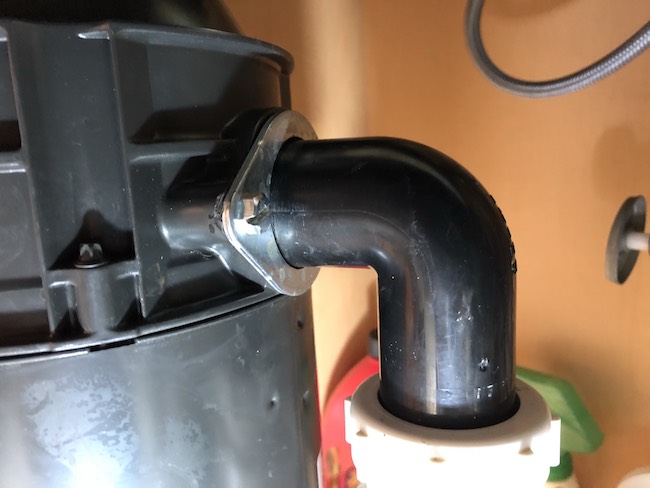
The pipe you want to focus on.
If you remove a few small obstructions and it still isn’t working, then something is clogging it up from below — likely in the plumbing itself. You’ll need to disconnect the piping. (Not the dishwasher hose, which is smaller/narrower and connected higher up on the disposal; that’s only given attention if your dishwasher is having problems draining.)
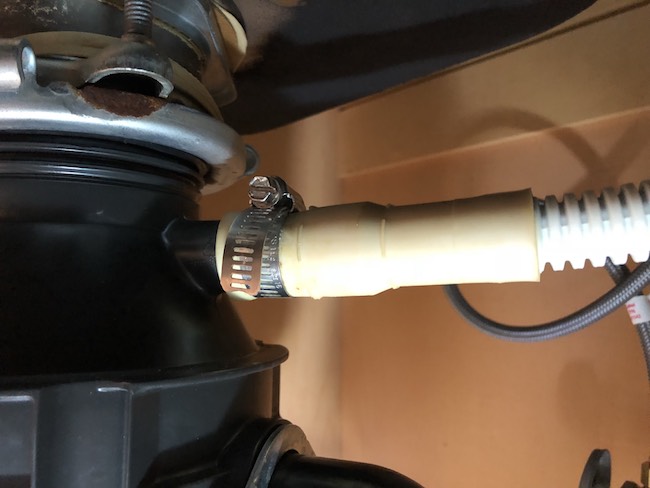
Dishwasher hose.
Once you’ve disconnected the pipe, run a wire brush through to unclog and possibly remove the blockage. Re-connect the pipe, and proceed to the next step.
Step 4: Re-Connect Power and Hit the Reset
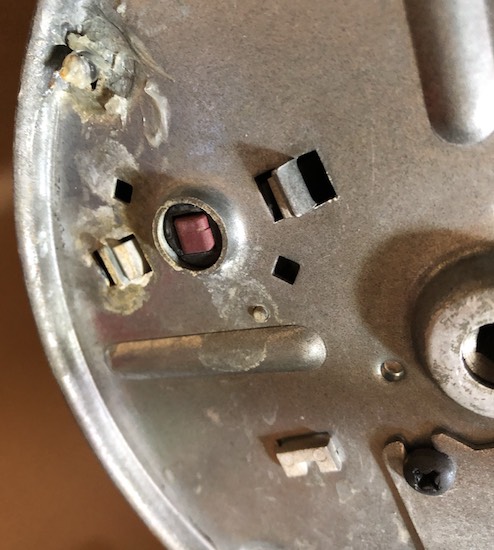
Red reset button.
Like a power outlet or circuit breaker, a garbage disposal has a safety mechanism that trips if something goes wrong. It’s down at the bottom of the disposal, near the manual crank. It’s usually a red, rectangular button that pops out like a GFCI button on an outlet. Once you’ve hooked everything back up and are ready for a test, push the safety button back into place and give it test.
Step 5: Celebrate!
Crack open the celebratory beverage of your choice as your wife or girlfriend marvels at your money-saving handyman skills. Just don’t drop the bottle cap down the disposal.
_________________________________
Will Whitson is a news producer and long-time AoM reader. He lives with his wife and daughter outside Washington D.C.