This article series is now available as a professionally formatted, distraction free paperback or ebook to read offline at your leisure.
Fssssssshhhhh….
“Just jiggle the handle…”
Have you heard that before? Yep, that wonderful sound of a rogue toilet. You lift the lid, poke things a little, and hope the pot fixes itself.
My late father had many fine qualities, but aside from knowing which end of the hammer was for hitting, he was not a handyman. If something broke, he would rig it as best he could, but since this was before duct tape, his solutions were sometimes more creative than effective. Replacing toilet guts might as well have been brain surgery.
Even if you’re not “handy,” you can fix a running toilet rather easily, and many other things as well. The key is the right tools, the right parts, the ability to read, the discipline to not take short cuts, and patience.
The truth is that a toilet is a simple thing. There are two moving parts: the float and valve assembly, and the stopper that controls the release of water. When you release 1.6 gallons of water, it splits between the top of the bowl and the bottom, creating a Venturi effect that sucks down (hopefully) the waste.
But moving parts wear out, bend, come loose, or just give up the ghost. If your toilet is running or not working, take the following steps.
1) Check the connection between the handle and the stopper valve. A chain of some sort will connect the handle with the stopper, and pushing the handle opens the stopper valve. That’s why jiggling the handle will sometimes help the stopper close properly, but it’s not a permanent fix. If the chain is disconnected entirely, the toilet will obviously not flush.
2) Check the stopper valve. It should easily flop into its “seat” and seal the tank. If the stopper valve is not seating properly, then the toilet runs and wastes a lot of water. Sometimes you can tweak the hinge on the valve to get it to seat properly. If not, it’ll need replacing.
3) Check the float. The traditional float is a big ball at the end of a rod that controls the valve that fills the tank after a flush. More common these days is a donut-shaped float that slides up and down on the overflow tube, or an internal float that shuts the water valve when it hits a certain level. Either way, if the tank isn’t filling up as much as needed to flush properly, make sure the float isn’t leaking. If it is, it’ll need replacing.
Let’s say all your poking and prodding isn’t doing the trick. Lucky you! You get to replace the toilet guts. So go buy the toilet guts. You can get them almost anywhere. No need to be a plumber, just go to the local hardware store and ask for toilet guts (or something like that). They are almost always sold as one unit, and they’re inexpensive enough that you can replace the whole thing easier than replacing specific parts. You may also decide to replace the supply hose, since you’re already messing around there.
You can spend a lot or a little. The expensive ones are quieter, but other than that, it doesn’t matter. Fifteen bucks will do the job. It’s a toilet.
Remove Old Toilet Guts
1) Pee. The sound of all that water flowing will no doubt cause an increase in urgency.
2) Disconnect the flushing handle from the stopper on the inside. It should be a simple chain or other mechanism you can do by hand.

Note the crusties around the top of the drain tube. Just some calcium, not part of the pipe. It’ll break right off. If you’re highly anal you can nuke the whole tank with vinegar. That said…it’s a toilet.
3) Shut off the water. The valve below the toilet gets very little use. Sometimes it’s a little corroded or encrusted with hard water minerals, since the last time it was used was when the toilet was installed or the mechanism replaced. A little vinegar and a soft wire brush can clean it up a little. Close it tightly. Place an old towel or two under the faucet to catch water when you unhook the supply hose.

4) Drain the tank. Easy to do–flush the toilet by reaching in and pulling the stopper up. The tank will not refill because you shut the water off. To keep things a little neater, you could sponge out the remaining water and wring it into the bowl. It makes for less dripping later.
You’ll notice I use braided steel-covered supply lines. They’re probably overkill, but it’s cheap insurance. Your mileage may vary.

5) Loosen the supply hose at the valve. Use a proper wrench…not a crescent wrench. Let it drain into a small pan. Then loosen the supply hose at the fitting under the tank. This is usually a plastic nut or wing nut that you can hand-tighten or loosen. If it’s really stuck, carefully use a pair of Channel Locks to urge it along. Proceed carefully here.

6) Loosen the big, plastic nut under the tank where the supply hose entered. It’s a bigger plastic knob that attaches the guts on the inside of the toilet. Water will leak out here, but it’s clean water, just like from the tap. Continue to loosen it and remove the guts.
7) Pull off the old stopper thing.
Congrats, your toilet is now dry and useless. Time to fix that problem. Here’s the dead one below.

Install New Toilet Guts
1) Reinstall the new guts by dropping it through the hole in the tank. There should be quite a bit of gasketing here. Make sure the area is clean so the new gasket seals properly. Get a friend to hold it in place while you tighten the big nut underneath the tank. If you overtighten it, you might crack the plastic, so just go until it’s snug.
Proper building code says that the overflow tube has to be at least an inch above the full level. Different assemblies adjust differently. This one adjusts by twisting the whole mechanism and sliding it up and down, then twisting to lock it. The float is internal in that white part that sticks off to the side of the water feed.

2) Attach the supply hose to the bottom of the tank. Finger tight only, but do turn it until it stops. No need to use Teflon tape here; it’s plastic to plastic. No wrenches.

3) Attach the supply hose to the faucet. Here it’s metal to metal, so use a bit of Teflon tape. Just wrap the threads, then re-attach. Non-crescent wrenches work best.

4) Turn the water on, check for leaks. Your fill hose should squirt into the overflow as noted. The tank won’t fill here, you’re just checking your connections. Turn the water off.
5) Install your new stopper thing by pushing the plastic studs on the overflow tube through the soft rubber of the flapper. It should go on easy.

6) Reattach the chain from the stopper to the toilet handle, adjusting the chain so it is as taut as possible without lifting the stopper. Test by flushing a few times. The stopper should drop on its seat when the water reaches the bottom of the tank. If it doesn’t, adjust it a little until it does so consistently. When it doesn’t seat, that’s when you have to jiggle the handle to get it to do so. That’s what we’re trying to avoid.
7) Clean up. There will be black goo on things. That’s not what you think it is — it’s just deposits that form inside the tank over time.
That’s it. Your toilet is now operational again, simple as that. Drink a few beverages of your choice and test it again. Congratulate yourself on a job well done.
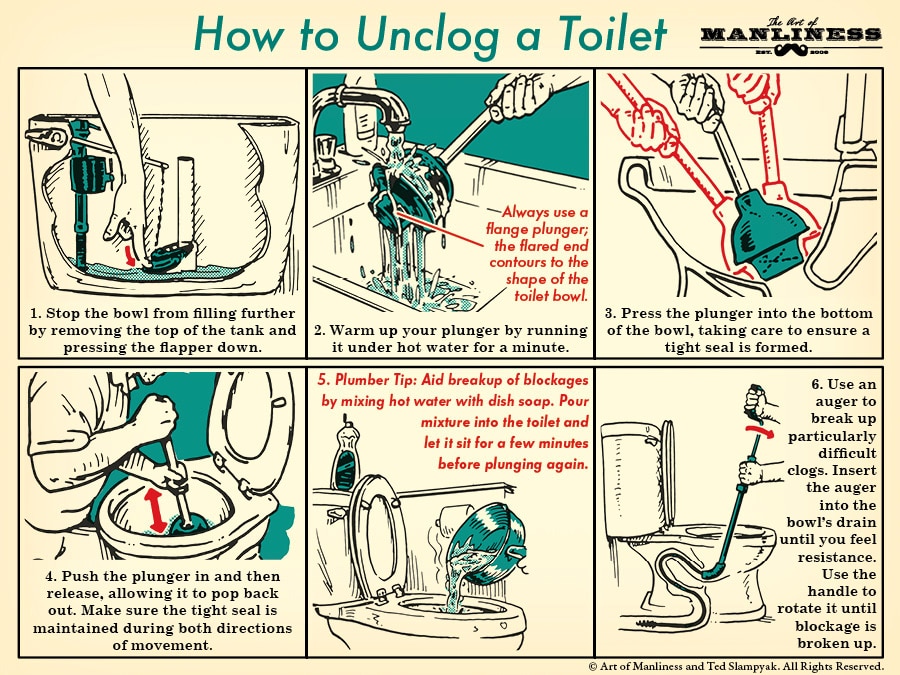
To fix another common toilet-related problem–how to unclog one–see this AoM post.