The following is an adapted excerpt from The Disaster-Ready Home: A Step-by-Step Emergency Preparedness Manual for Sheltering in Place by Creek Stewart.
A long-term food storage pantry is designed to provide a buffer of food for you and your family in case of unexpected shortages due to a large-scale disaster of some kind. Long-term food storage can take many different forms, but is primarily comprised of three types of food:
- Shelf-stable grocery store items such as canned goods, boxed meals, and dry pastas.
- Freeze-dried food that has a 30+ year shelf life.
- Bulk dry goods such as beans, rice, and grains.
Bulk dry goods are foods, typically seeds or grains, that can be purchased in bulk in large bags or buckets. While this is likely the category that will be least familiar to most people, it is also the category that presents the greatest opportunity to amass the most amount of food for the least amount of money. While you may have purchased 1-pound bags of rice or beans at the grocery store, not many people have purchased 50-pound bags of rice, lentils, oats, elbow pasta, or whole-wheat berries.
If repackaged and stored properly at home, bulk dry goods can last 20+ years. This makes them a fantastic option for a “set it and forget it” buffer of backup survival food. A free PDF publication by the Federal Emergency Management Agency (FEMA) titled “Food and Water in an Emergency” states that whole-wheat berries, dried corn, soybeans, pasta, and white rice all have an indefinite shelf life when properly stored.
I would argue there are many more dry bulk foods that do as well. If packaged and stored properly, bulk dry foods can last as long as freeze-dried foods. One of the big advantages is that bulk dry goods are very inexpensive in comparison. In fact, just a few hundred dollars’ worth of bulk beans, lentils, and rice can feed a family for several months. These items, along with some spices for flavoring are always my suggestions for people who are looking for some quick long-term food storage and are on a very tight budget.
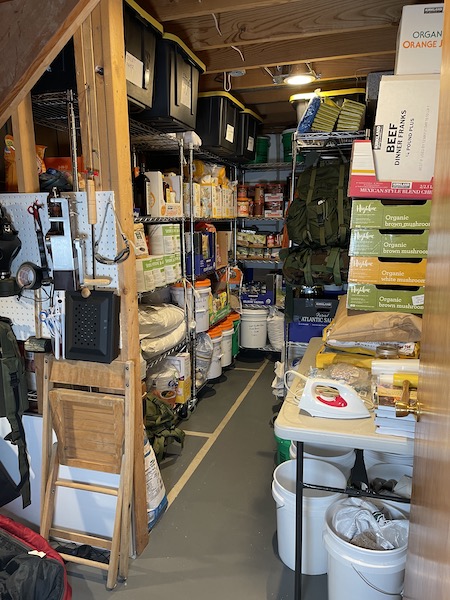
A variety of bulk dry goods, ready to be repackaged for long-term storage.
One downside of bulk dry foods for survival is that they’re especially susceptible to moisture, oxygen, pests, and sunlight. These seeds, beans, and grains are durable when stored properly but extremely vulnerable when not. The problem is that most of these goods are sold in large paper bags or, if you are lucky, a cheap plastic bucket. This may work for restaurants or large catering companies that will use the goods within a few days, but it does not work for the long-term food pantry enthusiast who wishes to stash away said goods for twenty years or more. The good news is that I will teach you how to store these items in a way that keeps all the threats at bay.
The process outlined in the next section will give you peace of mind in knowing that the investment you have made (in time and money) in your long-term food storage is protected for many years to come.
How to Repackage Bulk Dry Goods at Home for Long-Term Storage
The best container for repackaging bulk dry goods is a 5-gallon plastic bucket with a waterproof lid—they are cheap, readily available, and stack well. They also help protect the food inside from three of our four main threats: water, sunlight, and pests. However, they do not protect your food from oxygen. Because of that you will need an oxygen barrier and absorber. This is why we use Mylar bags and oxygen absorbers.
Mylar was developed by DuPont in the 1950s and revolutionized the food packaging industry. It is technically a metalized polyester—a polyester bag coated in aluminum. This combination makes the bag a superior barrier against moisture and gases, including our nemesis oxygen. When you package bulk dry goods in Mylar bags and then pack them inside durable sealed plastic buckets, you can essentially create a time capsule of food and a microclimate of protection around it.
Below, you’ll find the step-by-step process I recommend for repackaging.
Purchasing Materials
Purchase the plastic 5-gallon buckets from your local hardware store. A food-grade bucket is best but not necessary because of the Mylar lining you will be using. I purchase my buckets from stores like Lowe’s, Home Depot, or Menards. You will also need to purchase lids. I suggest spending the extra few dollars on what is called a gamma seal lid. This type of lid is unique in that the center screws out and gives you easy access to the contents without having to remove the lid. This is a convenience, not a necessity. If you are on a tight budget, you can opt for a regular lid.
While you’re shopping, you’ll also need a rubber mallet to seal the lids (either style) and a bucket wrench for getting the lids off once they’re on. If your local hardware store does not have a bucket wrench, just do a quick online search for “bucket wrench,” and many options will pop up.
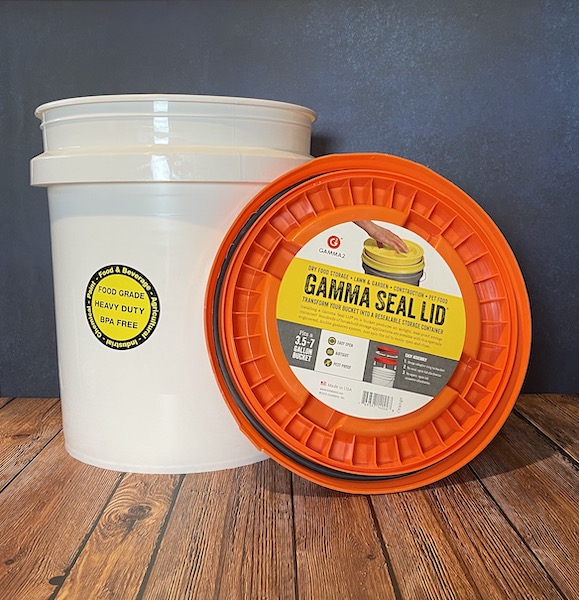
5-gallon food-grade plastic bucket with a gamma seal lid can be used as a storage container for bulk dry foods.
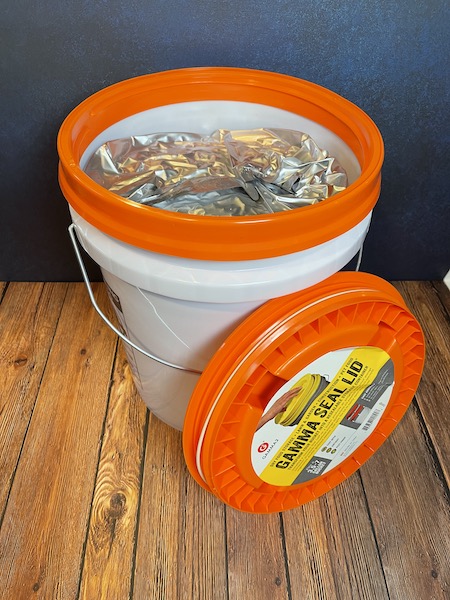
Once the outer ring of the gamma seal lid is snapped onto a bucket, the inner portion of the lid can be screwed out for convenient access to the food inside.
You will also need to purchase Mylar bags and some oxygen absorbers to seal inside with your food. The Mylar bags keep oxygen out once you seal your food inside. The oxygen absorbers soak up any oxygen that you seal inside of the bag with your food. You will need to buy either 5-gallon or 6-gallon Mylar bags (6-gallon bags give you a little more wiggle room but are not necessary). Oxygen absorbers come in many different sizes for different-sized containers. The size you will need for 5-gallon buckets is 2000cc. Often you will find Mylar bags and 2000cc oxygen absorbers sold together. You can find these online at MylarPro, PackFreshUSA, or Amazon.
Once you have these supplies and your dry bulk goods, you are ready to repackage.
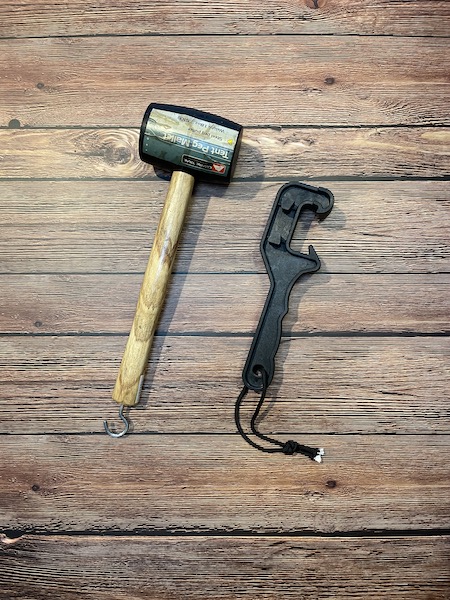
Tools needed to repackage food in 5-gallon plastic buckets include a rubber mallet for hammering on the lid and a bucket wrench for getting the lid off.
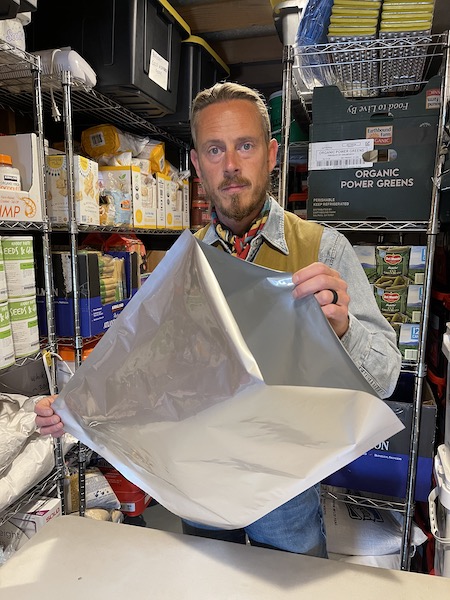
A 5-gallon Mylar bag acts as an oxygen barrier to protect the food stored inside plastic containers.
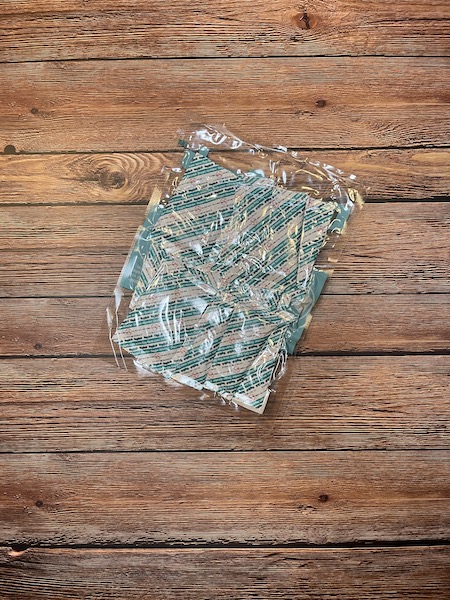
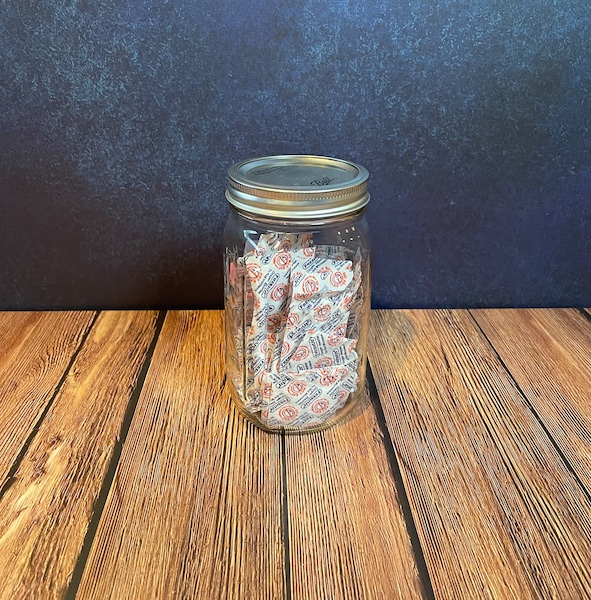
This vacuum-sealed package contains 2000cc oxygen absorbers that will be opened and placed individually inside Mylar bags with food. These will absorb any trapped oxygen inside the Mylar bag with the food. These must be kept sealed until ready for use.
Oxygen Absorber Tips
Oxygen absorbers will immediately start absorbing oxygen when taken out of the airtight package they are shipped in. They will be fully spent in roughly 30 minutes, so you do not want to just open your oxygen absorbers and leave them sitting on the table while you are repackaging. While it is best to use an entire package of oxygen absorbers once it is opened, it is not always realistic to fill ten or twenty 5-gallon buckets of food at a time. My solution is to store the absorbers in a simple 1-quart glass Mason canning jar with an airtight canning lid. The lid with the screw-on rim creates a tight seal that does not allow oxygen to get inside and keeps my oxygen absorbers fresh in between filling buckets or until the next time I repackage.
Step 1: Prepping Your Bucket
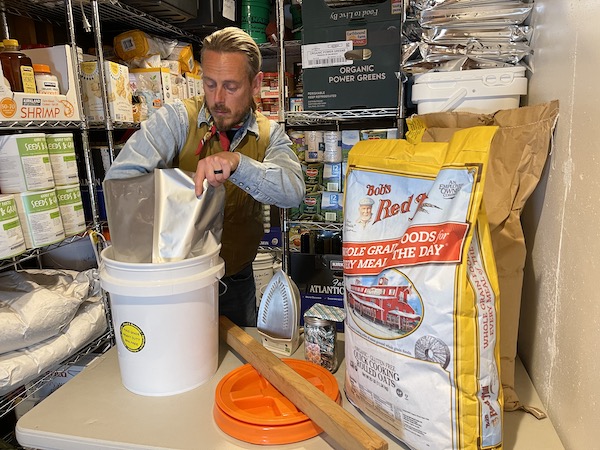
Put your bucket on a sturdy work surface, put your Mylar bag inside, and spread it open in the bucket a little bit. You do not have to be too meticulous about this because the weight of the food will do most of the work.
Step 2: Filling Your Bucket
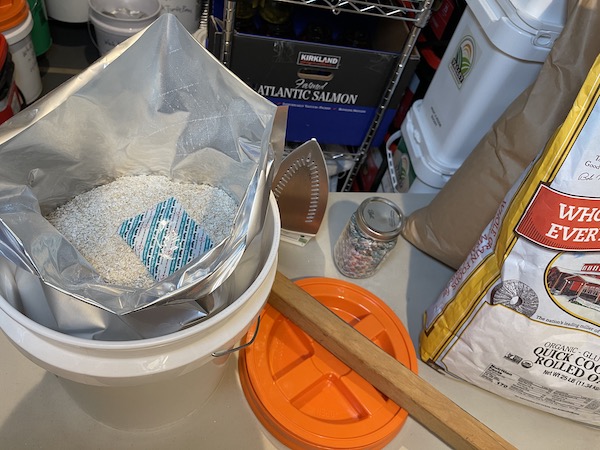
Pour your dry bulk food (grains, beans, rice, pasta, and so on) into the Mylar bag, shaking the bucket a little bit as you go to help the food settle. Fill the bucket to within about 2 inches from the top. Toss one 2000cc oxygen absorber right on top.
Step 3: Sealing Your Mylar Bag
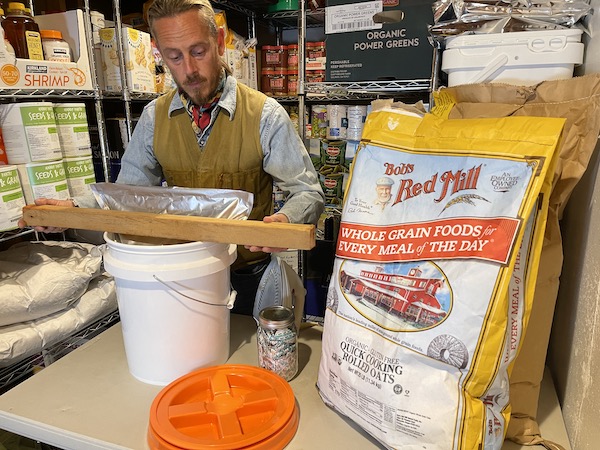
1. Place a 2 × 4-inch or 2 × 2-inch board across the rim of the bucket. This creates a smooth, solid surface against which to seal your bag.
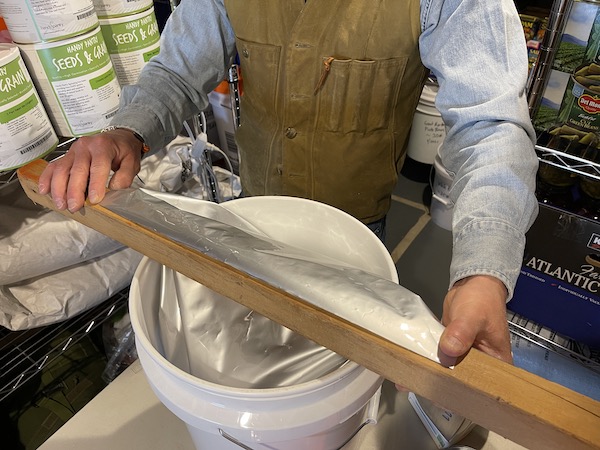
2. Neatly fold the top of the Mylar bag across and over the board and smooth it out with your hands.
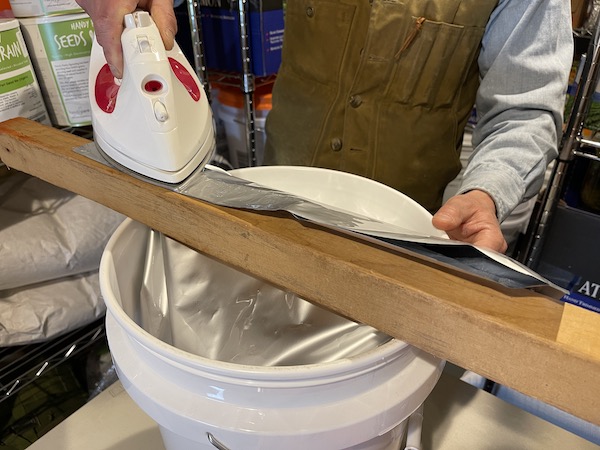
3. Mylar seals with heat, and the best tool I have used for the job is a home clothes iron set on the cotton setting. Start in the middle and work your way out to each side. You’ll see the Mylar seal as you run the hot iron over it. Leave about a 3-inch opening in the Mylar bag before you completely close out the second side.
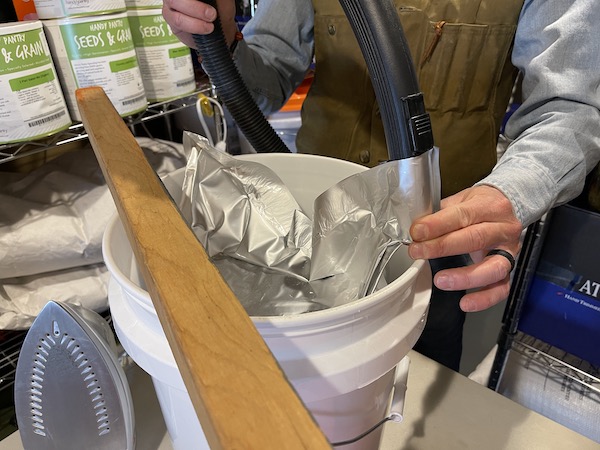
4. Use a Shop-Vac or vacuum cleaner hose to suck out as much air as you can from the bag, then quickly seal up the last 3 inches with the hot iron. As long as you keep the tip of your Shop-Vac or vacuum cleaner hose several inches away from the dry goods you will not run the risk of sucking any up.
Step 4: Closing Your Bucket

Neatly tuck the top of the Mylar bag into the bucket and use the rubber mallet to
hammer the rim of the gamma seal lid into place. You have to hit it surprisingly hard to make sure the lid is pushed down to the seal. You will know when it is seated correctly because it will snap into place. Then, screw in the center of your gamma seal lid.
Step 5: Labeling Your Bucket

Finally, label your bucket with the following for easy visual inventory in your long-term food storage pantry:
- Date of packaging
- Quantity of contents
You can write right on the bucket with a Sharpie marker or use a label or duct tape. Once done, these buckets are ready to store in a cool, dry place out of direct sunlight. Once opened, there is no need to replace the oxygen absorbers or reseal the Mylar bag as long as you plan on eating the food within several months. As long as they are kept away from moisture, sun, heat, and pests, dry bulk foods are shelf stable for many months on their own.
A Note About Killing Insects, Insect Eggs, and Larvae
Like it or not, there are live insects, insect eggs, and/or larvae in pretty much all bulk dry food goods. It’s just a fact of life. They can be microscopic and undetectable to the human eye at the time of storage. Over time, they can hatch, grow, reproduce in and feed on the food inside of a bulk packaged container. I take two measures with my bulk packed food to help prevent this from happening and destroying my investment of time, materials, and money.
Oxygen absorbers are the first step in preventing insect infestation. Sucking out available air as described and then reducing the oxygen within the sealed Mylar bag with oxygen absorbers creates an environment that is not easily compatible with life, even for insects.
I place each of my bulk packaged containers into a chest freezer for three days. In fact, I have a small chest freezer in my basement dedicated for this purpose that I purchased for $50. It fits three 5-gallon buckets perfectly. Neither step is 100 percent effective at killing all insects, eggs, or larvae, but when combined, they have worked very well for me over the years.
Diatomaceous earth (DE) is also an option to kill insects in food storage. Diatomaceous earth is a powder made from ground fossilized remains of a plankton called diatoms. This powder has been used for a very long time to deter, control, and kill insects. The sharp edges of these ground remains cut through the insect’s exoskeleton and cause it to dry out and die. It does not work on insect eggs and only works on insects with an exoskeleton. According to a Utah-based supplier of DE, 2 teaspoons of DE should be used for every pound of stored food. The powder should be mixed directly with the dry food at the time of storage.
Conclusion
I consider bulk dry goods to be a great solution for “fast action food storage” on a budget. Bulk dry goods don’t have the variety or flavor of freeze-dried food products, but they don’t have the price tag either. If you’re looking for a set-it-and-forget it option to long-term food storage, this is it. In just one trip to a buyer’s club like Sam’s or Costco, you can purchase enough food to feed your family for months without breaking the bank. Don’t forget spices and flavorings because you’ll need them!
Remember, it’s not IF but WHEN.
__________________________________
Creek Stewart is the author of The Disaster-Ready Home which shares practical, affordable, and achievable disaster preparedness projects for the average household. Learn more about Creek at https://www.creekstewart.com.