A couple months ago my fancy DSLR camera that I use for work purposes crapped out on me. It was a decade old so it wasn’t too surprising. The question, then, was whether to buy another professional camera or just upgrade to an iPhone Pro. After plenty of research, I came to the conclusion that the difference in quality and functionality for the layman photographer (which includes me; I take photos for work, but taking photos isn’t my job) between a pro camera and a smartphone camera just isn’t great enough to justify having two separate pieces of tech.
The smartphone cameras of 2020 are true wonders of technology. Not only is the photo quality exceptional, but the free editing functions are akin to software that used to cost hundreds of dollars. Unless you’re a professional photographer (or a very serious amateur), there just isn’t much need to venture beyond the device in your pocket.
Yet even with its suite of built-in features, taking great pictures with your phone isn’t necessarily easy or intuitive. After I got an iPhone Pro, I took a couple classes to get the hang of the phone as well as learn some basic photography skills and I’ve been thrilled with the results. Below are what I consider the simplest and most effective tips to upgrade the photos you’re taking with your smartphone.
1. Use Grid Lines (At First)

One of the classic tenets of photography (and most visual art mediums) is the “rule of thirds.” An image should be broken into thirds, both horizontally and vertically. As a grid, this makes for nine squares. Your instinct is probably to put the main subject of your photo right in the center. Don’t do that. Instead, place the subject — whatever you’re trying to take a picture of and draw people’s eyes to — near one of the four intersecting points.
To get acquainted with using the rule of thirds, you can easily make those grid lines show up right on your camera screen:
- iPhone: “Settings” —> “Camera” —> toggle “Grid” on
- Android: from Camera app, go to “Settings” —> scroll down to “Grid Lines” and toggle on
Once you get used to the grid, you’ll naturally get better at composing your photos, and you can turn the grid lines off.
In addition to helping you follow the rule of thirds, using grid lines also helps accomplish another key tenet of good photography (and design in general): embracing negative/white space. Rather than filling up the entire photo with your main subject, you want to leave white space around it, which actually better draws the eye towards your focal point. Whether you’re taking a picture of a person, a mountain, or a plate of food, the primary focus of the photo, in most cases, shouldn’t compose more than ⅓ to ½ of the total area in your frame.
Look at the photo above. By using the rule of thirds and placing the primary focus — my son’s beaming face — at one of the grid intersections, I’ve given nearly ⅔ of the photo to “negative” space.
2. Don’t Zoom In
Whatever you do, don’t use the pinch-to-zoom function on your phone’s camera. Without getting into the tech, the vast majority of phones use a digital zoom, which pixelates and blurs your photo. Professional photographers use different lenses and simple physical proximity (they get closer to the subject when they want to “zoom” in). You have two options better than pinching to zoom:
- Take a photo without zooming. You’ll probably better accomplish the rule of thirds and using white space, anyway. That said, if you still feel the need to zoom, edit the photo afterwards. The quality of smartphone photos is good enough that you can often zoom in and crop things just how you want after the fact without losing much in the way of quality. Much better to zoom in on a photo already taken than while taking the photo.
- Use the photographer’s trick and simply get physically closer to your subject.
Some models, like my iPhone 11 Pro, have what’s called optical zoom, which is functionally like a photographer switching out lenses. This feature works great, if you have it. Google your phone to see if it has optical zoom; unless you have the newest high-end model, it probably doesn’t.
3. Focus Appropriately
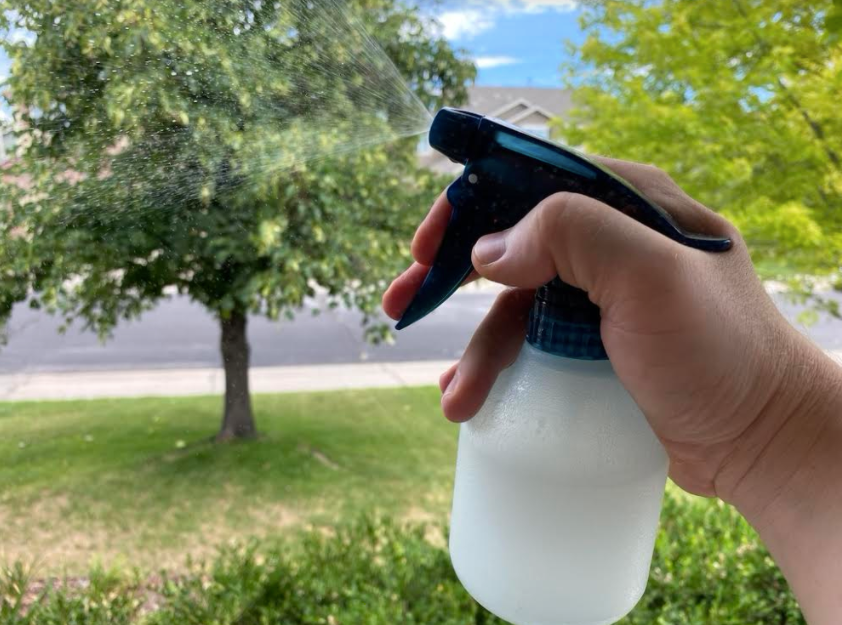
If the trees in the background were as much in focus as the spray bottle, this picture I took for my article on DIY bug spray wouldn’t be nearly as good.
Smartphone cameras are very smart nowadays. Using portrait/live focus mode, available on most new-ish models for both iPhones and Samsung devices, you can easily simulate what a professional photographer expertly does with what’s called depth of field — a clearly focused subject with a blurred background. It’s a stunning effect which clearly separates foreground from background and instantly gives a professional look to your smartphone photos. Don’t neglect portrait/live focus mode.

Portrait mode can make an everyday photo look professional. And sometimes, the subject is cute enough to ignore the rule of thirds.
While portrait mode often only works with human faces (except for the latest iPhone and Galaxy devices, which can create the effect with non-human subjects), there are apps you can use to edit your photos afterwards. Before getting an iPhone Pro, I used Focos and found it to work great.
Even if not using that mode, it’s best to “manually” focus on what you want the subject of the photo to be. If you’re taking a picture of your dog, tap the dog on the screen so that the camera focuses there instead of on the park in the background. It can make a big difference.
4. Spend Time Getting to Know Your Smartphone Camera

If like me, you’ve been part of the smartphone landscape since its inception, you probably just open your camera app, point it appropriately, and hit the button. That’s indeed the apex of what the tech was initially capable of — the intention was never to replace “real” cameras. Fast forward to today: your smartphone camera is way more powerful than those real cameras you were buying a decade ago. I recently happened upon an old camera from college that featured 4 megapixels, whereas my iPhone Pro sports 12 megapixels. It’s an insane leap in technology.
Your phone’s camera features an array of settings, capabilities, and editing functions that I can almost guarantee you aren’t aware of. Beyond taking a photography class that was focused on composing good photos, I spent some time with a couple of iPhone guides that were dedicated to understanding the technology and the various built-in functions of my particular smartphone. No matter your phone, there are numerous guides (both free and paid) available online that you can use to familiarize yourself with it and start taking even better pics.