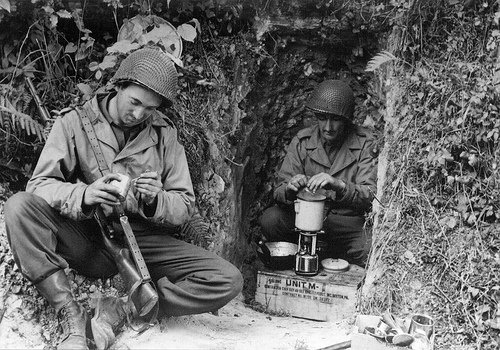
The EE-8 Field Telephone was used by the Army’s Signal Corps shortly before the beginning of World War II and up through Vietnam. Carried in a leather (and then canvas and eventually nylon) case by a strap slung over the shoulder, the portable ten pound phones replaced the telegraph and flag signals as a more effective and efficient way for commanders and troops to keep in touch on the battlefield. Two phones could be wired together directly, or several phones could be connected to a common operator, which could put any one phone in contact with any other in the group.

A hand-generated crank on the side of the phone was turned in order to signal another phone or the operator. The signal range between these rugged, self-contained phones varied according to the type of wire used to connect them, and the conditions in which the wire was situated (wet, dry, in the air, or on the ground), but generally averaged about 11-17 miles. However, a direct, point-to-point connection made with copper wire could extend the range up to an astounding 360 miles.

After the war, the government’s glut of surplus EE-8’s were sold to civilian households as a way for mom to call dad out in the garage to tell him dinner was ready.
These days, there isn’t much use for old field phones, unless you have a pair or more. While I love all things vintage, unless they’re very rare, I’m not one for fetishizing antiques, insisting that they remain preserved on shelves or gathering dust in the attic. Rather than just looking at them, I love to find a way to put them to use again in my daily life. So with the help of my electrical engineer brother-in-law, Ryan Davis, we decided to mod the EE-8 for the modern age, turning it into a Bluetooth headset that could be paired with a smartphone or even your computer for VoIP calls.
You might be asking yourself, “Is there a functional reason to do this, Brett?” No sir, there is not. This project is about the pure fun of tinkering.
But bear in mind that unlike the incredibly simple shoe shine box I showed you this week, this project is not for the faint of heart. It requires moderate soldering skills and some rudimentary knowledge of electronics. All-in-all, this project will probably take up to four hours to accomplish.
Here’s how it’s done.
Materials & Tools Needed

- EE-8 Field Phone. You can find these on eBay and flea markets. Price varies by age and condition.
- Bluetooth headset chip. We bought an Earforce PBT Bluetooth headset by TurtleBeach for $10 at Bestbuy.
- Boost converter. Available at Radio Shack for a couple bucks.
- Wire. Just plain old copper electrical wire. We used a mixture of 26 and 30 gauge wire.
- Screwdriver
- Soldering iron
- Peg board
Remove the Field Phone from Its Case & Unscrew the Top

To remove the field phone from the case, you’ll first need to remove the screws from the crank handle on the side.

See that receiver switch on the right? We’re going to remove that from the top. Also, see that plate with the three wires coming off of it? We’re going to remove that, too.

There are two screws on the underside of the receiver. Remove them and set them aside someplace safe. In this pic, we’ve already removed the left screw.

Here’s the receiver detached from the top of the field phone.

Now it’s time to take off the top plate. Unscrew that screw on the right.

There’s a screw that looks like a pin. We need to remove that, too.
Mod the Receiver
If you’ve ever used a Bluetooth earpiece, you know that whenever you want to take or end a call, you press a small button on the earpiece. The receiver switch on our field phone will take on the functions that the button on the Bluetooth receiver had. To take a call on the field phone, we simply tap the receiver switch once; to end a call, we tap it again. Pretty cool, huh?
Ryan had to hack the receiver switch a bit in order for our Bluetooth mod to work. The field phone’s receiver switch is spring loaded so that it is depressed when the weight of the handset is rested on it. In this state, the switch is open, and the EE-8 is offline. The EE-8 comes online when the handset is lifted and the switch closes.
For our Bluetooth mod to work, we needed the switch to be open only if the handset wasn’t resting on the receiver switch. To do that, Ryan put a piece of electrical tape between the plates to keep them from making contact with each other when the handset was not resting on the switch. He soldered a ring around the plates so that they made contact when the handset was resting on the receiver switch. This turned a normally closed switch into an open switch.

To turn a normally closed switch into an open one, Ryan put a piece of duct tape between the plates and soldered a ring contact around them.

Here’s a zoomed out picture of the ring soldered around the plates.

Top view of soldered switch plates.

We need to connect some new wire to the soldering terminals on the receiver switch. These wires will eventually lead to the button terminals on the Bluetooth headset,

Another angle of the receiver switch terminals.
Add LEDs

We added some red and green panel LEDs to the top of the field phone. Not only do they look cool, but they serve an actual function. They’ll alternate on and off whenever the bluetooth chip is in sync mode and the green light will flash whenever you receive a phone call. To add the LEDs, simply drill two 5/32” size holes and insert lights.

The panel LEDs come with the wires pre-soldered. You should have one black wire and one red wire connected to each light. These wires will eventually connect to the Bluetooth chip.
Connect New Wires to Terminals on Top Plate

On the underside of the top plate that we removed earlier, there are three terminals. There were some old wires that were worn out, so we replaced them with new ones. The terminal on the left is for the handset’s speaker. Attach a green wire to it. The middle terminal is the common terminal. Attach this wire to ground (the negative battery terminal). The terminal on the right is for the handset’s microphone. Attach a white wire to it.

There’s a terminal on top of the field phone that connects to the batteries. Connect a new red wire to it.

Here’s a pic of all the new wires we just added. Thread them through the hole on top of the field phone as shown above.
Dismantle Bluetooth Headset

Take your Bluetooth earpiece and remove the chip.

Here’s what our Bluetooth chip looked like out of the earpiece.
Connect Boost Converter to Bluetooth Chip

See that green rectangle next the to the Bluetooth chip? That’s a boost converter.
The Bluetooth chip requires a range of 3.7 to 4.2 volts of electricity to power up. However, the two DD batteries that power the field phone only put out three volts. What to do about this power gap? Answer: boost converter. A boost converter takes the three volts from the battery and “boosts” it up a voltage level so the chip gets the four volts that it needs.
We placed the Bluetooth chip and boost converter on a pegboard and connected the boost converter to the Bluetooth’s power source with wires behind the pegboard. Because the soldering terminals on the Bluetooth chip are so small, we used 30 gauge wire.
Connect Wires to Bluetooth Chip
Now comes the tricky part. We need to connect all the wires from the field phone to different parts of the Bluetooth chip. Every Bluetooth chip is different, so what we show you here might not work on other Bluetooth chips. You may have to use a scope to figure out which terminals on your Bluetooth chip are responsible for the microphone/LEDs/speaker/etc.
Again, because the soldering terminals are so small on the Bluetooth chip, we soldered 30 gauge wire to the soldering points first and then soldered the big wires running from the phone to the 30 gauge wires.
Connect Receiver Switch Wires to Bluetooth Button

Remember those new wires we connected to the field phone’s receiver switch terminals? We need to wire them in parallel to the Bluetooth button. Now the field phone’s receiver switch will do everything the Bluetooth earpiece button did.
Connect LED Wires to Bluetooth

We need to connect the two black status LED wires to the Bluetooth chips. The red wires will be connected to the boost converter.
Connect the Microphone Wire to Bluetooth

Earlier, we connected a white wire to the terminal on the field phone responsible for the microphone. We need to connect that wire to the microphone-in terminal on the Bluetooth chip. On our Bluetooth chip, the microphone-in terminal is on the back of the chip. Again, because the soldering terminals on the chip are so small, Ryan soldered 30 gauge wire to the chip terminal and soldered the 30 gauge wire to the larger, white wire.
Connect Speaker Wire to Bluetooth & Connect Power Wire to Boost Converter

Connect the speaker cable (green) to the speaker out terminal on the Bluetooth chip. On our chip, it was on the opposite side of the button’s side. Our power wire (red) connects to the boost converter. The ground wire (black) connects to the chip. Again, we connected 30 gauge wire to these wires before soldering to the Bluetooth terminals. We’ve already connected the microphone wire (white) to the Bluetooth microphone terminal.

Wire #1: Ground. Wire #2 (Green wire): Attaches to Bluetooth speaker terminal. Wire #3: Ground. Wire #4: Connects boost converter Output to Bluetooth power Input.

Here’s what all the wires look like on the front.

And here’s what they look like from behind. “I used the pegboard as scaffolding for the two chips and weaved and soldered wire to keep things in place,” Ryan said. “It’s kinda messy, but it got the job done.” Ryan covered the wires with double stick tape (that’s the red rectangles) to protect them from unconnecting and also to stick the finished board to the inside of the EE-8 housing.
Insert Double D Batteries and Put Field Phone Back in Case

Place DDs into battery respectable. The positive ends need to both point up. Put the field phone back in its case. You’re done!
How to Use Your WWII Field Phone Bluetooth Handset

Pick up the phone! It’s the general calling!
Here’s how to use your Bluetooth WWII field phone:
- Put field phone into sync mode by holding down receiver until red and green LEDs begin alternating on and off.
- Select bluetooth device on your smartphone.
- When you get a call, green LED will light up.
- To answer call, tap receiver once.
- To speak, push and hold switch on handset.
- To end call, tap receiver twice.
- If you want to make a call out, you’ll have to tap receiver once and dial number on your smartphone.
Here’s a video of it in action: