Looking to make your house cooler in the summer, warmer in the winter, and more energy efficient?
Got water leaking in through a window whenever it rains?
Would you like the interior and exterior trim of your house to look nicer?
If you answered yes to any of the questions above, you, my friend, need to get caulking.
Caulk is a material used to seal joints and seams in a structure. It’s everywhere in your house: around your windows and doors, in the joints between the wall and your bathtub, along your interior and exterior trim.
While caulk lasts a long time, it does wear down and deteriorate. To ensure your home is energy efficient and looks sharp to boot, you’ll want to touch up and replace your caulk as needed.
Below, we walk you through how to get started with caulking. Let’s gooooo!
Choosing Your Caulk
When you wander down the caulk aisle of a home improvement store, prepare to be overwhelmed. There is a crap ton of different kinds of caulk to choose from. But if you look closely, you’ll see that there are four basic types; the type you choose will depend on the job you need it for.
Silicone caulk. Ideal for kitchens and bathrooms where your joint will encounter water. Silicone caulk is water resistant and often contains additives that prevent molding. Silicone caulk is also easy to work with and easy to remove and replace when it gets gross looking.
Latex caulk. Great for interior use. Seal gaps and holes with latex caulk before painting. It’s cheap and easy to work with.
Polyurethane caulk. Best for exterior siding, windows, and doors. Polyurethane doesn’t shrink and doesn’t attract dirt and dust the way silicone caulk does.
Elastomeric caulk. This stuff is super sticky and doesn’t dry out. Save elastomeric caulk for your roof.
After picking the type of caulk you need, you pick the color of caulk that you want. Latex and polyurethane caulks can be painted over when dry, so you can effectively change the color of those caulks to your liking. Paint doesn’t stick well to silicone caulk, so you’ll need to choose one in a color that you don’t mind being seen as is.
Choosing Your Caulking Weapon
Don’t skimp on your caulking gun. Yeah, you can buy one for six bucks, but working with it will likely give you headaches. Opt for a caulk gun that’s a bit more expensive — we’re talking $12 expensive. The added stability and pressure that a quality caulk gun provides is definitely worth the small upgrade.
There are powered caulk guns these days too. Some DIYers swear by them, but a manual number is sufficient to get the job done.
Prepping the Surface
Remove dry paint and old caulk. Using a paint scraper, scrape away any dry paint, residual glue, and old caulk from the crevice and surfaces between your joints.
Wipe the surface down. To ensure that your caulk sticks to the surfaces, dip a rag into a water-diluted detergent and wipe them down to remove any dust and dirt. Dry the surfaces with a dry cloth.
For gaps wider than ¼ inch or deep gaps, use caulking backer rod. Caulking backer rod is a foam tube that you can stuff into joints that are wide or deep. By filling the joint with the backer rod, you’re able to reduce the amount of caulking needed to fill the gap.
There are two types of caulking backer rods: 1) closed-cell and 2) open-cell.
Use closed-cell backer rod for all outside joint filling and those that require water resistance. Open-cell backer rod is ideal for indoor joint filling (except for joints that require water resistance, like in showers or tubs).
Apply painter’s tape to control your caulk lines. For a clean caulk line, apply painters tape on each side of the joint.
Prepping Your Caulk Tube
You’ll need to cut the tip of the caulk tube with a utility knife. Cut the tip at a 45-degree angle.
How far up the tip you cut will depend on how much caulking you want to dispense at a time, and that depends on how big the gap is that you’re filling. If it’s a small gap, just nip the tip; for a wider gap, cut further up.
If you’re filling joints with multiple-sized gaps, cut the tip smaller and fill the smaller-sized gaps first. Then when you move to the larger gaps, cut the tip further up to enlarge the hole.
How to Caulk Like a Pro
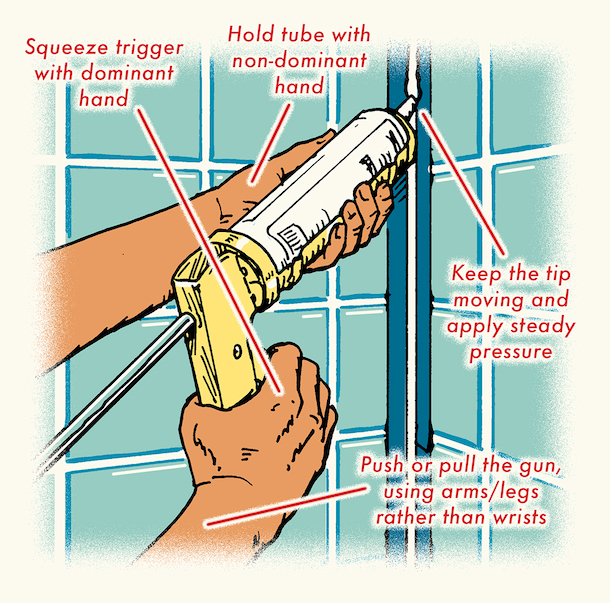
Use both hands. Squeeze the trigger of the caulk gun with your dominant hand and hold the caulk tube with your other hand, sort of like you’re holding a rifle. This will give you more control.
Push or pull, it’s up to you. There’s a big debate in the caulking world as to the best way to lay a bead of caulk. Do you pull or push the gun across the joint?
Most people pull the gun. It feels natural and it gets the job done.
The push faction argues that by pulling the gun, you leave behind a formless bead that hasn’t been adequately pressed into the joint. By pushing the gun, you force the caulk into the gap and ensure it adheres to the surface.
The pullers counter by saying you can always go back with a caulk tool or your finger and press the caulk into the joint if needed.
Experiment and find what works for you.
Keep the tip moving and apply steady pressure. This will ensure you lay a clean bead.
Don’t use your wrists. To maintain a straight bead, don’t use your wrists to pull (or push) the tip across your joint. Use your arms and legs as you caulk to maintain a straight line.
Avoid long runs. While it’s tempting to see if you can lay a single clean bead over a long joint, your best bet is to break it up. Lay a bead, tool it with your caulking tool so it looks clean and purty, and then lay another bead. Continue until you’ve caulked the entirety of the joint.
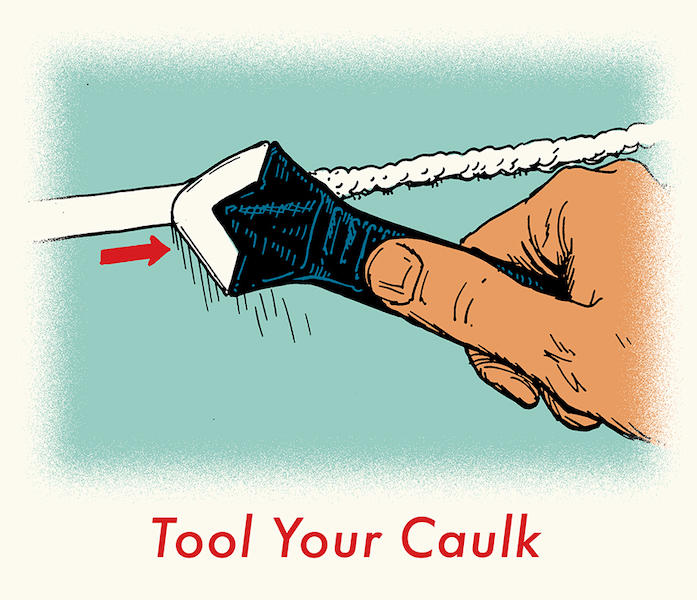
Tool your caulk. After you’ve laid a bead of caulk in a joint, use a caulk tool to smooth out the caulk and make it look nice. Clean off any excess caulk that spread out of the joint by wiping with a damp cloth. After that, let the caulk dry. Allow for 24 hours for a solid sealing.
There you go. Get caulking.