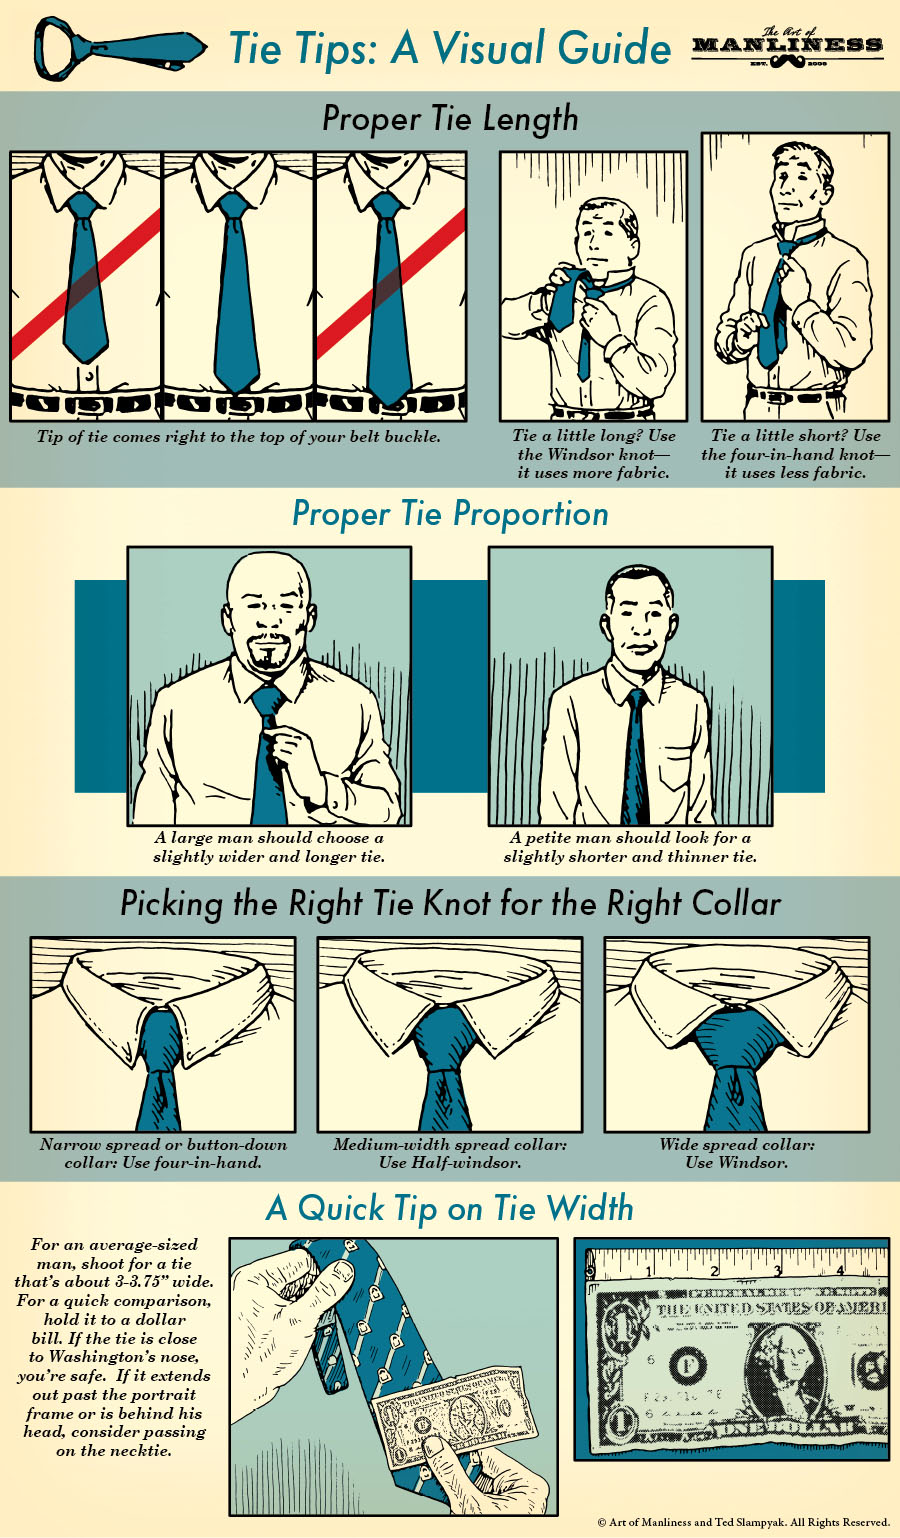
Editor’s Note: This a guest article from Tony Galloway.
I started my automotive DIY journey about 12 years ago when I was supporting a family of three on a salary of $28K a year. It was the height of the economic recession, and I had to cut costs somewhere, so I decided to change my own oil. It wasn’t long before financial necessity dictated I graduate to brake pad replacement as well. Each year some new problem would pop up, leading me to question whether I might be better served by a trip to a mechanic, or in some cases to a used car lot. Invariably it was hundreds of dollars cheaper to make the repair myself, but only if I could pull it off. Failure meant paying the mechanic on top of losing whatever I had invested in the attempt.
Each time it was something bigger than anything I’d done before. First, a spark plug replacement, followed by a serpentine belt, then a wheel bearing, a steering knuckle, a starter, and even prying the dash apart to replace a blend door actuator and blower motor. There was a certain thrill in the risk of failure. Like a gambler at the slots, I’d pull the ratchet handle and wait to see what I’d won. But, there was always a limit to the risk; at the end of the day if I couldn’t complete a repair the car would still run, or at the very least would run again after being towed to a real mechanic.
This was where I drew the line. I would work on things around the engine and transmission, and occasionally even things bolted to them, but those precision engineered inner workings? No thanks.
Then last year, my wife brought to my attention the recent worsening of a rather loud and unhealthy rattle in her Kia Sorento’s engine that I had been happily ignoring for the better part of a year. I had an idea that the problem was worn out timing chains, but I didn’t want to do it because those things are inside the engine, and if you mess them up you are probably shopping for a new motor. So I called three local repair shops — two independent shops and one dealership. I was prepared to pay $800. The lowest quote, shockingly from the dealership, was $2,700, one of the others turned down the job, and the last wanted more than $3,000.
I went back to the car; surely the rattle wasn’t all that bad. I started it up and was greeted by a sound like an aluminum can in a garbage disposal. I could see in my mind’s eye the chains flopping around, chewing up the inside of the timing cover, ready to jump and grenade the engine at any moment. They’re just chains, I reasoned; I’ve put them on bicycles, how hard could it be?
I sure learned a lot from the time I made that musing, to when I completed the job. If you’re like me, and are considering tackling your first big automotive repair, read on. Here are ten lessons I gleaned that may help you succeed:
1. Set the Stage
Most major automotive repairs shouldn’t (or can’t) be done in your driveway. This is probably going to take a while and you don’t want squirrels storing their nuts in your open intake manifold. You need a garage, a shop, or a basement for something like this. In my case I’m fortunate enough to have a basement with a garage door. If you don’t have something like that, maybe you have a generous friend or neighbor who will let you use his space for a few days . . . or weeks . . . or months.
Another thing to consider upfront is if you have the tools and the time to attempt a major repair. If you’ve done your own maintenance then you probably have a basic set of tools, and 90% of jobs only require wrenches and sockets to complete anyway. In my own repairing, there were a couple of times when having air tools available made my life much easier, and although the manual referenced a number of SSTs (Specialty Service Tools) available from Kia for a small fortune and my firstborn child, I got by just fine without them. It’s worth researching to see if you have everything you need to do the job before you get started. As a side note, most auto parts stores will loan specialty tools for free. You pay the cost of the tool, but so long as you return it in working order you get the money back.
2. Gather Resources
A lot of people have had the same problem you are having, and some of them probably posted it on YouTube. If a picture is worth a thousand words then a YouTube video is worth a billion. Unfortunately for me, there weren’t very many videos on making this repair to our vehicle. The videos I did find were for older rear-wheel drive Sorentos with timing belts, which were totally different than my front-wheel drive, timing chain-toting vehicle.
The next line of defense for the home mechanic is a service manual. If you can find a factory service manual, that is often the best source of information, but other companies offer repair manuals as well. The two most well-known are Chilton and Haynes. I started my repair with a Haynes manual, but quickly discovered some of the details were missing. Phrases such as “remove the engine wiring harness, plenum, and valve covers,” quickly disheartened me because I didn’t know how to do those things. I needed step-by-step help.
I went back to the internet and tried to figure out how independent shops get their information for auto repairs. As it turns out, there are professional websites and shop software programs for this. They are cost prohibitive for the home mechanic; however, several offer a scaled down DIY variant of their service that allows you to buy time-limited access, for a single vehicle, at a reasonable cost. The two I encountered most often were Mitchell 1 and AllDataDIY. Both run about $30 for a year of access, and both offer a test version so you can get a feel for the layout and see what you are getting for your thirty bones. Opinions online were most often in favor of Mitchell 1, but I personally found AllDataDIY to be easier to navigate. So, I went with that and suddenly I had 40 pages of step-by-step instructions with diagrams for things that my Haynes manual summarized in a sentence or two.
Other resources of note are people, social media, and model-specific forums. If you know someone who is a mechanic that will lend you a hand or at least answer a few (hundred) questions, hit them up. There are social media groups for everything; there is probably a Facebook group of owners for your particular car, and that can be a great resource. By joining such a group you’ll have access to the collective knowledge of many people who are deeply familiar with your vehicle and its common issues. If not, there are usually owners’ forums you can join. As long as you are patient enough to post a question and wait a day or two for answers, and are able to separate the good advice from the bad, you should be fine.
3. Shop Around
It may feel convenient to run by the local auto parts store chain and get the things you need, but let’s remember that, in most cases, taking on a job like this is about saving money. The Melling timing kit that costs over $500 at my local store was available online from RockAuto for about $350. The variable valve timing assemblies were $280 each at the dealership, and were not available at the auto parts store. I found them on Amazon for $80 each and it was the exact same OEM branded part. The point is that you can save a lot of money by shopping around and you don’t have to compromise on quality to do it.
4. Document Everything
So now you are armed with information, you have the tools and parts you need, and a sheltered place to work. Before you dive in, pull out your smartphone or camera and take some pictures. No, this isn’t for your social media before and after shots, this is for reassembly. I can promise you that while you remember where everything goes in the beginning, three weeks from now you won’t. I took hundreds of photos — multiple photos after each step of disassembly from various angles — and I put them all into a document and typed reminders for myself underneath each photo to help jog my memory. This arguably takes a lot of time, but it saved me over and over again. I even shot a couple of videos when I thought pictures and notes were not up to the task.
Organize and label everything you remove. A good method is to get zippered sandwich baggies and a pack of notecards. When you take out the oil pan bolts, put them in a baggie with a card that says “oil pan bolts.” This may seem tedious, but it will save hours when it is time to reassemble. You don’t want to get your engine all put together and have a tray full of parts left over. Our timing cover had 47 bolts in it. Both my Haynes manual and AllData provided a diagram detailing which bolts went where, but if I hadn’t carefully removed all of the “B bolts” and kept them in a separate baggie from the C, D, E, etc. bolts, I would have never gotten them all back where they belonged.
The most daunting part of disassembly, for me, was the sheer number of wires I had to unplug in order to move the wiring harness aside to access the engine. I disconnected in the neighborhood of 30 electrical connectors. I used masking tape to keep track of them; just take a strip of tape and wrap it around both plugs and label them with matching numbers. If you do that, when you reassemble you can reconnect wires with complete confidence.
Lastly, save your receipts for any tools or parts you buy. If something is defective out of the box, or fails prematurely, you want the option to return it for cash and not just store credit. Plus, it is good to track your expenditures to see how much money you’ve saved doing it yourself.
5. Be Patient and Relentless
The old adage “haste makes waste” is doubly apt in automotive repair. Go slow and do it right. When you get stuck, be ready to step back and think about things, research solutions, go back through the manual, or post on the forums or social media groups. Be relentless. Do whatever it takes to get the information you need to move forward.
I pulled out my impact driver on day one and began zipping bolts out of the upper intake or plenum. I was making good time on disassembly. I felt kind of like a NASCAR pit crew member until I got to the last two bolts. The first of those two broke off in the lower intake. It was locktited in place and my impact applied enough torque to snap the aging and stressed metal. The last bolt was also locktited in, but I was able to bring it out slowly with a ratchet, using just enough pressure to keep the bolt turning. Man, I wish I had slowed down and loosened every bolt by hand before zipping them out with a power tool.
I strongly considered putting the bolts back in and taking it to a mechanic at this point. Five minutes in and I’d already damaged something. Ultimately, I pressed on, figuring this would be a problem for reassembly anyway. It certainly wasn’t holding me back from continuing disassembly, albeit with just a little bit less enthusiasm. In the end I plugged on not because it wouldn’t have been a relief to hand the whole mess over to someone more qualified, but because I couldn’t stomach the idea of giving up in defeat.
6. Don’t Let Fear Paralyze You
Doubt was my biggest enemy and deterrent throughout this repair. I wasted a lot of time procrastinating. This was particularly the case once I had opened the engine and determined the timing chains were in fine condition (considering they had 180,000 miles on them). They definitely were not the source of my start-up rattle. Doubly disheartening was the $350 worth of unnecessary timing chains, hydraulic tensioners, guides, and gears on the floor beside me. I had consulted multiple mechanics and all had agreed the noise was caused by timing chain rattle.
Surprisingly, it only took me a few minutes to find a service bulletin from Kia which detailed my exact problem and what I needed to do to fix it. There were even audio files so I could hear the before and after start-up sounds. If I had researched my symptoms instead of assuming I knew what the problem was, I might have found this in the beginning. Thankfully, the repair prescribed by Kia requires exactly the same disassembly as a timing chain replacement, so all my time was not a wash. Still, I didn’t move forward for almost a week because the fix was to replace my old variable valve timing assemblies with an updated design. Unfortunately, that updated design was incompatible with my camshafts and required the installation of updated camshafts as well. Once I worked up the nerve to dig even deeper into the engine’s innards, it really wasn’t hard at all. I went slowly and I followed the directions carefully and it was over before I knew it.
7. Check Everything Three Times
I know what you’re thinking: twice is enough. It isn’t. Not when an oversight could cost you thousands of dollars in damage. Two times I caught a critical mistake on my third check. Once, I hadn’t looked closely enough to notice the new timing chain wasn’t properly seated on one of the cogs and would have likely jumped off on startup. Later, on a final check before beginning reassembly I noticed I had made a rookie mistake and used the wrong mark on one of my cam sprockets. I was supposed to use the round mark, not the straight mark. Starting the engine with either of these problems unnoticed would likely have caused engine damage, or at the very least required a complete do-over on the repair.
When in doubt, check it again. Get someone else to check it with you. Fresh eyes may notice something you’ve missed.
8. Go Ahead, Fix It Even If It Ain’t Broke
When you are elbow-deep in your engine, you’ll invariably wonder about replacing other things that you normally don’t have easy access to. It’s a judgement call, but my advice is, if it isn’t cost prohibitive, go for it. I sprung for a new oil pump because I knew that our original had nearly 200,000 miles of wear and tear, it’s a critical part for engine health, and I never wanted to need to open this thing up again. I likewise opted to install a new water pump and to change the spark plugs and coil packs that are normally inaccessible. This did add extra costs to my repair total, but it also gave me peace of mind that I wasn’t reinstalling old worn out parts on the brink of failure.
I even kept the $350 timing kit and changed the chains and tensioners, even though the old ones did not appear to be in danger of failing. I could have saved some money by reusing the old parts, and I would have if they were easier to access, but my time has value, too, and I would sure hate to be doing this job again in a couple of years.
9. Take One Bite at a Time
One of the epiphanies I had along the way was that my years of minor repairs and maintenance had prepared me for this in ways I didn’t fully understand. Once you realize a major repair is really just a lot of minor repairs compiled, then the overall task becomes far less daunting. By breaking a big job up into several smaller, more attainable goals, you can avoid becoming overwhelmed. This also helps maintain a sense of accomplishment. If all I really expected to finish today after work was removing an oil pan, and I got that oil pan off, then I was successful. I made progress — and slow, steady progress is still progress.
10. Trust Yourself and Don’t Give Up
Other people may doubt you, and you will doubt yourself at times, too. Just remember there was a reason you thought you could do this, and you were probably right. At times I worried the Sorento would never run again, or worse, that it would start up with the same loud rattle despite my 50 hours of labor and considerable financial investment.
It’s important not to dwell on those thoughts. That mental energy is better spent triple checking what you’ve done, reviewing the manual for the next steps, and learning to trust yourself. Success is ultimately about having the grit to finish the job, whatever it takes, even when it forces you well outside your comfort zone.
At the end of this journey, our Kia started up, ran just fine, and the rattle was gone. I learned a lot about automotive repair, saved $1,600, impressed my wife, and gained a lot of confidence and experience for the next time a big job comes my way. You can’t beat that.
_____________________________
Tony Galloway likes reading, writing, and all things DIY. If he’s not at work, or spending time with his wife and four kids, you can usually find him in his basement tinkering with something.