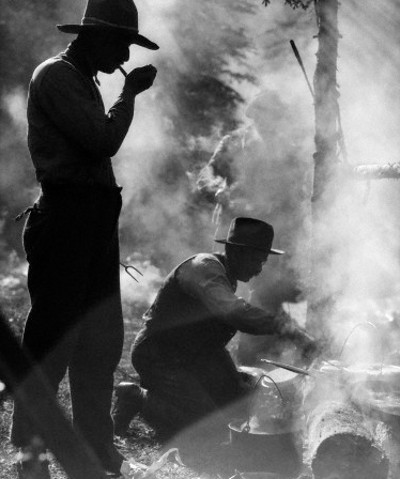
The practice of spit-roasting meat over an open fire goes back for at least 8,000 years, and probably much further than that. It’s cooking at its most primal — all you need is a hunk of meat, a stick, and some hot coals. Still today it’s a satisfying, tasty, and supremely elemental way to cook a meal. With this article we’ll show you the master techniques and practices that will take your spit-roasting beyond the merely primitive and turn out a platter of fire-cooked meat everybody will want to tear into.
The Spit
You have a few choices, depending on your aesthetic and technological leanings, and whether or not you want to invest a few bucks.
Greenwood
Counterintuitive as it may seem, wooden cooking tools can be serviceable and fairly durable, holding up many a roast before finally succumbing to the flames (and that end is usually an accident late at night and unrelated to cooking, when someone fails to recognize a stick as a tool and tosses it on the fire).
What wood ultimately lacks in permanence, it more than makes up for in other ways. Crafting your own spits and skewers is cheap and fun. And in at least one respect, using wooden tools makes roasting much more trouble-free. One of the trickiest parts of spit-roasting a whole animal is keeping the meat turning with the spit, especially when that spit is made of smooth, terribly thin metal. A wooden spit that is many times the thickness of a metal one will still be light enough to easily wield around the fire, and the meat will cling to a wooden spit much more readily. Fashion your custom-made spit of larger-gauge stock and leave it fat enough that its girth is almost wedged through the carcass. Along with a few skewers deployed crosswise, this practice helps keep the animal fastened smartly.
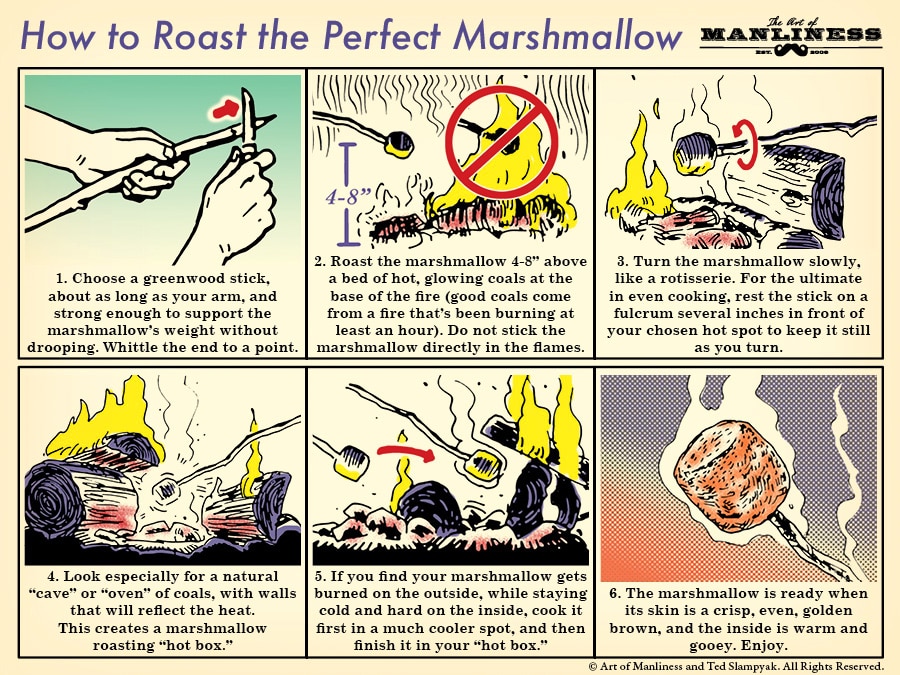
Using the shape and size of the food you plan to roast as your guide, select a green branch or sprout from a hardwood tree, certainly a nontoxic species and preferably one without an aggressive smell. Maple, blueberry, and basswood are my favorites, since they have a neutral or even pleasant aroma, are locally abundant, and tend to grow obligingly into spit-shaped forms. Search out what makes sense in your region.
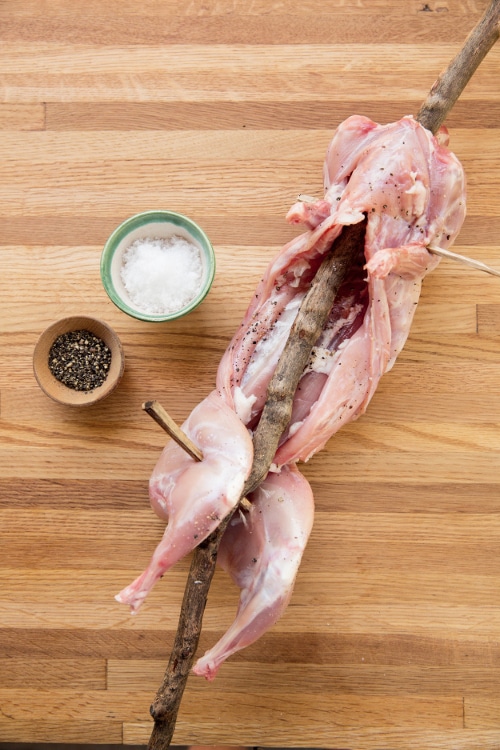
Look for a natural “crank” at the heavy end of the stick, and otherwise considerable straightness. Consider the length, weight, and conformation of the item to be cooked. Is the stick fat enough to bore holes in for some skewer attachment points without fatally weakening it? For the rabbit example, look for something with nearly an inch diameter on average; for the kid or lamb, over an inch and a half.
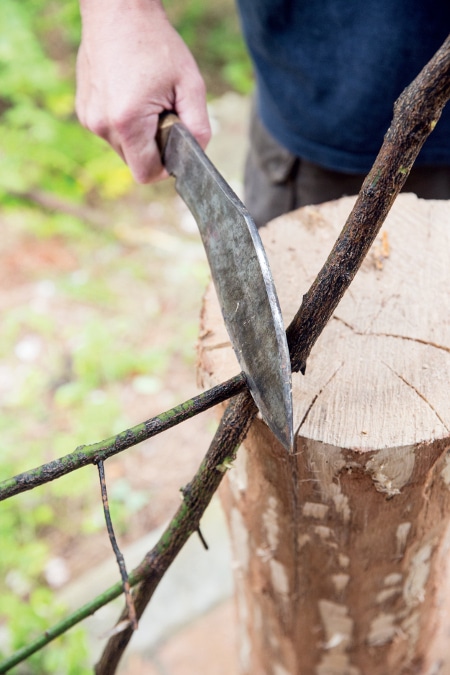
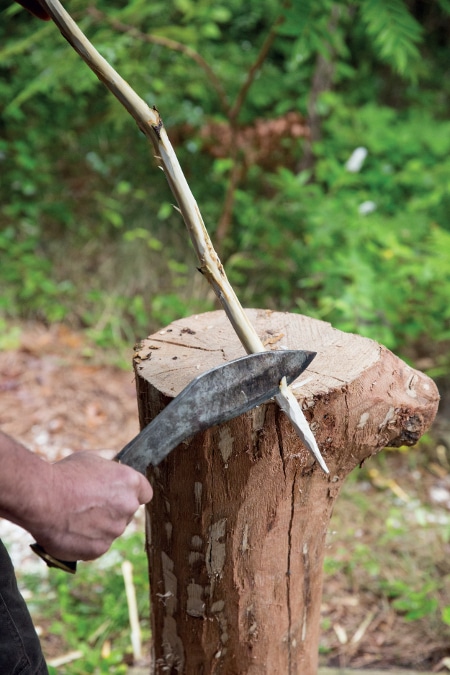
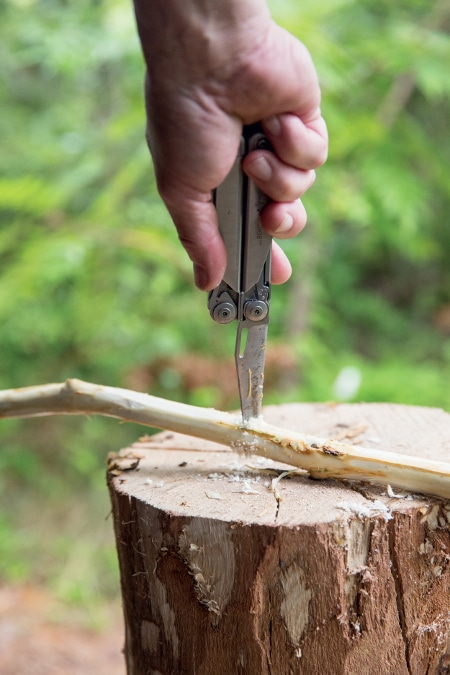
Gather a few as you find them, so you have fallback in case of hidden flaws. Using pruners, a knife, machete, or small hatchet, trim off all the side branches and twigs that will be in the way. Cut any excess length away and sharpen it to a point. Pare off the bark.
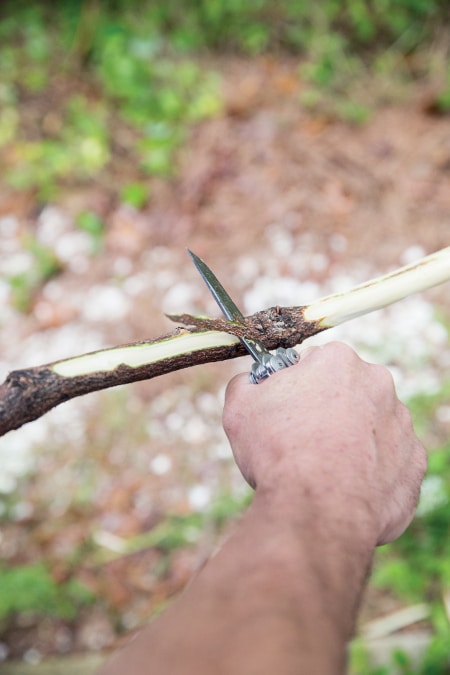
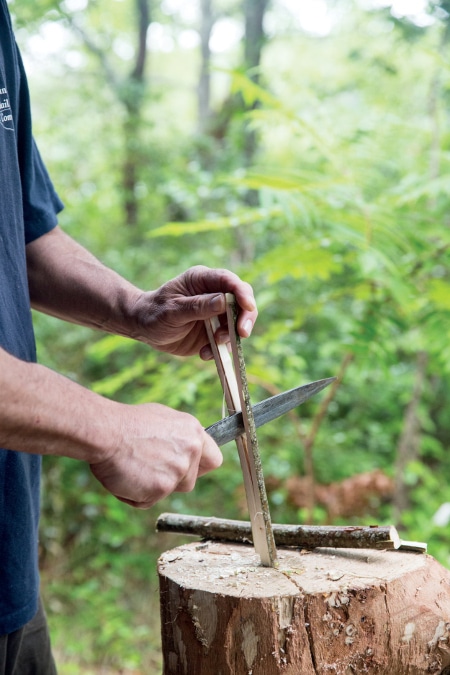
For fastening the meat to the spit, you may use short metal or bamboo skewers if you already have them. Or to continue with the woodland theme, you may prepare some from a similar branch stock. For very small roasts, you may get away with using small, flexible sticks in the round, but they tend to be weak for their size. A much stronger skewer may be made by splitting a length of a larger branch in quarters using a heavy bladed knife, and whittling the quarters until they are small and sharp enough to do the job. Willow sprouts are great for this purpose.
Again, using the meat that is to be roasted as a guide, bore holes in strategic points in the wooden spit. If we continue with the rabbit example, that will mean in the vicinity of the hips and the shoulders. For a fowl, three holes are helpful: one for fastening through the carcass along the spine near the wing and thigh joints and two for tying the drumsticks. You may use any sort of drill, from a cordless power model to a brace-and-bit to a gimlet to a stone awl, depending on how archaic you’re feeling; we usually have success with some of those otherwise inexplicable blades on a pocket knife. Keep the holes as small as possible to accommodate the skewers. If the skewers have a flat profile, poke two or more small holes near each other to open up a slot lengthwise in the spit.
Making a Greenwood Spit
1. Lop off any branches and irregularities that won’t be helpful to your roasting task.
2. Pare off the bark.
3. Cut the spit to length and sharpen the point.
4. Perforate the spit to accommodate skewers for securing the roast.
5. Split, pare, and whittle a straight section of branch or sapling stock for skewers.
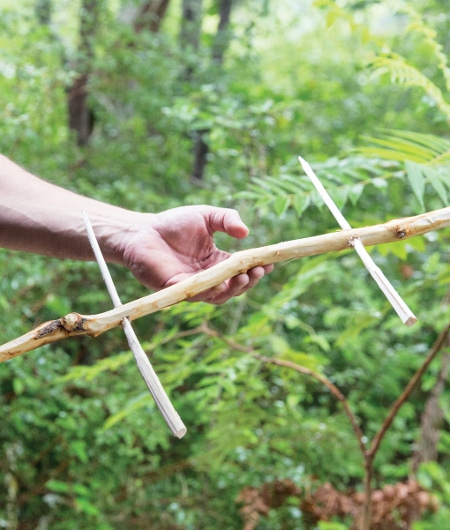
6. Locate the fastening points strategically for the roast.
Metal
A homemade spit equipped with commercial “meat forks” secures a pork roast over a dripping pan.
One simple, functional spit design — a long pointy piece of metal with an offset handle — was long in favor in cultures where blacksmithing skill was widespread and cooking large joints of meat was considered desirable (cultures in which the device that turned the spit was the human hand, at any rate). When the spit was geared to mechanical means of turning, the crank at the end was transformed into a wheel, or other form, designed to interface with the driver, whether canine, mechanical, or electrical.
A basic spit can be easily reproduced in iron or steel by a blacksmith or fabricator. One helpful refinement is to flatten the spit where the meat will be held, as an encouragement to its staying put. (The areas of the spit that will rest on supports must be kept in the round, of course.) Flattish skewers of metal or wood are pierced through the meat and engaged against the flat of the spit, to keep the meat rotating properly with it. This technique is very helpful in roasting a joint or loin of meat, and even a whole animal.
Another refinement to the metal spit is to cut a few slots within it to receive skewers, like we did with the wooden spit. Or you can make yourself a nice adaptable steel spit inexpensively with just a few tools. I bought a 3-foot piece of K-inch square stock from a regular big-box home improvement emporium. I ordered gadgets called “meat forks” from an online specialty supplier. These are made for commercial electric-driven rotisseries, but adapt nicely to our purpose. The four-tined attachments clamp on to a spit with thumbscrews and secure the roast so that it spins with the spit. These are especially good for boxy roasts like pork loins and mid-sized poultry.
To round off the corners of the steel and to make a point on one end, you need a grinder with a general-purpose metal grinding wheel. If you are using a handheld model, clamp it securely to a workbench. Wear safety glasses and hearing protection and gloves. Grind off the corners of the square stock, and taper one end to a point over about 1.5 inches.
Rather than bend the spit to make an offset handle (which would take more tools and skill, and would make the spit pretty short), just use vice-grip pliers (if they’re not already in your toolbox, that’s $12) or a C-clamp ($5) as a detachable handle. This whole arrangement, while not classic, has its own charm, once you’ve given it all a good scrub with hot soapy water.
Supporting the Spit
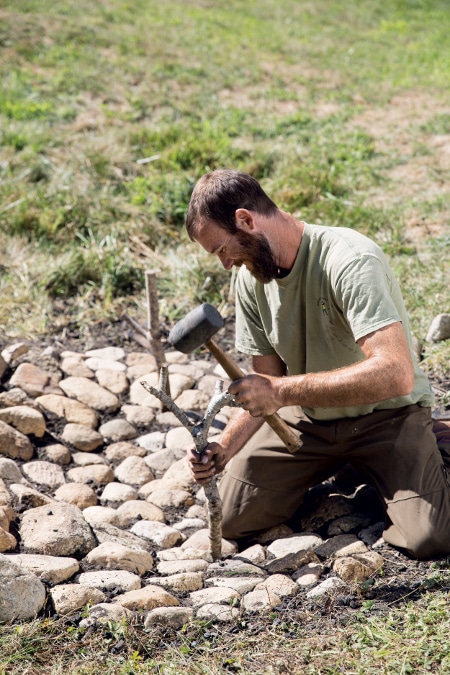
An outdoor spit can be supported by simple crochets made from branches.
If you are enjoying the greenwood theme, crochets — forked sticks driven into the ground — are a simple and attractive way of supporting your spitted roast. Find two robust (1-inch diameter, or larger for something heavy) branch forms containing the necessary Y-shape, and trim away the superfluous top with a saw or hatchet. Leave plenty of wood at the bottom so that it will stand securely upright when driven into the ground. Rest the base on a stump and, cutting downward in short chops with a hatchet, put a point on it. Drive the crochets into the soil in or at the perimeter of the hearth, far enough apart so that there are a few inches to spare on either end of the roast.
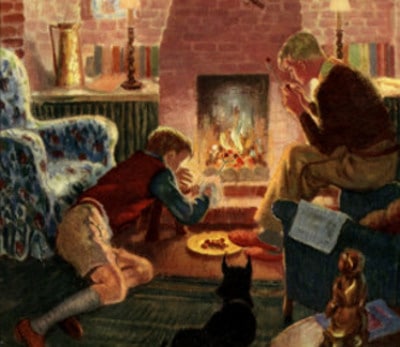
Perhaps less elegant, but just as effective, is to use something solid and stable, such as small stumps of wood with grooves in the top surface to keep the spit from creeping, or as we see in seventeenth-century Dutch genre paintings, an upside-down three-legged kettle.
Whichever course you take, make a trial run of putting the spit across the supports before you make a fire to make sure that the height is right and that it’s more or less level. Imagine the same scenario with coals and meat to get an idea of whether the height of the supports will work. Remember that you can always move coals around to intensify or buffer heat.
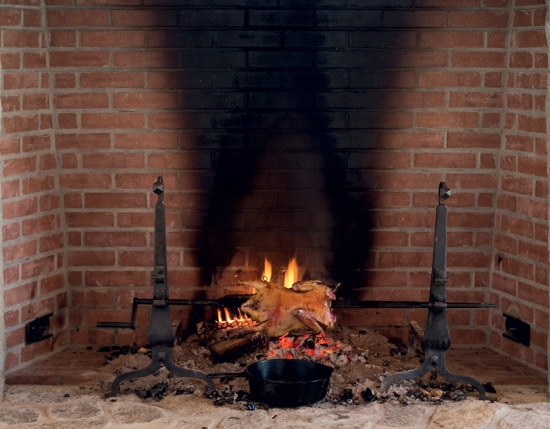
This indoor roasting setup is hand-forged. The fireplace andirons have built-in supports that allow the spit to be lowered and raised.
The traditional indoor method of supporting a spitted roast is with andirons that have been furnished with hooks at various heights. Today’s enterprising metal-worker can forge or fabricate such equipment in the traditional L-shaped hearth-cooking format, or even adapt the design for outdoor cooking so that the andirons terminate in long stakes that may be driven into the ground — like a more durable version of the wooden crochets.
Turning the Spit
It is not essential to keep spitted foods rotating continually to produce a very fine result. Many very good home cooks through history have had neither the equipment nor manpower in their kitchens to keep their spits in constant motion, yet have not shied from roasting. I have occasionally had the fun and ease of using an electric rotisserie of high caliber to cook largish whole animals, but most of the roasting I have done has been without that refinement, and the quality of the final product has not been impaired.
That’s not to say that roasting sans turnspit will not demand considerable attention from the busy cook. Especially in the first quarter-hour or so of cooking, I like to keep my hand on the spit, so that I can closely observe the fire and its interaction with the food. Once all is proceeding as it ought, then it’s more a matter of propping the spit’s handle this way and that to achieve even roasting, and manipulating the coals to radiate upon the places that need it most. But, what with feeding the fire, shoveling coals about, and basting — tasks occasioned by roasting even when spit-turning has been knocked out of the equation — the cook’s attendance must be frequent regardless.
Master Recipe and Technique: Roasting a Small Whole Animal
A rabbit, chicken, or duck is a manageable — and delicious — introductory project to the world of whole-animal spit-roasting.
Ingredients (4-6 servings)
- 1 rabbit, duck, or chicken (2 to 5 pounds)
- 1 clove garlic, minced
- 1 teaspoon kosher or sea salt
- freshly ground black pepper
- 1 sprig fresh sage or rosemary, chopped
- 2 tablespoons extra-virgin olive oil
- 1 quarter of a lemon

Directions
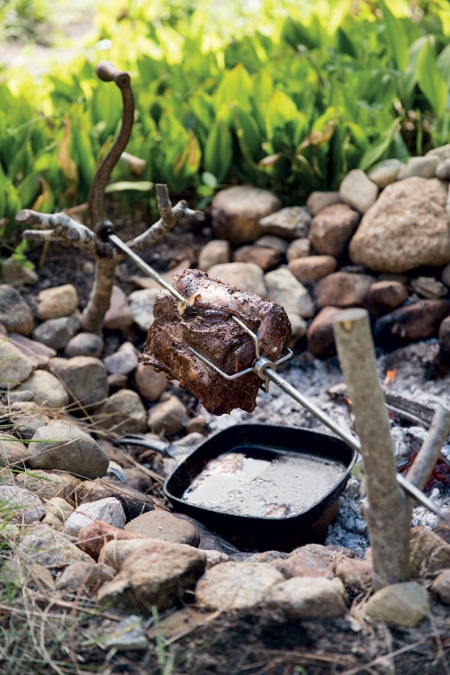
- Make ready a spit setup in one of the ways discussed previously, allowing the meat to be suspended about 6 to 8 inches above the coals. At least an hour before you intend to start roasting, make a fire of split hardwood behind the space that will be occupied by the meat. You will draw coals forward under the roast when the time comes. The blazing part of the fire should be around 18 inches away from the roast.
- Meanwhile, rinse and pat dry the animal, and set aside any innards for another use. (The liver, if present, could be subjected to the same marinade, cooked on a skewer like a marshmallow, and then minced as garnish. Offer it to guests in some clever amuse-bouche, or pop it into your mouth when no one is looking.)
- Mince together the garlic and salt on a cutting board. Add the pepper and sage or rosemary and work it all together. Rub all over the meat. Drizzle over the olive oil, squeeze on the lemon, and massage the whole mess together.
- Check on the fire. Make sure lots of coals will be forthcoming. Place new fuel on the back of the fire; this habit makes it easier to access the coals at the front and keeps the blaze closest to the roast bright and clear.
- Wrangle your victim onto the spit, locating the thighs and wings or upper arms where they can be pinned to the spit with skewers. Use a fire shovel to drag coals out from beneath the fire and lay out a nice little coal bed in between the spit supports. Set up the roast over the coals. You may reserve the marinade for basting later.
- Turn the spit slowly for a few minutes and watch carefully to get a notion of the degree of heat from the coals and the fire, and their effect on the meat. Nothing very dramatic should happen for a little while unless your fire is way too hot or you fail to turn the spit enough.
- If you have nothing else to do and would like to experience the life of a seventeenth-century kitchen drudge, you may turn the spit slowly and continually. However, your roast will come out just as well if you carefully observe the cooking as it progresses and turn the spit a little at a time, propping the crank end at the proper angles to facilitate even cooking. Strategically shaped sticks or a couple of bricks usually suffice for this purpose.
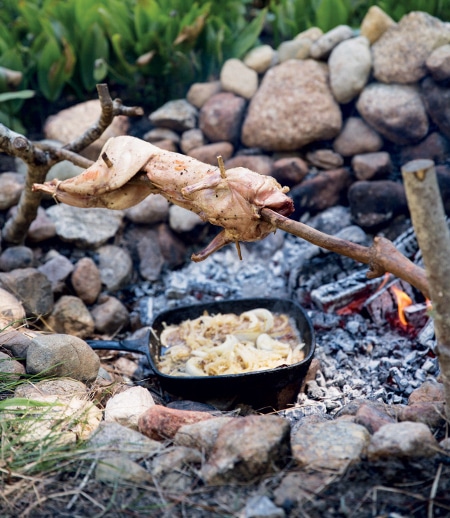
- Gradually you may notice that the meat is steaming or sizzling a bit and becoming paler in color, as cooking begins. Observe areas that are lagging behind the rest, and take steps to correct. Replenish the coal bed strategically. Quadrupeds, such as rabbits, are thickest at the hip and shoulder areas. Keeping steady heat on those areas is key. Much less heat is necessary through the midsection; in fact it’s desirable to avoid overcooking the loin meat. So, essentially, your coal bed should be hourglass shaped — good heat at either end of the carcass and very little in the middle. In cooking much larger animals, I find that by halfway through the cooking process, it appears that I am essentially maintaining two separate fires, replenishing coals at either end of the animal.
- When the roast begins to put forth drippings, set up a dripping pan directly under the roast. Use a heavy or expendable pan that can tolerate heat shock and other abuse, and nestle the coals along its edge closest to the fire. Do your best to keep coals and ashes out. Baste with the reserved marinade and the drippings, if you like, periodically through the first 60 minutes of cooking. Stir the contents of the dripping pan and add a splash of wine or water to prevent scorching.
- Depending on the size of the roast, and your fire, and whether you are inside a brick chimney or out in a wintery wind, the process may take 75 minutes to 2 hours. Observe closely and learn before reaching for your instant-read thermometer: Are there places that could use a little more crisping? Or is it nice and golden-brown all over, with the meat clearly pulling back a bit from the leg bones? This sounds stupid, but most times when meat really looks cooked it is cooked.
- Rabbit and poultry ought not be served rare, but neither should you dry it out. When internal temperature, taken near the thigh joint reads 150°F for rabbit or 165°F for poultry remove it from the fire, and allow it to rest for 15 minutes in a warm place on a preheated dish, before carving and serving.
Making a Sauce in the Dripping Pan
Ingredients
- leftover marinade
- 1 tablespoon olive oil, if needed
- 2 onions or 4 shallots, slivered
- 1/2 cup dry red or white wine or 1/3 cup stock
- 2 tablespoons wine vinegar
- freshly ground black pepper
- 1/2 cup minced parsley
- 4 tablespoons cold butter, cut in bits
Directions
- Stick a 10-inch cast-iron pan under the meat as a dripping pan after it’s been roasting a little while. Baste with the marinade occasionally for 20 to 30 minutes.
- The next time you replenish the coals near the roast, pick up the pan and put some coals under there as well. Unless there’s a coating of drippings in the pan, add the olive oil; then toss in the onions. Let them cook very slowly until soft and translucent, catching the drippings for the remainder of the roasting time. Stir and look out for burning, moving the pan to a cooler place if necessary for a while.
- When the cooked roast has been moved away from the fire for its rest period, attend to the sauce. Put the pan on a fresh bed of coals and bring to a sizzle. Add the wine, vinegar, and pepper, and simmer down to almost nothing. When the liquid is reduced and syrupy, pick the pan up and move it to a cooler spot. Meanwhile, carve the roast into serving pieces and arrange on a warm platter.
- When the iron pan feels warm, rather than hot, it’s ready to finish. Stir in the parsley, and then half the cold butter bits. Stir and swirl until the butter softens and amalgamates. Repeat with the other half of the butter; taste the sauce for seasoning and serve immediately with the meat.
____________
Intrigued by the idea of cooking food on a spit? Rediscover the pleasures of a variety of other unconventional techniques, from baking bread in ashes, searing fish on a griddle, roasting vegetables in a fireplace, making soup in a cast-iron pot, baking pizza in a wood-fired oven, cooking bacon on a stick, and much, much more in Cooking with Fire.
Photography by © Keller + Keller Photography. Used with permission of Storey Publishing.