Editor’s note: This is a guest post from former Army medic Bruce A. West.
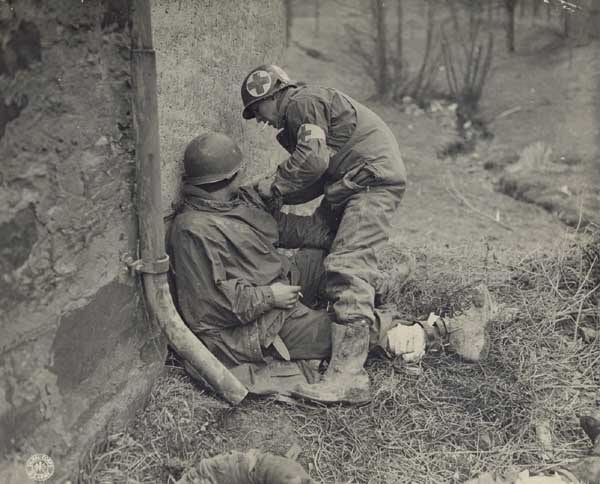
You’re miles from any civilization at a lookout point on a large boulder with a friend, taking in the beautiful fall scenery, when your buddy slips and falls to the ground. They’re holding their leg and screaming in pain; their tibia (shin bone) is sticking out of the skin, and blood is quickly escaping the wound. You run to their aid and put an improvised tourniquet on them to stop the bleeding. Now you need to get them out of the woods quickly, but you’ve got to do something about that fractured leg before you move them. What do you do?
When you’re in the wilderness you don’t always have all the gear you need to save lives — let’s face it, few of us are strong enough to carry an entire ambulance’s worth of supplies on our backs. You don’t have pre-made braces, crutches, or cast-making material on hand, and you probably don’t have the tools to properly set a broken bone. What you do have is a first aid kit (maybe), a pocket knife, the clothes on your back, and the woods around you. These are all the tools you need for a makeshift splint that could mean the difference between life and death.
Never mind all the rules you’ve learned about first aid, or all the technical gear you wish you had. You simply need to improvise. These techniques aren’t pre-made, and they certainly aren’t pretty. They’re passed down through years of combat medics’ experiences, and they’re proven to save lives.
Knowing how to treat a broken limb is one of the easiest and most important improvised first aid skills you can learn. Different kinds of fractures are treated differently, so today we will just focus on those in the lower leg (tibia and/or fibula). In future articles, I will explain how to handle other kinds of fractures (upper leg and arm). Lower leg fractures are common, and severe breaks can even be life threatening. I’ll provide all the steps you need to know to perform this potentially lifesaving technique.
Your Lower-Leg-Splinting Battle Plan
If there are other people with you, have them call 911. If you’re alone with the victim, make sure they’re breathing, their heart is beating, and they have no major bleeding, and then call 911 yourself.
Assuming you’re in the middle of nowhere with no phone signal, you’re probably going to have to move your patient to get reception – and you may need to travel just to be in a place where rescue workers can find you. But you can’t move someone with an unsplinted, severely fractured limb. Follow these steps to brace their broken leg:
Step 1: Scene Safety and Body Substance Isolation
In military medicine, civilian medicine, and basic first aid the most important consideration is safety of the rescuer. Don’t treat anyone if you’re in harm’s way. Now, you’re not worried about guns and bombs, such as in military medicine, but you should consider other threats: your patient broke their leg from a fall…are you in a position to fall yourself? If you’re at risk, address your threat first, and then care for the patient. In this case, you may need to drag your patient to level ground (despite their fracture or bleeding) before you can safely treat them. Then, before you do anything, protect yourself from disease by wearing gloves (or even plastic bags).
Step 2: Expose the Wound & Assess the Patient
Before you treat a patient you have to assess them in order of most important functions to least — and treat them as you encounter problems. It’s always important to make sure your patient is breathing and that their heart is beating. You may have taken first aid and learned to remember your ABCs: Airway, Breathing, and Circulation. This is a great mnemonic device in a medical situation, but in major trauma this order of procedures can cost a life. In the Army we taught an acronym called MARCH, which stands for:
- Major Hemorrhaging
- Airway
- Respirations
- Circulation
- Head Injuries, Minor Hemorrhaging, Hypothermia/Shock
ALWAYS address major bleeding first — if they’re losing a lot of blood and you’re worried about doing CPR, you’ve already lost them. In this case of open fractures (broken bones protruding through skin), blood loss is a major concern. You’ll need to apply a tourniquet. So, assess and treat any major bleeding, then do your ABCs, or “-ARCH.”
The best and only way to know where your victim’s wounds are is to expose them. In major trauma, do NOT focus only on the spots you know are hurt — there could be other injuries you’re not seeing because they’re masked by clothing. There’s an old saying in medicine, “A happy trauma patient is a naked trauma patient.” You can’t fix anything you’re unaware of. I advise undressing your patient entirely (you can always redress them later — as long as you don’t cover any wounds).
Step 3: Manually Stabilize the Fracture
You’re not a doctor (unless you are), and this isn’t the movies, so you won’t be setting your victim’s broken bone. You need to leave it in the position you found it in, and you need to keep it still (so the broken bone doesn’t cause more internal damage, i.e.: severed arteries; torn muscles, ligaments, tendons, etc.). You’re going to splint it, but before you do, it’s good practice to manually stabilize the broken limb while you prepare your homemade splint.
If you aren’t alone with the victim, have someone hold the broken limb in place. Manual stabilization is that simple; complicated name, easy execution. They’re in pain, and they may be moving around; have someone hold their limb still to prevent further aggravation of the injury. This can really only be done if you have help; if it’s just you and the victim, limb immobilization will have to wait until you’ve applied your splint.
Step 4: Check for PMS
Before you splint the limb, you need to assess their PMS. This means you check below the fracture for:
- Pulse
- Motor Control
- Sensory Feeling
Check for tibial pulses (on the inside of the ankle, just behind the bump commonly referred to as the “ankle bone”), or for a dorsal pedal pulse (on top of the foot); have them wiggle their toes, and make sure they feel you touching their feet (pinch their pinky toe, ask them which toe you’re touching). Here’s a short video on how to locate these pulses:
If there was an exposed fracture and you used a tourniquet, you won’t find a pulse below the injury, and there may be little motor control or feeling. In less extreme cases, checking for PMS is important. If they had circulation, movement, and feeling to the hand/foot before you installed the splint, you want them to have the same sensations afterwards. Thus, you’ll repeat this step later.
Step 5: Select Your Splint

If you fracture your leg during a bartitsu fight with another distinguished gentleman, have your friend splint it with your umbrella.
Here is your opportunity to get creative. You need to improvise a splint.
Grab some thick sticks, a hiking pole or walking stick, the frame from inside a backpack, an axe handle — anything rigid will do. You simply need two objects, preferably the length of the limb (or at least the length of the affected half) to splint each side – for even more support, extend a longer outer splint up to the victim’s armpit.
Next you need something to tie your braces to the limb with. Again, get creative. You can use belts, shirt sleeves/torn strips from t-shirt, bandanas/handkerchiefs (just another one of their many uses!), a shemagh/scarf, rope from a survival bracelet, even a tie! It matters not what you use, but how you use it.
Step 6: Apply the Splint

Get everything into place before you tighten it down. Start by laying your ties in place under the limb — for a leg, you can carefully slide the tying devices through the void below the knee and ease them back and forth until you’ve slid them into place. Place one by the ankle, one below the fracture, one below the knee, one above the knee, and so on. Don’t place one directly on the knee — and definitely don’t place one around the wound!
Once you have your ties in position, place your splints on either side of the limb on top of the tying devices.
Starting at the bottom and working your way toward their body, tie the splint to their leg. For more support, if you have time and a long enough strap, you may wrap the ankle strap around their foot; this immobilizes the foot, preventing the victim from creating unnecessary pain by bending their ankle, which causes the leg muscles and tendons to place stress upon the tibia and fibula. You may also place padding between the splint and the patient’s body for comfort (this can be in the form of torn cloth, acrylic sleeping bag stuffing, spare socks, etc.) But if your top priority is getting someone out of the woods as quickly as possible, you don’t need to waste time on it; their leg is already uncomfortable.
In the end, you want the ties to be snug, but not too tight. The idea is to hold the braces to the leg, but not to cut off circulation. Remember this rule of thumb: you should be able to easily slide two fingers side by side between the ties and their limb.
Step 7: Assess and Treat Remaining Injuries
Great! The victim’s fractured limb is splinted! But, they’re far from lying in a warm and comfortable hospital bed awaiting powdered eggs. Aside from simply getting them to a hospital, there are other things to consider before they’re truly safe.
First, check their affected limb again, and make sure they have PMS. If they did before and they don’t now, you likely need to readjust your splint (again, unless you’ve applied a tourniquet).
Next, assess them again: Do they have an open airway, and are they breathing? Do they have a pulse? Are they bleeding? Any exposed wounds? In this case, yes! There are exposed wounds. The victim has an open fracture, meaning open flesh and exposed bone, which can lead to severe infection. You’ve already stopped the bleeding with the tourniquet; now its time to protect the wound from the elements. If you have sterile gauze in your first aid kit, now is the time to use it — if you don’t have gauze, use soft cloth from a shirt. Cover the wound entirely, and secure it in place with another handmade tie (making sure not to tie it too tightly so as not to cause pain).
Now would also be the time to assess for shock. In the event of such a severe fracture, shock is very likely. Look for:
- Cool, clammy skin (moist, cool, and pale)
- Cyanosis (blueing of skin)
- Weakness
- Confusion
- Rapid Breathing
- Unconsciousness
To treat the victim for shock, lay them on their back and keep them warm. Cover them with clothes, coats, blankets, a sleeping bag, or even a pile of leaves or pine needles — whatever you have available, just get them warm.
Step 8: Get Help!
If 911 hasn’t been called yet, do so now. If you still can’t call 911, it’s time to move. Never leave your patient behind. If they can hop on one foot as you aid them, do it — but this may not be possible. In such a case, it’s time to summon your inner fireman — carry that person, and go find help.
_________________________
Bruce A. West served as an Army medic in the Iraq war. He taught over 500 soldiers how to save lives in a class called Combat Lifesaver, and will be sharing his knowledge here on AoM in a series on important first aid/first responder skills every man should have. Bruce also recently started Geared Magazine, an outdoor gear and instructional site with a focus on survival and preparation.