After a couple years of heavy use, my filthy baseball caps have been known to simply find their way to the trash rather than be washed. I’d tried the folk-lore-ish top-rack-of-the-dishwasher route, but it had never yielded great results for me. The hats came out misshapen, seemingly discolored, and only partially cleaned.
But I did some digging, and discovered a far better, and gentler, methodology for cleaning the ol’ ballcap that will refresh it, brighten it, and add years to its life. And best of all, it’s largely hands-off.
Luckily for you readers, I had a few very gross hats to do some testing on. Let’s dive in.
General Hat-Washing Tips
- Don’t put caps into the laundry — either the washer or dryer. A high-efficiency washer that doesn’t have a center agitating column can be okay, but even then it has to be cool water on the gentlest cycle, and you also have to be concerned about other clothes in the load squishing the hat’s form. Dryers are too hot, and the tumbling isn’t good for the shape. Better to just avoid the laundry machines altogether.
- Don’t use any products with bleach in them; you want your ballcap colors to stay nice and bright for years to come.
- Dispelling the dishwasher myth. You’ve probably heard you can throw caps in the dishwasher on the top rack. Don’t do that. Dishwasher detergents often include bleach, and the appliance usually runs at high heat (both for washing and drying), which can damage the hat as well.
- Hand-washing is really the best method to retain both the color and shape of the hat.
The Best Way to Wash a Baseball Cap
1. Fill a clean sink or bucket with warm water. Err on the side of cool versus hot.
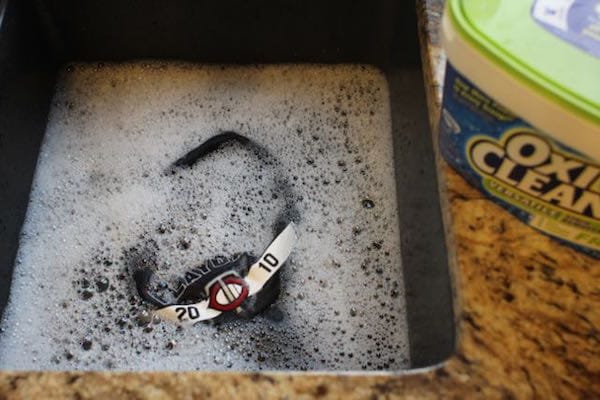
2. As it’s filling, add a tablespoon of laundry detergent or OxiClean. Dish soap can do in a pinch, but detergent, or a dedicated stain-fighting treatment like OxiClean, is stronger and works harder at getting the stains out of the hat’s fibers.
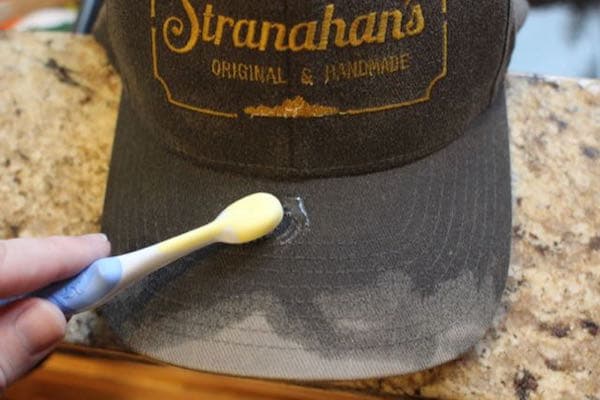
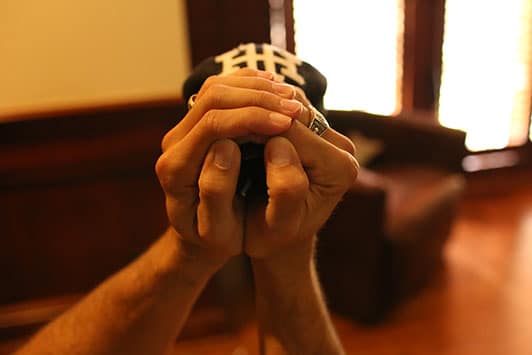
Shampooing the bill of the ballcap.
3. Spot-clean the hat first, as needed. If there are areas that are especially problematic, spot-clean them with a dab of cleaning product right on the hat. After first dipping the hat in the water of your bucket or sink, use a toothbrush or other small scrubber to rub the cleaner into the fabric. I saw a tip to use shampoo on sweat stains; I tried it on one of my caps and the results were pretty spectacular. The bill was clean of sweat stains, while the back (where I didn’t use any shampoo), remained pretty gross after cleaning:
One note here: Be especially careful around threaded stitching. If you’re too vigorous, the stitching can become misplaced, and the artwork marred.
4. Let the hat soak for up to a couple hours. After you’ve spot-washed, let the hat soak in the soapy water-filled bucket or sink you’ve filled for up to a couple hours, though I found that even just 20-30 minutes will get the job done. About halfway through soaking, take a look at the cap and see how the stains are looking. Although the wetted fabric will hide some staining, they’ll still show through if they’re bad. Using your small scrubber, again spot wash those persistent problem areas, and again, be careful around stitched patterns and logos.
5. Rinse all the soap off with warm water. Give the hat a good rinse before letting it dry.
6. Pat down with a towel to get rid of excess moisture. The hat will obviously be very wet when you remove it from the water; let some of the excess drip off, then pat dry with a towel as much as you can while retaining the shape of the hat, and being gentle with logos. Your goal here is simply to remove the excess so that it can dry on a counter without dripping water all over.
No towel underneath = wet countertop.
7. Always air dry on some sort of container. You want to find a way to dry the hat so it’s not just crumpled on the counter. Find a coffee jar, a canister, a balled-up towel, or perhaps any mannequin heads you have lying around to set it on. This will ensure the hat’s shape stays true and doesn’t crinkle up. Throw a towel under the container too; no matter how much patting you do, I’ve found there will always be some drippage. If you want to speed things up, use a small fan to blow air over it, or a hair dryer on the low setting.
Tips for Cleaning Wool Hats
Wool hats are a bit more delicate than your standard cotton or mesh caps. The discontinued AoM cap (if you have one, keep it, it’s now a vintage collector’s item!), for instance, is wool, and needs just a little more TLC to clean. Rather than standard detergent or cleaning product, find something that’s made specifically for wool, and soak it as directed above.
Be sure to be especially gentle when doing any scrubbing; if you’re too harsh, the wool can get matted and come to resemble felt. You don’t want that.
And finally, when drying the hat, pat it dry to remove excess moisture, then consider actually wearing it to dry the rest of the way. It will probably be a little uncomfortable, but the shape will conform exactly to your head rather than to some coffee bean container. Wool hats are notorious for losing their shape after washing, so be especially careful.
Tips for Cleaning Older Hats
If your hat is 20+ years old, there’s a decent chance it’s made with different, less-durable materials than today’s hats, both in the bill and the cap. Believe it or not, bills used to be made from cardboard rather than the more forgiving plastics of today.
The first thing to do when cleaning an old cap is to give it a color test. The vast majority of today’s hats are colorfast, meaning they have some blend that helps them retain color upon washing. Old caps don’t always have this, though. To test, rub a small amount of cleaner on the underside of the bill with a rag. If the rag comes away with some color, you’ll have to use water only to clean the cap, and simply do the best you can. If the rag comes away clean, you’re clear to use detergent.
As for actual washing, spot-clean only, especially if you’re unsure of the bill material. Soaking an old cardboard bill in water will obviously ruin it. And old hats in general are just less durable than today’s. Use a small scrubber, and clean up any problem areas by hand.
The Verdict
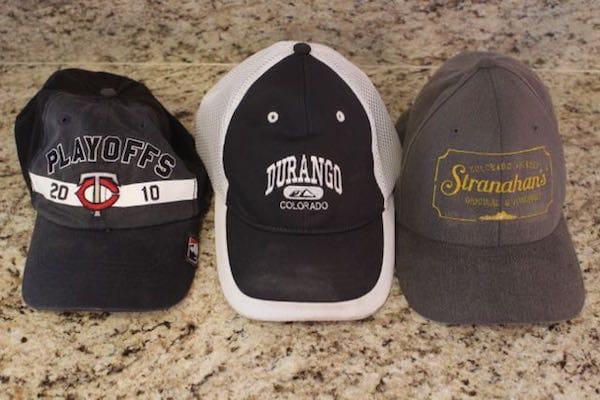
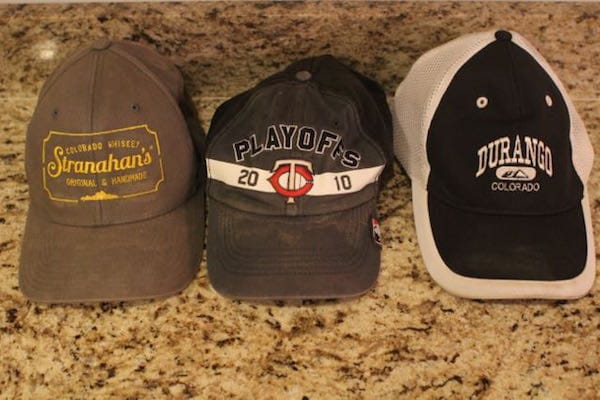
Washed caps to the right and left; unwashed “control” cap in the middle.
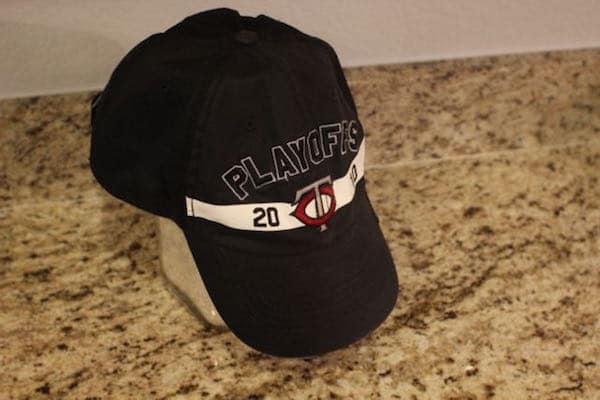
My hats came out much cleaner after using this hand-washing method. I did some testing of different methods, including not washing the middle black and white cap. The stains are still visible on the bill, and the white isn’t as white as the newly-cleaned “Playoffs” baseball cap to its left. The OxiClean really brightened up the colors on that one. You’ll also notice on that Playoffs cap that the stains on the bill are almost completely gone. They’re still faintly visible, but it’s way better than before.
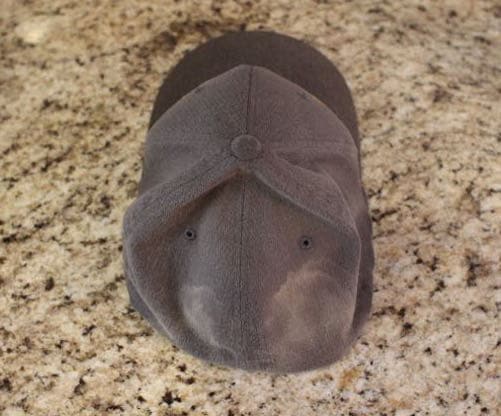
The gray cap on the right is also much better, although as you saw above, the back is still kinda gross because I didn’t spot-clean it. Lesson: spot-cleaning is a must for especially problematic areas.
If your favorite baseball cap is grimy from a few too many summertime sweats, give it a good hand-washing and you’ll be able to take it into plenty of extra innings.
FAQs
Can you put your hat in the washer?
No, a washing machine will only damage your baseball hat.
Can you put your cap in the dishwasher?
No, the dishwasher detergents are a lot harsher than clothing detergents, so you’ll ruin your hat putting it in the dishwasher. Also, the heat in a dishwasher can also damage and shrink your hat.