Contrary to the name, English muffins are not in fact English. They were first created by Samuel Thomas in the late 1800s at a bakery in New York City. (Thomas’ brand English muffins are still largely what you see on store shelves today.) This new muffin was modeled after the crumpet, which is indeed an English bread product that rises using baking soda and is known for its fluffy, spongy texture. It’s almost like a small pancake. Thomas’ recipe used yeast instead of baking soda, creating a product that tasted more like true bread than cake, while retaining some of the spongy texture. It was always intended to be something that would be placed in the toaster (they were in fact first called “toaster crumpets”) and enjoyed with honey, butter, or jam, or some combination thereof.
I grew up eating a lot of English muffins (including sometimes at dinnertime in the form of my grandma’s Spam-topped “pizza burgers” — you can check out that recipe here), and that continued into adulthood; we sometimes even used to buy them at Costco, getting four six-packs at a time. That stopped, however, when I started making my own bread. Why buy English muffins when toasted slices of my homemade bread tasted so much better?
After getting the hang of bread making, I decided the only thing that could be better than subbing in homemade bread for store-bought English muffins, was to figure out how to make the latter from scratch. After making half a dozen batches or so, I can confidently say that if you have the basics of bread-making down, you’ll be able to follow this recipe with no problems.
Note: The recipe below is adapted — not copied; it indeed has some unique steps/measures — from a recipe that originally came from Bread Illustrated, which I can’t recommend enough for the home baker.
Ingredients
- 1 lb flour (16oz or ~450 grams) — I used bread flour, because that’s what I always use, but it can be all-purpose
- 1 Tbsp instant yeast — you could use active dry; just be sure to activate it with water/sugar for 10-15 minutes
- 2 tsp salt
- 1 cup whole milk (8oz), room temperature — microwave for 20 seconds to get it to room temp; you could also use 2% milk if it’s what you have
- 1/2 cup water (4oz), room temperature
- 2 Tbsp butter, melted — salted or unsalted works
- 1 Tbsp sugar
One notable ingredient left out that you often find in English muffin recipes is cornmeal, which lends the muffin even more of its classic texture. I’ve found, however, that when it comes to cooking the muffins, it just ends up burning and I scrape most of it off. There’s no real difference in taste, so I leave it out.
One final note: If you’re into sourdough and have a starter, you can incorporate that as well. If you’re going to do that, you probably know enough about sourdough to be able to modify the recipe on your own. Experiment with different amounts of starter to get your desired results. Since it’s a quick rise and a hefty amount of yeast, you’ll still need to supplement with yeast rather than getting all your rise from the sourdough.
Directions
1. Mix Dry Ingredients in Large Mixing Bowl
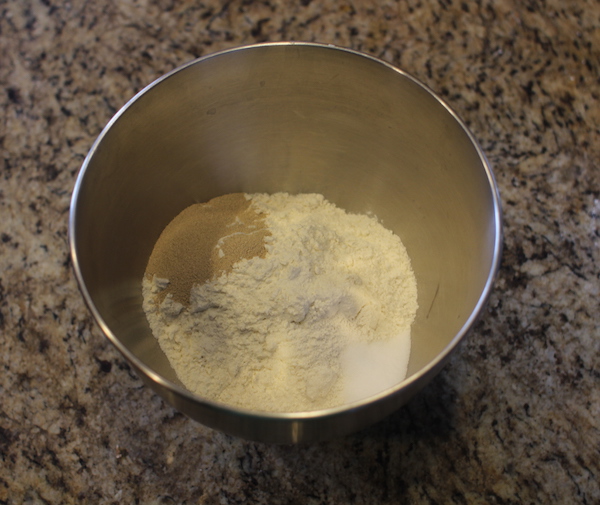
Use a whisk (or fork) to thoroughly mix the flour, yeast, and salt.
2. Mix Wet Ingredients in Large Liquid Measuring Cup
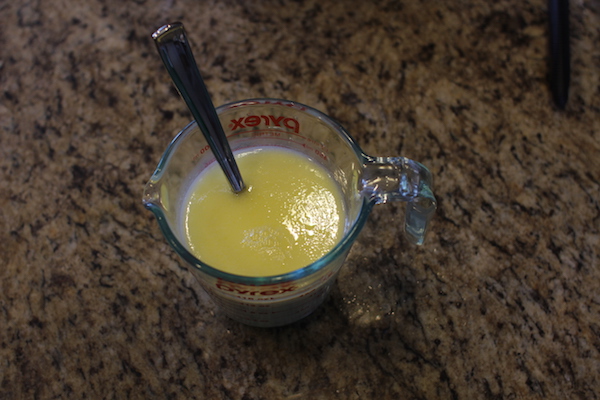
Add milk, water, butter, and sugar to a large measuring cup (I used a 2-cup variety), and whisk together. A coil whisk or a fork do the job as well as a standard whisk here.
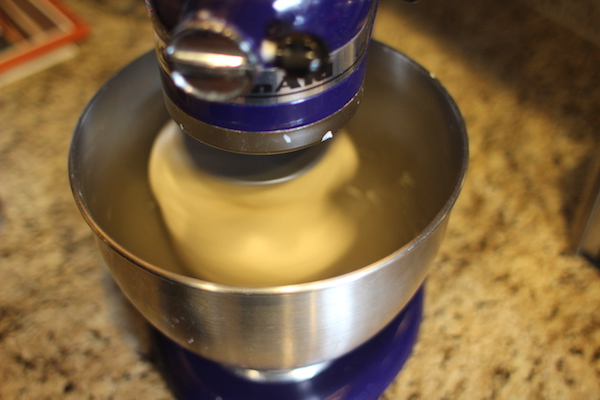
3. Using Electric Mixer, Incorporate Wet and Dry Ingredients
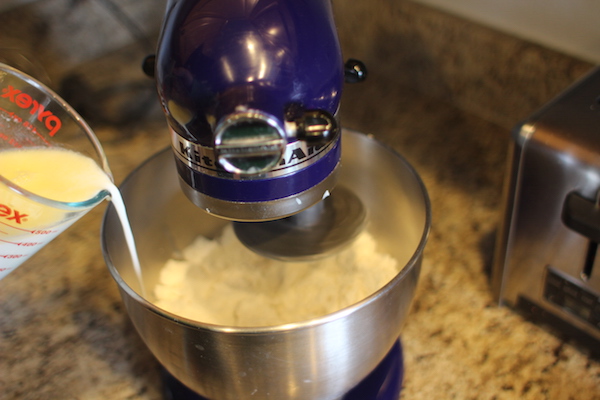
Use the dough hook attachment for your mixer on low speed to get ingredients fully incorporated. (Side note: If you make a lot of bread (or do a lot of baking of any sort), you really should get yourself a KitchenAid Stand Mixer. It’s expensive, but worth every penny.)
If you don’t have a mixer, or a dough hook, just use a spatula.
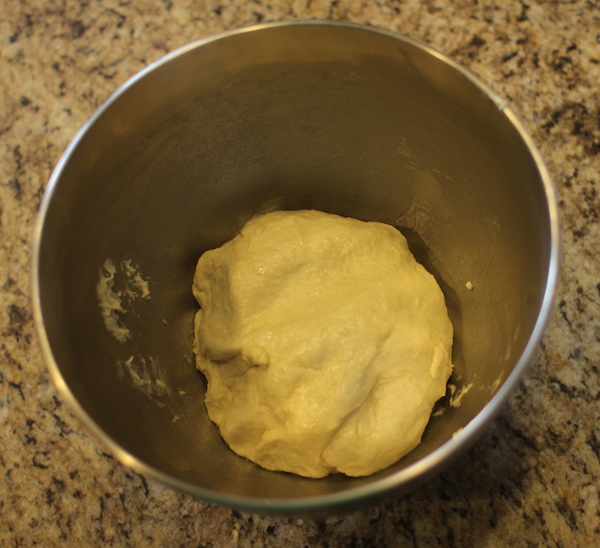
4. Beat for a Few Minutes to Create Dough Ball
As the dough whips around, it will naturally clear the sides of the mixing bowl.
Once ingredients are mixed, increase speed on your mixer to medium-low or medium, and let it beat for a few minutes. You know the dough is well-kneaded when the ball of it naturally cleans the side of the bowl.
If you don’t have a mixer, or a dough hook, knead for ~10 minutes until you have a smooth, elastic ball of dough.
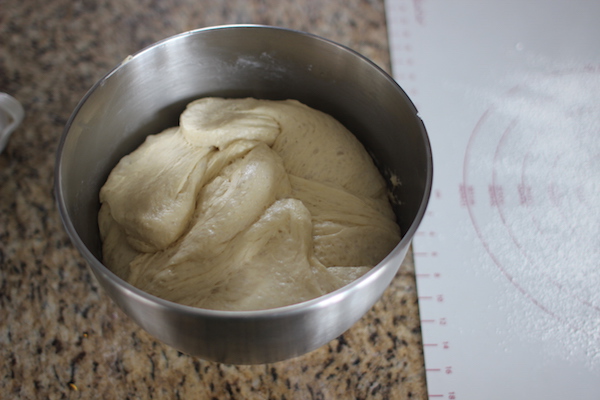
5. Add Oil, Cover Until Doubled
Add a teaspoon or so of olive oil to your mixing bowl and flip the dough ball around so it’s covered in oil and won’t stick to the bowl. Cover with plastic wrap until it’s doubled in size, generally 1.5-2 hours. This is pretty forgiving though; I’ve gone as short as an hour, and as long as about 3 hours.
6. Once Doubled, Turn Out Onto Counter, and Split Into Quarters
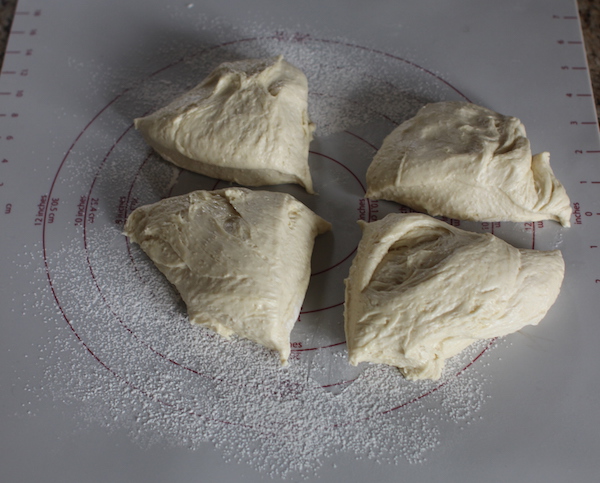
I like to use a baking mat, but whether you use that or the counter, give your surface a liberal sprinkling of flour, and turn the dough out onto it. Split your dough, using a thin spatula or dough scraper, into quarters.
7. Roll Dough Into 12 Balls
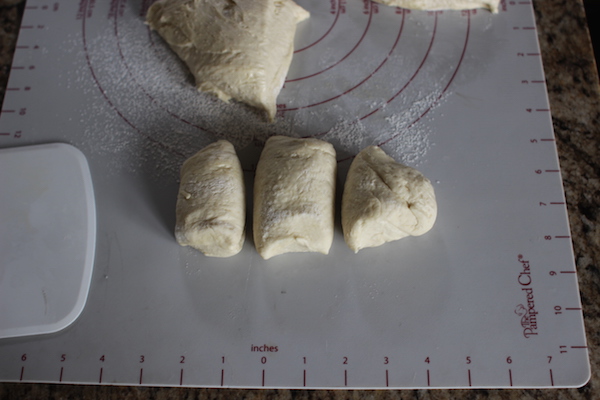
Working one quarter at a time, split that quarter into thirds, and roll each of those into dough balls by gently rolling it between your hands until it’s smooth and just about perfectly round. Once done, place onto a greased baking sheet.
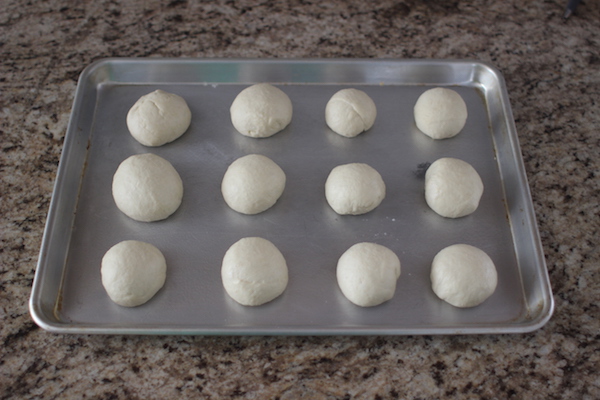
The dough balls inevitably won’t be perfectly uniform in size. Don’t worry about it; you’re a home baker, not a professional.
8. Refrigerate for 12-24 Hours
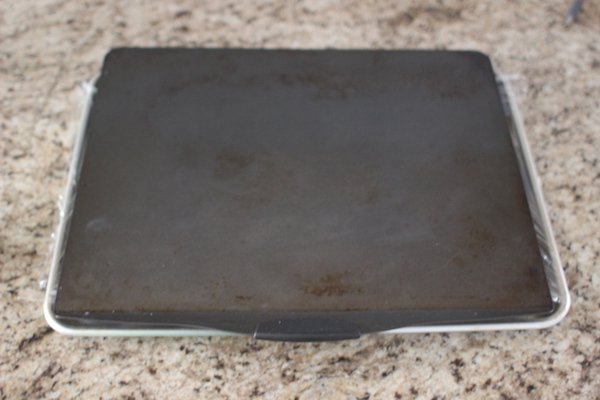
Once all 12 balls are on your baking sheet, place a layer of plastic wrap over the top of the whole thing. Then, place another baking sheet on top of that. This is what flattens the dough balls and gives them that classic look of an English muffin. Let it rest on the counter for 30-60 minutes.
Next, place the baking sheet in the fridge for 12-24 hours, depending on your convenience and availability. There’s no difference in cooking performance or taste between those hours.
9. Pull From Fridge, Rest 30 Minutes
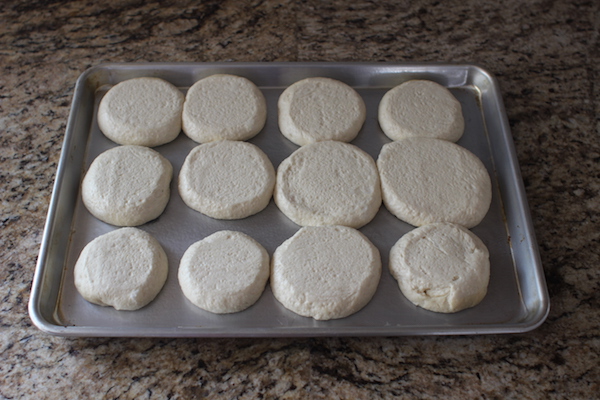
When you’re ready to cook up your muffins, pull them out of the fridge and let them rest for about 30 minutes in order to let them come roughly to room temperature.
10. Preheat Oven to 350 F, Then Preheat Large Skillet on Low Heat
You’ll first cook the muffins on the stovetop for a few minutes, then throw them in the oven. Use a low heat — for reference, I put our electric stovetop at 3 (out of 10) — and let your skillet warm up for at least 5 minutes.
11. Cook Muffins on the Skillet
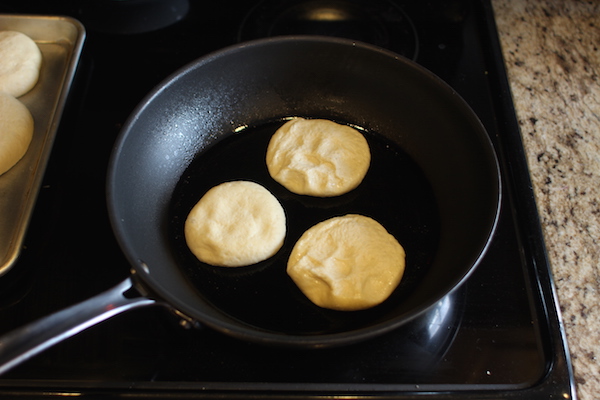
Give your skillet a good greasing with whatever spray you prefer (or butter!). Place as many muffins as will fit on your skillet — probably 3 or 4 — and cook on each side for a couple minutes until they start to turn golden brown. The difference between golden brown and slightly burned is only about 30-45 seconds, so be sure to keep an eye on them, lifting them up with a thin spatula every 30 seconds or so after the first minute. They’ll get nice and puffy from this stovetop heating.
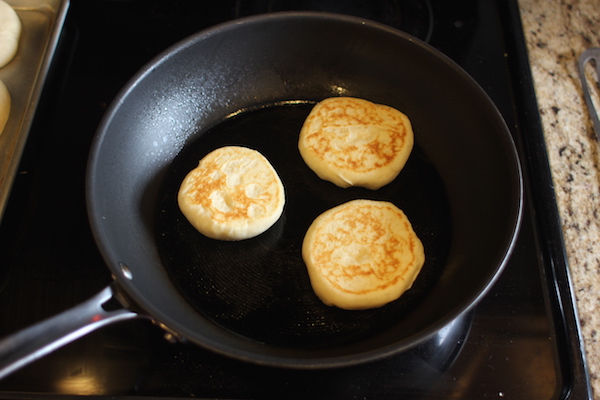
After you’ve done both sides, place them onto a sheet for baking (no need to grease the baking sheet). Repeat in batches until all 12 muffins are cooked.
12. Bake for 12 Minutes
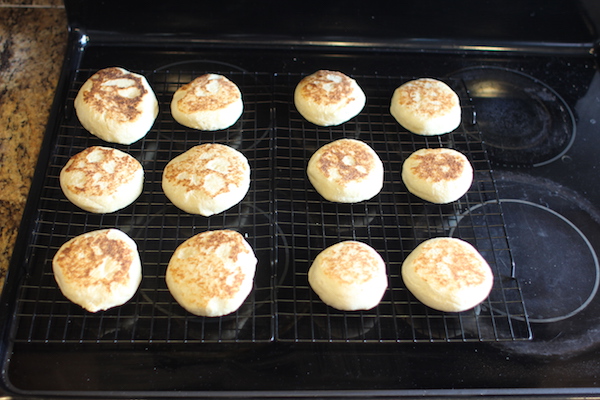
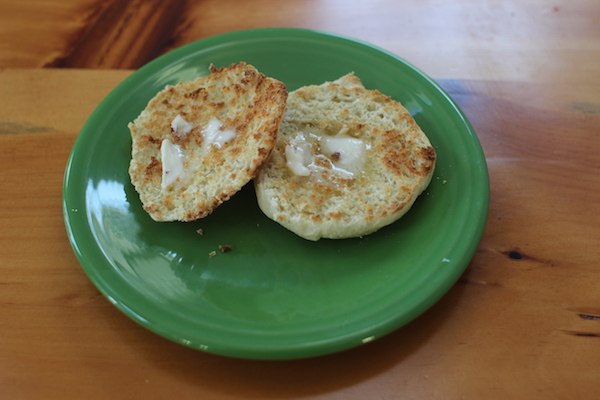
After all the muffins are cooked, bake for 12 minutes, then transfer to a baking rack until they cool slightly, about 15 minutes. Serve them while they’re still warm for best effect, though they hold for a few days in a ziplock bag just fine.
I’ll sometimes make a double batch, freeze them, and pull them out as desired. To warm, I’ll microwave for 15 seconds or so, then split and toast.
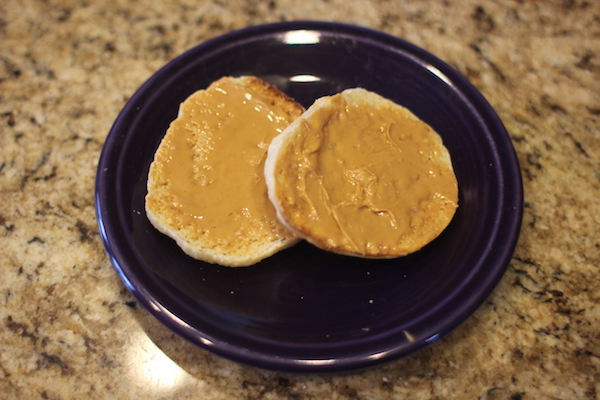
I like to enjoy my morning English muffins with a nice slather of peanut butter.
The process of making your own English muffins is admittedly a little involved, but it’s a very impressive bread product to serve to friends and family, and especially the in-laws.