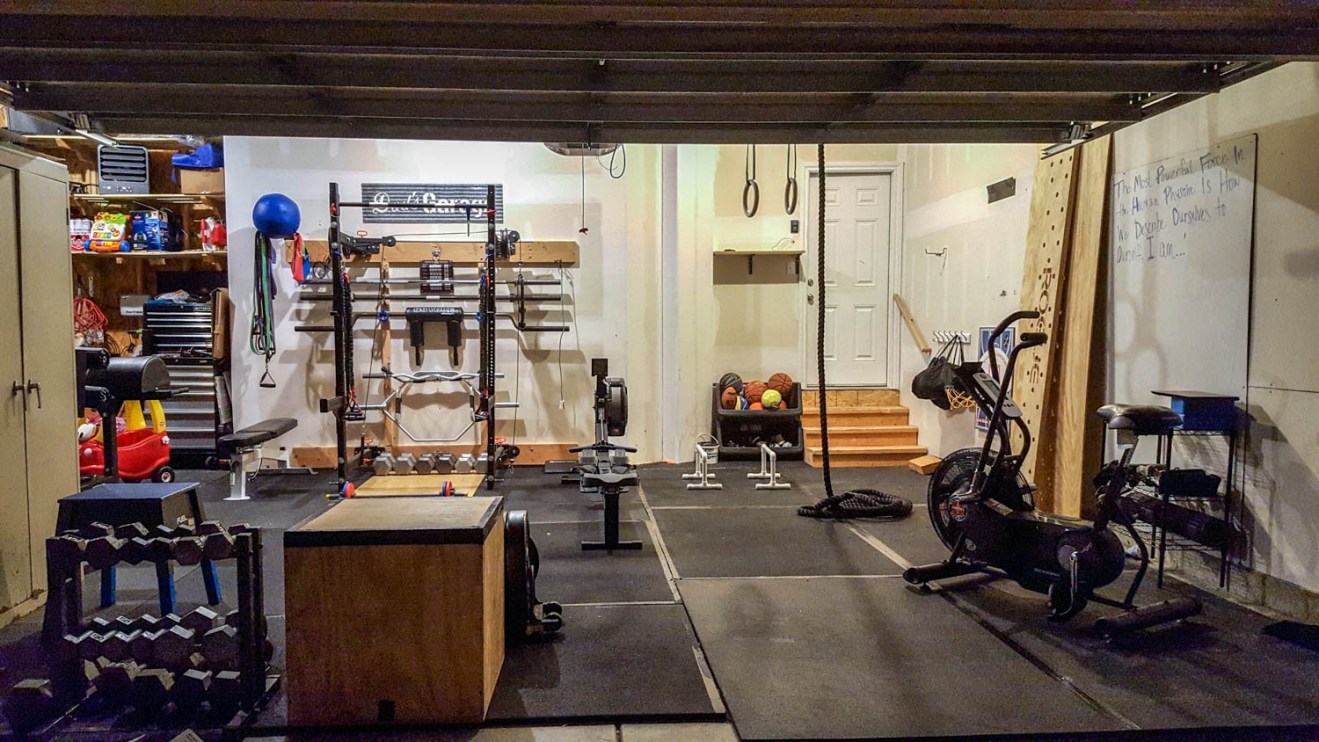
It’s been exactly a year since I started working out in my garage gym and I absolutely love it. Going to the gym is just a trip to my garage and I never have to wait on equipment.
For the past year, I’ve been lifting on a piece of 1/4″ rubber matting. It’s served its purpose in providing traction and protecting my garage floor from heavy weights being dropped (in a controlled fashion) on the ground. But I’ve never been completely satisfied with it. Lowering heavy weights to the floor was still insanely loud with those mats. Also, in the way I had it set up, my squat rack wasn’t anchored to the floor. The only thing keeping it from tipping over when I racked a heavy barbell were two 55-pound bumper plates resting on the back legs of the rack.
I had been exploring solutions to these issues for the past few months, and one that came up over and over again was to put in the kind of weightlifting platform most strength gyms use. So I texted by buddy and coach Matt Reynolds, owner of Barbell Logic Online Coaching to ask what was involved with doing that. He responded that it was super easy and pretty cheap, and offered to come down to Tulsa from his home in Springfield, MO to help me build one.
After a trip to Home Depot and an hour of work, I had a highly functional and sharp-looking weightlifting platform in my garage gym. It’s offered numerous benefits to my strength training, which I’ll detail below, and I’ve really enjoyed using it.
For you fellow garage gym athletes interested in doing the same, here are step-by-step instructions on how to build your own weightlifting platform.
The Benefits of a Lifting Platform
Protects your garage floor. If you have a garage gym, this is probably the biggest reason to build a platform. Lowering and dropping weights on a cement floor covered with just a rubber mat can lead to damage. This happened to Matt in his first home, where he had a garage gym that was covered with just hard rubber mats. He did heavy barbell and strongman training that involved dropping a lot of heavy weights on the ground. When it was time to move, he discovered a cement floor filled with cracks and holes from years of impact. He had to do a costly and time-intensive concrete patch job.
A lifting platform eliminates this problem. You’ve got a layer of thick particle board or plywood and a layer of thick rubber matting standing between the floor and the plates.
Protects your equipment. Not only does dropping weight on a hard floor (even layered with a rubber mat) damage it, it can also damage your equipment. The extreme force that occurs when you drop or lower the weight on a concrete floor can damage bars and bumper plates. A lifting platform absorbs some of that force, prolonging the use of your home gym equipment.
Makes lifting safer. A platform makes lifting safer in a few ways. First, it allows you to easily bolt your rack to a stable surface, ensuring that it stays put during all your lifts. As mentioned above, before my platform, the only thing I had anchoring my squat rack were two 55-pound bumper plates resting on its back legs. It did the trick, but my rack was always pretty unstable when I was doing pull-ups or re-racking a heavy barbell during squats.
Yes, I could have anchored the rack to the floor of my garage, but I didn’t want to put holes in it, and anchoring to cement can get tricky. With a platform, securing your squat rack to a stable surface just requires a few lag screws and you don’t have to put any holes in your garage floor.
The other way a lifting platform makes lifting safer is that it provides a flat, even, and hard surface for you to do your lifts. With the old mats that I was using, I’d sometimes find bulges beneath my lifting area because stuff somehow ended up underneath the mats. Also, I’d have to sometimes kick mats back into place to eliminate gaps between them. No longer a problem with the lifting platform.
Feels better. Not only does a platform make lifting safer, it also simply makes lifting feel better. First, the force absorption that a lifting platform provides can make deadlifting a bit more comfortable. Try lowering a 475-pound bar to a cement floor — even with a controlled release, it sends a shock through your arms that’s not very pleasant. A lifting platform reduces that a bit.
Standing on a platform also simply feels better than standing on the garage floor. You wouldn’t think it would feel much different than standing on a cement floor/mats, but it feels more even and level. And there’s just something about being a little elevated off the floor!
Makes lifting quieter. One of the cons of having a garage gym is that it can be awfully noisy when loaded barbells hit the ground when you deadlift or perform Olympic lifts. With just a 1/4″ hard rubber mat, whenever I lowered a 405-pound barbell during a deadlift, the noise it created could be heard all the way on the other side of the house. This was especially an issue when I did early morning workouts, as my kids’ bedrooms are right above the garage, and sometimes the sound woke them up.
The platform’s thick rubber horse stall mats combined with the wood base definitely reduces the amount of noise when lifting. It won’t eliminate all the noise, but it does dampen it.
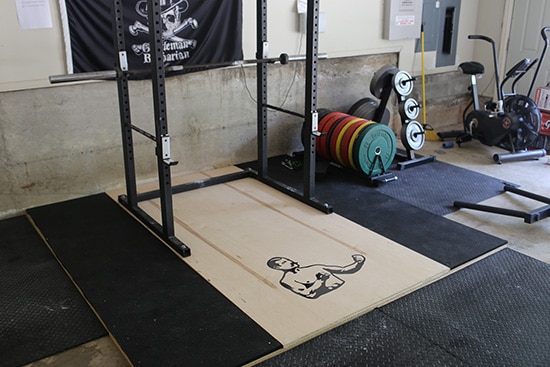
It just looks cool. I’ll admit it. One of the reasons I wanted a lifting platform in my garage is that they just look cool. The smooth piece of maple plywood with John L. Sullivan emblazoned on it, framed by the black horse stall mats, signals that this is an area where strength is forged. I’ve had the platform in my garage for a few weeks now, and I still stop to admire it whenever I walk by. Stupid? Perhaps. But anything that gives you a psychological boost and helps motivate you to work out is a good idea in my book.
How to Build a Lifting Platform
Building a lifting platform is relatively cheap and ridiculously easy. It cost me $170 and took Matt and I just an hour to build. Below is how to do it. When you’re finished, you’ll have a 8′ x 8′ platform.
Note: A lifting platform will elevate you off the floor by two inches. Make sure that you’ve got plenty of space above you to accommodate that. The last thing you want is to put in a platform and realize you don’t have enough height in your garage for it when your plates go right through your ceiling on an overhead lift.
Update: AoM reader Robert Heffern put together this CAD of the project if you want to use.
Materials
- (4) 4′ x 8′ pieces of 5/8”-thick OSB/particle board
- 1 piece of 3/4”-thick, smooth maple or oak plywood
- Box of 1 1/4” construction screws
- (4) 3 1/2” lag screws (these are used to bolt your rack to the platform — make sure the diameter of the screw fits the holes in the feet of your rack)
- (8) washers
- (2) 4′ x 6′ 3/4″-thick horse stall mats (I got mine at Tractor Supply Co.)
Total cost of materials: ~ $170
Note: If you don’t have a pick-up truck to haul the full-sized pieces of particle board and plywood, you can rent one from Home Depot (and most other big box home improvement stores) for $20.
Tools
- Power drill
- Box cutter with plenty of blades
- Chalk line
- Straight edge
Putting the Platform Together
Place the First Layer of Particle Board
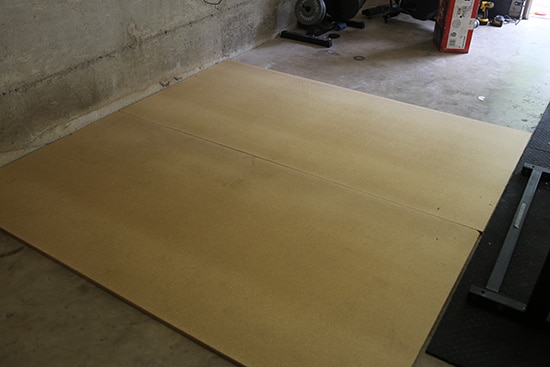
Decide where you want your platform to go because once it’s there, it’s hard to move without un-anchoring your squat rack from it. Lay two pieces of particle board side by side. Make sure there isn’t a gap between them.
Place the Second Layer of Particle Board
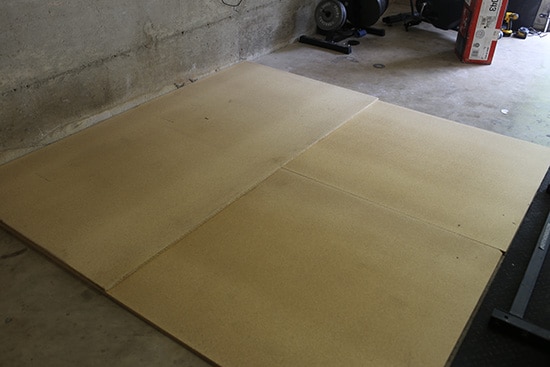
Lay your second pieces of plywood across the first layer in the opposite direction that you laid the first pieces. That is, make it perpendicular to the bottom layer.
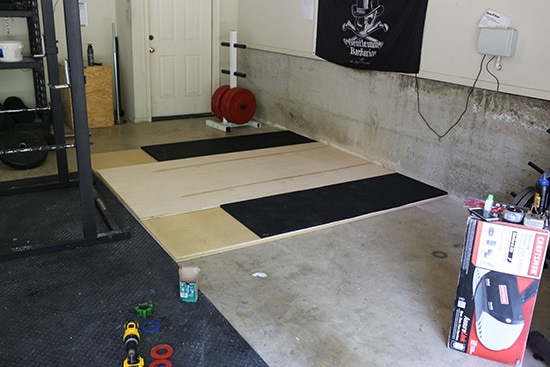
Here’s what it looks like finished:
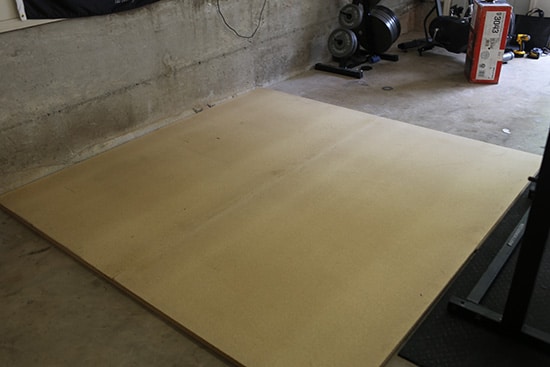
Screw the Particle Board Together

Using your drill, screw the two layers of particle board together. Be generous with the screws; the more secure the better. Put one in each corner, and then a few screws down all sides of your emerging platform.
Place and Secure the Screw the Particle Board Togetherwood
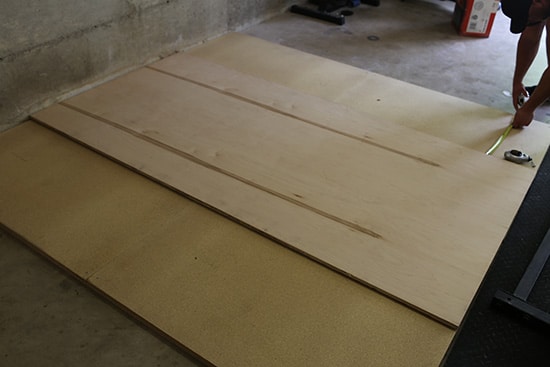
Time to lay your lifting surface! Get your piece of nice plywood and put it smack dab in the middle of the particle board. You should have two feet of particle board on each side of the plywood (this is where you’ll put your rubber matting). Once you’ve got it in place, screw it down to the particle board platform with construction screws.
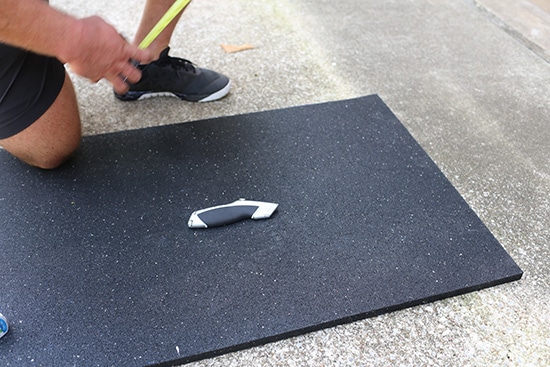
Measure and Cut First Mat
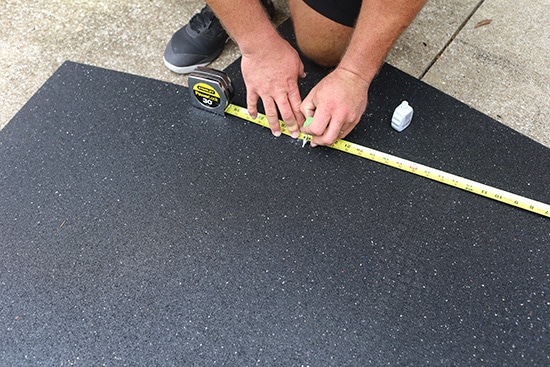
Take one of your horse stall mats and measure and mark a line that’s smack dab in the middle lengthwise, (the 2′ mark). This will divide the mat so that you have two pieces that are 2′ x 6′.
Use a chalk line to put a straight line down the mat that you’ll use as a guide for cutting.
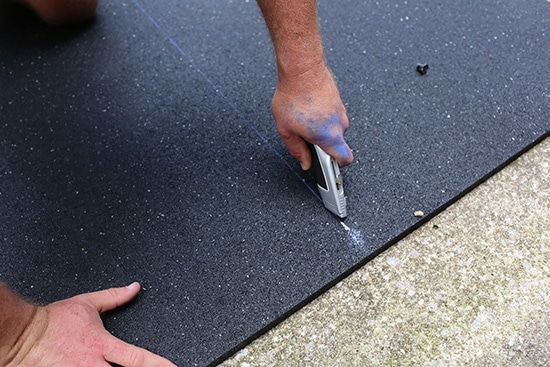
Using your box cutter, cut a scoring line in the mat along your chalk line. For added straightness when cutting, you can use a straight edge to guide the blade down the chalk line. Matt just freestyled it, and it came out fine.
Once you make the score mark, you’ll need to elevate the mat on a sawhorse or something else like a garbage can to finish the cut.
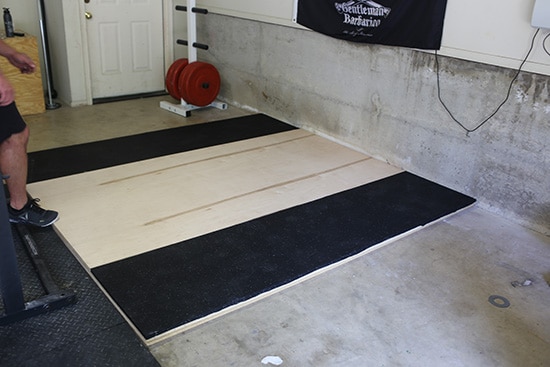
Place the First Mats and Secure
In the picture you’ll note that we put the 2′ x 6′ strips of mat so that they were flush against the back of the platform. The problem with that is it would leave a seam where our 2′ x 6′ and 2′ x 2′ mat pieces would meet at the front of the platform. Since this is where I’ll be lifting, I didn’t want any seam there that could possibly separate when lowering weights. Plus it just doesn’t look nice. So we ended up moving the 2′ x 6′ mats to be flush with the front of the platform.
Take your newly cut 2′ x 6′ strips of matting and lay them on each side of your maple plywood, starting at the front of the platform. They should fit perfectly in the space where the particle board is exposed. There will be a rough edge where you made your cut. We placed the rough edges of each piece facing the maple plywood, so that we had a nice, clean look along the edge of the platform. Screw down the mats to the particle board below.
You’ll be left with two 2′ x 2′ squares of exposed board on each side of the platform. We’ll be cutting squares of mat to fit those spaces next.
Measure and Cut Your Second Mat
Alrighty. Let’s fill in those 2′ x 2′ exposed squares of particle board with some more mat. To do that, we’ll take our second horse stall mat and cut it down the middle like we did with the first. That will give us two pieces of 2′ x 6′ mats. Put one of them out of the way, we’ll just be working with one.
Take one of those 2′ x 6′ mats and measure and mark off a spot 2′ down from the top. This will create a 2′ x 2′ square. Cut it.
Repeat the process again so that you have a second 2′ x 2′ square.
You’re probably thinking “What should I do with this leftover matting?” Great question. Cut it all down into 2′ x 2′ squares and put them somewhere in your gym. You can stack a few on top of each other and stand on them to perform deficit deadlifts. Or you can create two stacks to do block pulls. Boom!
Places Second Pieces of Mat and Secure
Lay these pieces of mat and screw them down to the particle board with construction screws.
Almost finished! Just need to bolt the squat rack to the platform.
Bolt the Rack to the Platform
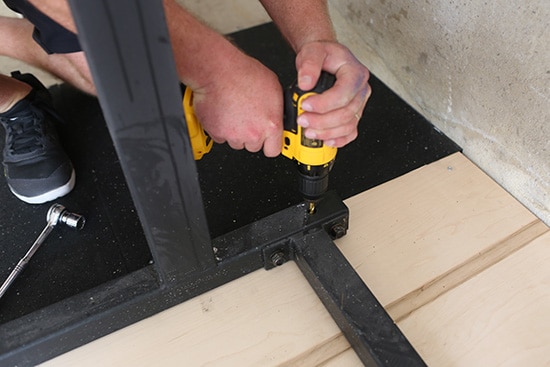
Time to bolt the rack to the platform. Put your rack near the back of the lifting platform, on top of the plywood lifting surface. You can put it flush with the back or leave a bit of a gap between the back edge and the rack.
Once you have the rack nice and lined up, drill a pilot hole for the lag screws, as seen above.
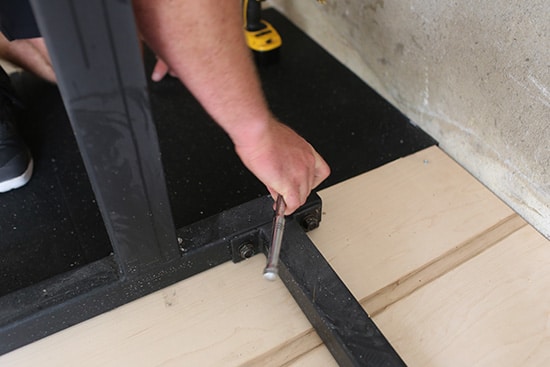
Once you’ve got the pilot holes drilled, screw in the lag screws through the holes in your rack’s “feet,” using a socket wrench. Be sure to put two washers between the head of the screw and the rack. Repeat for the other three corners.
Finished Product
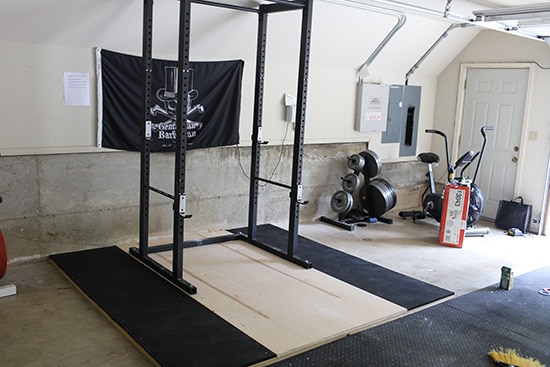
Would you look at that. Ain’t she a beaut! A floor-saving, sound-reducing lifting platform in under an hour. The maple wood in the middle gives you something solid to stand on, while the mats on the sides provide a cushion for the weights of your barbell.
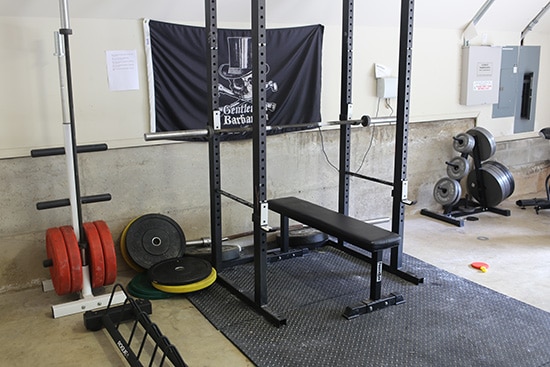
You’ve got function; now it’s time to add a little form. The Gentleman Barbarian flag in the background already punches up the atmosphere (you can get yours here). But the platform itself needs one last finishing touch.
The Pièce de Résistance: John L. Sullivan Logo
![]()
A popular thing for folks to do is put a vinyl logo on their lifting platform to give it a personal touch. I, of course, put none other than John L. Sullivan on mine. Getting a vinyl logo is easy. You can upload and order a custom one at Fast Signs. It cost about $30, and applying the logo is easy.
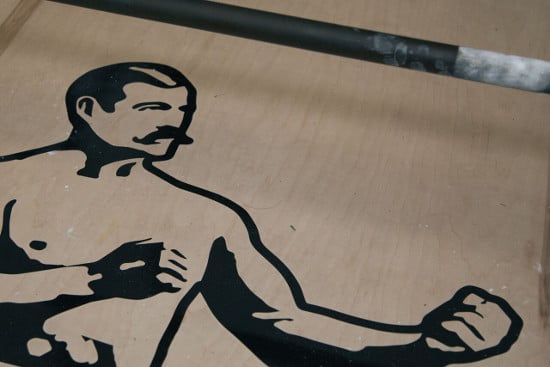
In case you’re wondering, I haven’t had any issues of the logo peeling off after lifting on it for a few weeks. Matt has a Reynolds Strong logo on his platform that’s he’s been lifting on for years and it’s still holding, well, strong. Also, no issues of the logo making the lifting surface slippery.
Before and After

There you go. How to build a weightlifting platform for your home garage. Hope you found these instructions useful. I’d like to thank Matt Reynolds for making the drive down to Tulsa from Springfield, MO to help me put it together, and his continued work helping me with my gains!
Until next time, lift hard, and stay manly.