We can’t all afford a personal masseuse or athletic trainer to regularly rub out the kinks, soreness, and tight spots in our muscles. But there is a way to massage oneself, with the benefit of being able to control exactly where and how much pressure to apply. For that reason, in recent years, doing exercises with foam rollers, massage balls, and the like has gained immense popularity. Yet with new products and cheesy accompanying infomercials coming out all the time, knowing what to do and how to do it can be an intimidating task. At worst, doing exercises wrong can lead to pain and discomfort, and ultimately injury.
You may have heard varying terms for these exercises: trigger point release, active release techniques, or perhaps something similar. The technical term, however, is self-myofascial release (SMR). Other terms may mean different things for different people, so we’ll stick with SMR for the purposes of this post.
Benefits of Foam Rolling
Let’s dissect this science-y term we’ve just learned before diving into the how-tos of the various exercises.
Fascia, as physical therapist Jane Anderberg described it to me, is much like that slimy layer on a chicken breast that you can peel off. Every structure in the body — organs, muscles, nerves, blood vessels, etc. — is covered in a layer of fascia. It’s almost akin to oil in your car’s engine — it allows everything to run smoothly and slide without friction. Through the overstress of our muscles, whether through overuse or trauma, our layers of fascia can get tears in them. When the tears don’t heal properly, the various layers of fascia in your body can adhere together in spots (called adhesions), which will cause pain and discomfort. These adhesions keep your muscles from working the way they’re supposed to, which keeps your body from living up to its potential for strong and natural movement.
This is where where foam rolling and other similar exercises come into play. When we put pressure on these adhesions, they are released, and we can get back to optimal physical performance.
In addition to releasing these adhesions, SMR also has some general benefits for our bodies:
- aids in preventing injuries
- gets rid of knots and tightness in your muscles
- physically de-stresses your body so it can work more efficiently
- increases flexibility
- increases blood flow, which helps for faster recovery from workouts
- reduces soreness from workouts
To put together a comprehensive tutorial on some of the best SMR exercises you can perform, I talked to Damyko Busby a trainer who specializes in trigger point release at the Sky Fitness and Well Being gym here in Tulsa, OK.
What You’ll Need
- Damyko used Trigger Point Performance products in his photo demonstration. They’re a bit pricy, but they can give you a more targeted massage. If you don’t want to fork over the dough for Trigger Point Performance, you can get by with…
- Foam roller. Several different foam rollers exist on the market at different price levels. A plain-old high density foam roller is the most affordable option and will get the job done. The only problem is after months of use, they start to lose their round shape. A foam roller with PVC pipe in the middle solves that problem. The added sturdiness of the PVC pipe also gives a deeper, more intense massage. If you want to get really targeted with your SMR, you can get foam rollers that have grids molded onto the surface.
- Ball. Many physical therapists and mobility trainers recommend a lacrosse ball for self-myofascial release. I’ve been using one for a few months now and can’t complain. You can pick one up at Academy Sports for a few bucks.
- Yoga block. Some of the exercises utilize a yoga block. Not necessary, but can come in handy.
- Mismatched compression socks (optional).
General Guidelines
- Roll on the foam roller/ball until you feel a “trigger point” or “hot spot.” You’ll know you found one when it hurts. When you find a trigger point, stop and just rest on the foam roller for 10 to 20 seconds. Contrary to popular belief, it’s the pressure, not the rolling, that smooths fascia.
- Avoid applying pressure on bones and joints. Just muscle.
- Combine an abbreviated SMR with your regular warm-up on workout days. I like to focus on the spots that I have the most trouble with. Use one of your rest days to devote 30 to 45 minutes to SMR for your whole body.
- Drink plenty of water after an intense SMR session.
Feet
Using Trigger Point Footballer
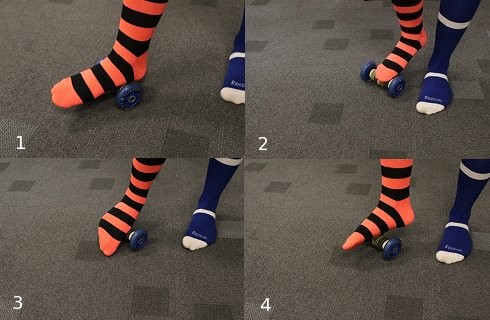
1. Start with Footballer on heel. 2. Roll to ball of foot, stopping and applying pressure on any trigger points you find along the way. 3. Roll the Footballer on the inside of your sole. 4. And on the outside. Do the same with the other foot.
Using Lacrosse Ball or Massage Ball
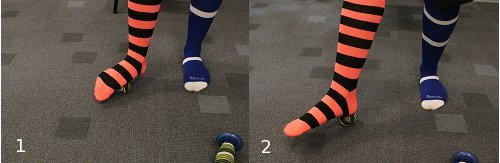
You can use a lacrosse ball for this exercise. 1. Start at ball of your foot. 2. Roll to your heel, stopping and applying pressure on any trigger points you find along the way. Don’t forget to get the insides and outsides of your feet.
Soleus (Inner Calf)
Using a Foam Roller
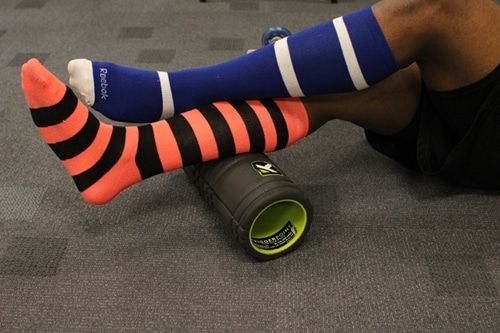
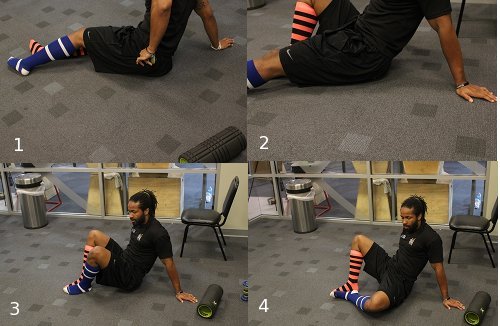
Put one leg on top of the foam roller with your other leg crossed on top. Roll up and down your inner-calf to find your hot spots. When you find a hot spot, stop and lift your butt off the ground with your hands to apply more pressure on your leg. In addition to applying steady pressure on your trigger points, you can also rock side-to-side on them.
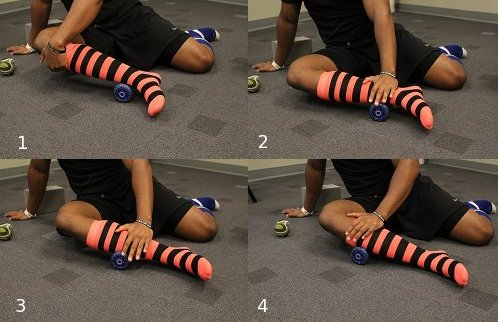
Using Trigger Point Footballer
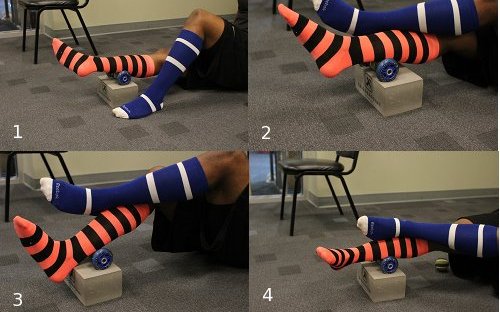
1. Place Footballer on the yoga block and your calf on the Footballer. 2. Place your other leg on top of the leg that you’re treating. 2. Roll all the way down your calf to your heel and all the way up near your knee. Stop on any trigger points and apply downward pressure on them. 4. Rotate your leg in to really work that soleus muscle.
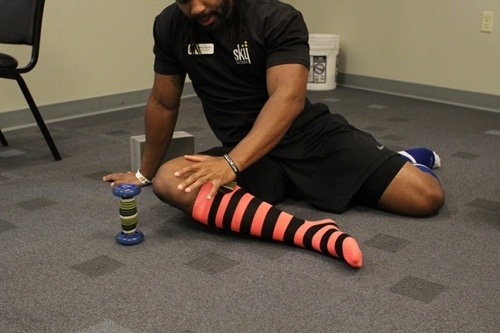
Using Lacrosse or Massage Ball
1. Place ball on yoga block, one leg on ball, and the other leg on top of the leg you’re treating. Roll up and down leg to find trigger points. 2. When you find a trigger point, point your toe forward and hold for a few seconds. 3. Then point your toe back towards you and hold. Alternate between pointing forward and back a few times. 4. Don’t forget to really work the inside of the soleus.
Gastrocneumius (Outer Calf)
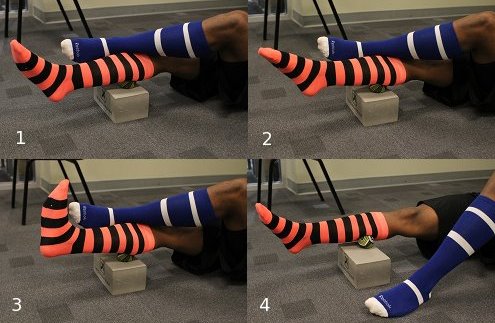
Using Trigger Point Footballer
Using Lacrosse or Massage Ball
You can do the same thing with a ball. When you find a hot spot, use your non-supporting hand to rock your leg back and forth on the ball. It’s going to hurt, but it’s the good kind of hurt.
Quads
Using Trigger Point Quadballer
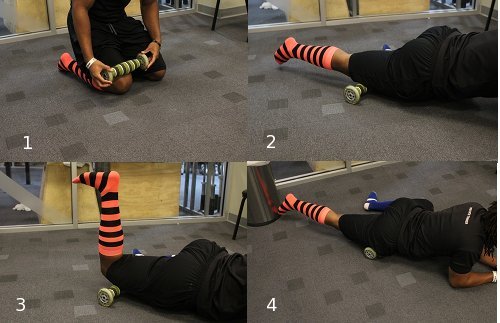
1. Place the Quadballler just above your knee. 2. Lie down and prop yourself up on your forearms. Roll the Quadballer up and down your quad, stopping on any trigger points. Gently rock side-to-side. 3. In addition to rocking side-to-side on hot spots, bend your leg back at your knee. Hold for a few seconds. 4. Straighten your leg. Hold. Alternate bending and straightening your leg on your hot spots on your quad. You can do this with a foam roller too.
Hip Adductors
Using Trigger Point Quadballer
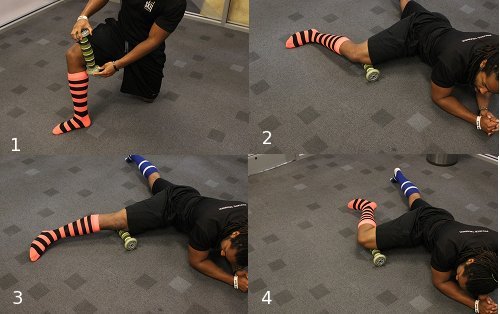
1. Place Quadballer on inside of your thigh. 2. Lie down, propping yourself up on your forearms. Roll Quadballer up to your groin, stopping on any trigger points. Apply pressure. 3. Straighten your leg and hold for a few seconds. 4. Bend your leg at your knee and hold. Alternate between straightening and bending on hot spots.
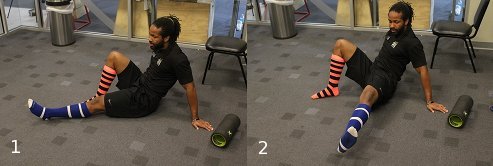
Using Foam Roller
1. Start with foam roller near your knee on the inside of your thigh. 2. Roll up towards your groin, stopping on any trigger points. 3. With the foam roller, you can go higher up your adductor than you can with a Quadballer. Repeat on other leg.
IT Band
This is my favorite trigger point release exercise. If you run a lot, chances are you’ve experienced “runner’s knee.” Runner’s knee is caused by a tightening in your Iliotibial band, or IT band. The IT band is a thick band of fascia running on the side of your leg from your knee to your pelvis. Massaging your IT band can help loosen up tightness and prevent future injuries. Take it easy when you’re first starting out rolling your IT band. It’s going to hurt.
1. We’re going to roll the foam roller up and down the side of our leg starting at the top of the hip and down to just above the knee. 2. Lean back on your arm and bend your non-treated leg for added support. Roll up and down IT band, stopping on any hot spots. 3. If you really want to dig into those trigger points, lift both legs off the ground. Grimace. 4. In addition to applying steady pressure on hot spots, rock side-to-side on them. Repeat on other leg.
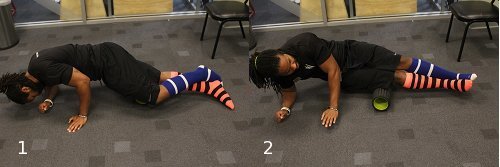
1. Turn your body in so you really work the inner part of your IT band. 2. Turn your body out to work the outer part.
Piriformis
This is my other favorite area to work during SMR sessions. If you spend your day sitting down like most folks, your piriformis muscle is probably very tight. Giving your butt a deep massage with a foam roller or ball will help alleviate some of that tightness.
Using Foam Roller
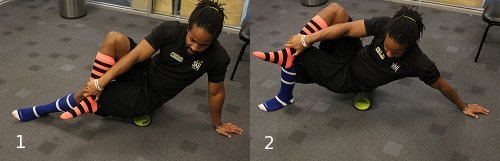
1. Sit on the foam roller and shift all your weight to one side of your butt. Your piriformis is located near your hip joint. You’ll know you’ve found it when it starts hurting so good. Cross your other foot over your knee. 2. Roll backwards and forwards to look for trigger points. Hold when you find them. Repeat on other side.
Using Lacrosse or Massage Ball
1. Place ball on piriformis. 2. Find hot spots on piriformis and hold. 3. To really dig into it, lift the knee up on the side that you’re working. 4. Lower your knee like you’re doing a butterfly stretch. Hold. Bring back up. Alternate between a down and up position.
1. Another way to work your piriformis with the ball is to straighten your leg out in front of you. 2. Maintaining a straight leg, bring your leg out to the side. Hold. Repeat on other piriformis.
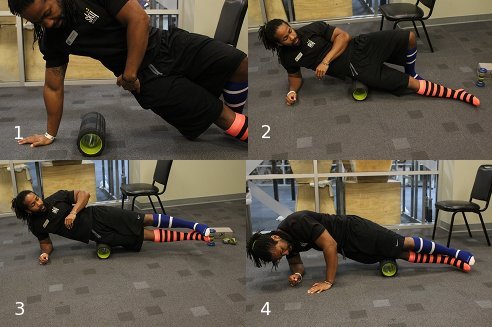
Lats
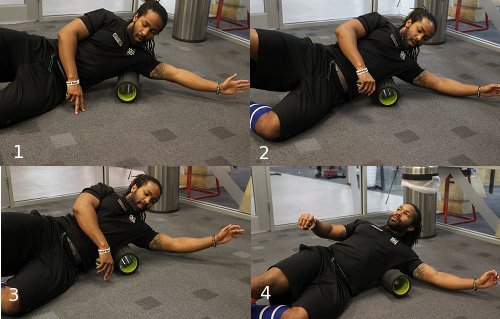
1. Lay on your side with the foam roller beneath your lat near your armpit. 2. Work the roller down your side stopping and holding on trigger points. Don’t go too far down, though! You always want to stay on muscle. 3. To really work those hot spots, rock back and forth on the foam roller. 4. Rotate until your face is looking up at the ceiling and roll up and down to work the lats closer to your spine. Repeat on other side.
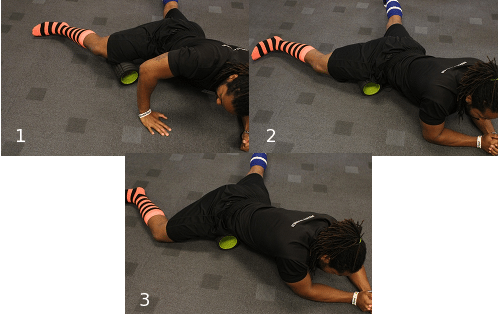
Biceps
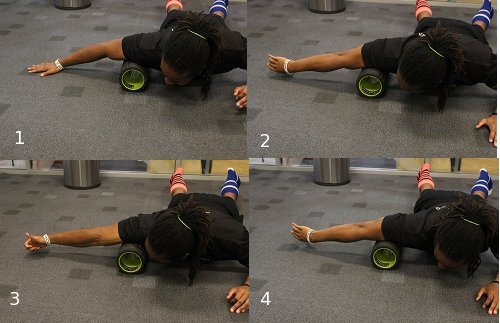
1. Lie on your stomach with your bicep resting on the foam roller. Work the roller up and down your bicep to find trigger points. 2. When you find a trigger point, rotate your arm in so that your thumb is pointing down. Hold. 3. Rotate your arm so that your thumb is pointing up. Hold. 4. Rotate your arm in and out like this for a few cycles. Repeat on other bicep.
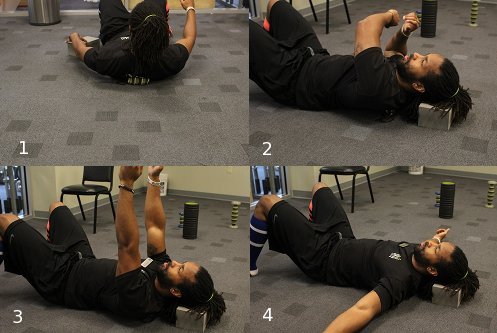
Back/Trapezius

1. Place roller at base of spine. 2. Lean back. 3. Work your way up and down roller stopping on any hot spots. Be careful about applying too much pressure to your spine. 4. When the roller reaches your trapezius, arch your back and hold.

5. With the roller beneath your trapezius, give yourself a hug. Hold. 6. Lift your arms straight in front of you. Hold. Alternate between self-hugs and raising your arms.
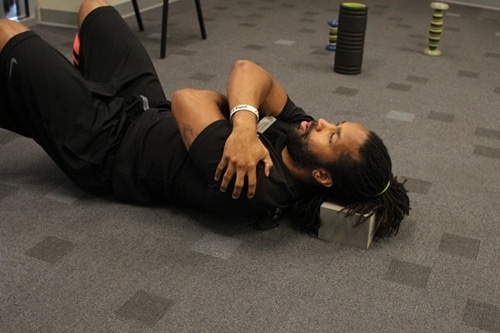
This next exercise requires two Trigger Point therapy massage balls and the little bag that holds them (don’t snicker). We’ll be hitting the fascia on the lower part of the trapezius.
1. Lie back on the ground so that both Trigger Point balls are in-between your shoulder blades. 2. You may want to rest your head on a yoga block so you can apply enough pressure on the fascia you’re going to work. 3. Lift your arms straight in front of you. Hold. 4. Spread your arms crucifix style. Hold.
Biiig hug! Aww… owww!
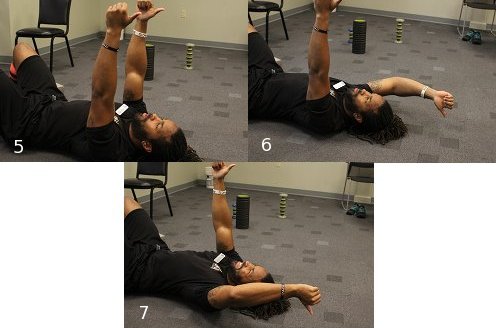
5. Lift your arms straight out. 6. Bring your right arm back above your head. Hold. 7. Bring your left arm back above your head. Look at that face. That’s the face of a man who’s getting rejuvenating deep tissue massage.
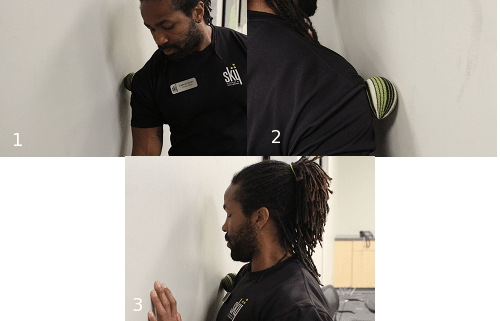
Traps with a Lacrosse or Massage Ball
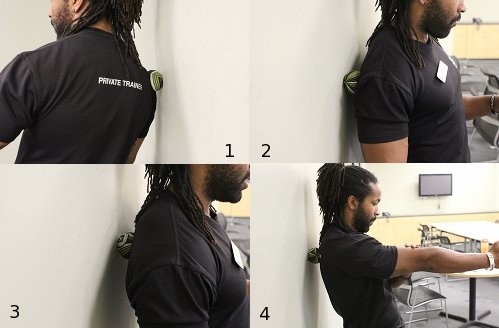
1. Place ball between the wall and upper part of your trapezius. 2. Turn your body away from the wall. 3. Roll back on ball until you find your hot spots. 3. Lift arm straight out. Apply pressure on hot spot. Repeat on other side.

5. Give yourself a hug. 6. Pull your arm on the side that you’re working on the ball across your body with your other arm.
Chest
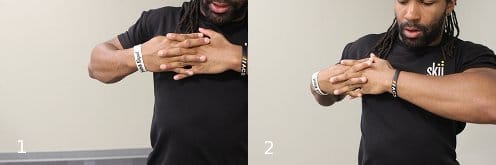
1. Place ball on pec and press down with both hands. 2. Roll ball around on pec until you find a hot spot and hold for a few seconds.
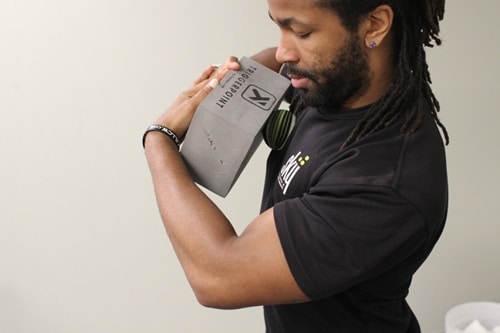
To apply more pressure on the ball you can use a yoga block.
Or you can place the yoga ball on the wall to get more pressure.
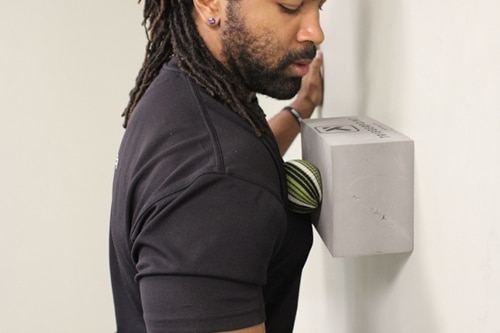
Deltoids (Shoulders)
1. Stand with your shoulder to the wall. Place massage ball between you and wall. 2. Roll deltoid on ball until you find trigger points. 3. Really focus on the front part of your shoulder.
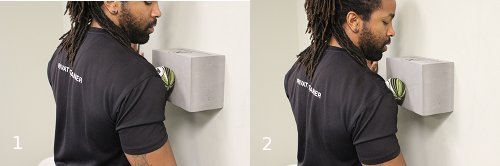
1-2. Use a yoga block to apply more pressure.
Neck
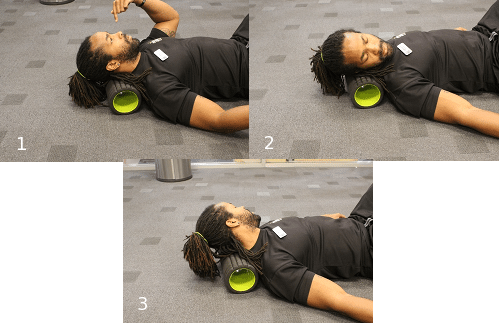
1. Rest your neck on the foam roller, like you’re using it for a pillow. 2. Turn your head to your right. 3. Then to your left. No need to apply pressure -your own bodyweight will suffice.
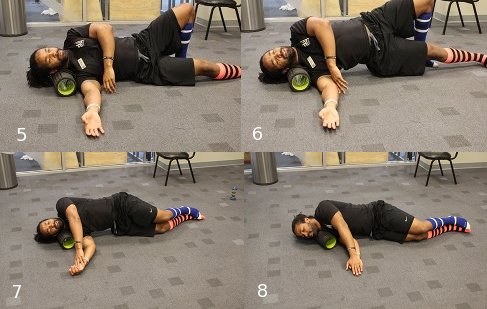
5. Shift your weight on to your right side. 6. Perform a slight bridge by lifting your hips off the ground. 7. Rotate all the way onto your side. 8. Take a nap. Just kidding. Hold for a few seconds and then repeat on the other side.
Big thanks to Damyko for taking the time to show us how to do some trigger point release. Another thanks to Jane Anderberg from Excel North PT and Performance in Duluth, MN for helping with the science.