Editor’s note: In 1944, the US War Department published FM 21-22, a manual on military watermanship. The manual covers everything a man needs to know to survive at sea, from how to properly abandon a sinking ship to how to stay alive in a lifeboat. This week we’ll be highlighting several of the manual’s sections; the information is both fascinating from a historical standpoint and useful for worst case scenarios.
FM 21-22 War Department Watermanship Manual, 1944
GENERAL WATERMANSHIP
Military watermanship means taking care of yourself on or in the water in any military situation. It combines ordinary swimming ability and knowledge of the sea with common sense and self-discipline. You may have to travel over water on various types of craft. All sorts of conditions arise where a knowledge of what to do and how to do it may mean the difference between life and death. Panic due to ignorance is often the main cause of loss of life at sea. Those who know what to do and keep a cool head have little trouble in keeping afloat until picked up.
PURPOSE.
The purpose of this manual is three-fold:
a. To give you those basic principles of watermanship that will enable you to meet with confidence any emergency that may arise.
b. To teach you certain fundamental practices used during small landing-craft operations.
c. To show you how to swim small lakes or rivers under combat conditions.
d. This manual does not describe waterproofing of individual equipment and weapons. Such information is covered in existing manuals and publications of the technical services supplying the equipment. The information included is intended to suggest ways and means rather than to prescribe definite rules. Methods must be modified according to the actual situation.
INSTRUCTION.
Training in military watermanship will, to a large degree, consist of actual practice under various conditions. Its objective is to equip you with the knowledge and confidence to take proper steps for your own safety.
SWIMMING
GENERAL.
Military swimming means swimming in full clothing and equipment to reach your objective in fit condition for action. If shipwrecked far from shore the soldier does not try to swim to shore but tries to keep afloat until he is rescued. Consequently, military swimming includes the basic water skills which conserve energy and which best insure buoyancy for long periods. The soldier must know how to jump from a sinking ship and how to swim under water to escape observation, or strafing, or to avoid surface oil or flame. Basic military swimming therefore includes the following items:
a. Submerging and floating.
b. Dog paddle and breast stroke.
c. Treading water.
d. Side stroke.
e. Elementary back stroke.
f. Jumping.
g. Underwater swimming.
For swimming instruction see FM 21-20. During practice if the man finds he can do the scissors kick more naturally and effectively than the frog kick, or vice versa, no attempt should be made to change his style.
How Good of a Swimmer Are You?
Editor’s note: This section is from a WWII era edition of FM 21-20, a manual for physical fitness. For more information on the interesting nature and origins of FM 21-20, as well as old-time GI workouts for the land, click here.
a. The swimming tests are designed to classify soldiers as to their present swimming abilities, and to both motivate and measure progress in swimming ability. It will be noted that these are minimum standards. Every effort will be made to improve swimming ability beyond this minimum. Where feasible, soldiers who have passed the A test should take the Maintenance Check test every 3 months. If unable to pass this check test, they should again engage in swimming practice to bring endurance up to standard.
(1) Beginner’s (C) Test. Jump into the water from float or bank of pool. Swim 50 yards, using any stroke. Soldiers who fail this test are classified nonswimmers, and are placed in a class for beginners.
(2) Intermediate (B) Test. (a) Jump into the water from a height of 10 feet. Swim 100 yards, using at least three different strokes (selected from the back, side, breast, Trudgen crawl, or back crawl strokes), each for at least 25 yards. (b) Stay afloat at least 10 minutes. (c) Swim 30 feet under water. Only swimmers who have passed the Beginner’s Test will take this test. Those who pass this test are classified as intermediate swimmers and are considered ready for instruction in advanced swimming and in life saving. Those who fail are classed as “elementary swimmers” who need additional help and coaching on swimming fundamentals.
(3) Advanced (A) Test. (a) Swim 220 yards, or for 10 minutes continuously, using back, breast and side (both sides) strokes, each one for at least 50 yards; or swim for 20 minutes continuously. (b) Jump into water feet first, and swim underwater 25 yards, breaking water to breathe not more than twice. (c) Remove trousers in water, and inflate them for support. (d) Approach a man of approximately equal size in the water, demonstrate one break or release from either a front or back head hold. Tow the man 25 yards with any carry. (e) Swimmers passing this test are considered advanced swimmers and able to care for themselves in emergencies.
(4) Expert (AA) Test. (a) Swim 880 yards, or swim for 40 minutes continuously. (b) Swim 440 yards wearing shirt and trousers. (c) From surface dive, swim 50 feet underwater. (d) In deep water, demonstrate breaks from both front and back head holds. Tow man 50 yards with cross chest, hair, collar, or wrist carry.
(5) Maintenance Check Test. Swim 440 yards in 15 minutes every 3 months. This test should be taken by all swimmers who have passed the Advanced Test. Those not having passed the Advanced Test will continue to try to pass that test.
SUBMERGING AND FLOATING.
1. To submerge, raise arms sideward and upward abruptly; stay under as long as possible.

2. To rise again, lower arms sideward and downward abruptly.
a. Submerging. Initially, the man must be taught to submerge in shallow water and keep his eyes open. He must learn by experience that it is difficult to stay under water because the buoyancy of air trapped in his chest forces him to the surface. By expelling part of the air he can submerge without effort. He learns how to expel air through his nose under water, and above water to gulp air through his mouth. He gains confidence. In deeper water he is taught how to bob up and down. Bobbing is performed by raising the arms abruptly, sideward and upward, when he wants to go down; and lowering the arms abruptly, sideward and downward, when he wants to go up.
b. Floating. Floating is the best way to conserve energy. Anyone can float, either motionless or with a slight movement of the arms or legs. To increase body buoyancy the chest is expanded as much as possible. After taking a deep breath further expansion can be accomplished without sucking in air merely by pulling up the stomach with the stomach muscles. Floating, combined with particular arm and leg movements to give propulsion, is swimming.
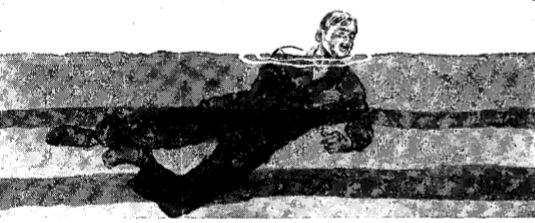
Use back float to relax. Modify back float to avoid blast injury in water by crossing legs, tensing body, tightening anus; float on very top of surface.
(1) Back float. This, the best relaxing float, can be accomplished with legs together or apart and arms extended to the side or overhead. With legs together and arms by the side there is a tendency for the legs to sink and drag the body under.

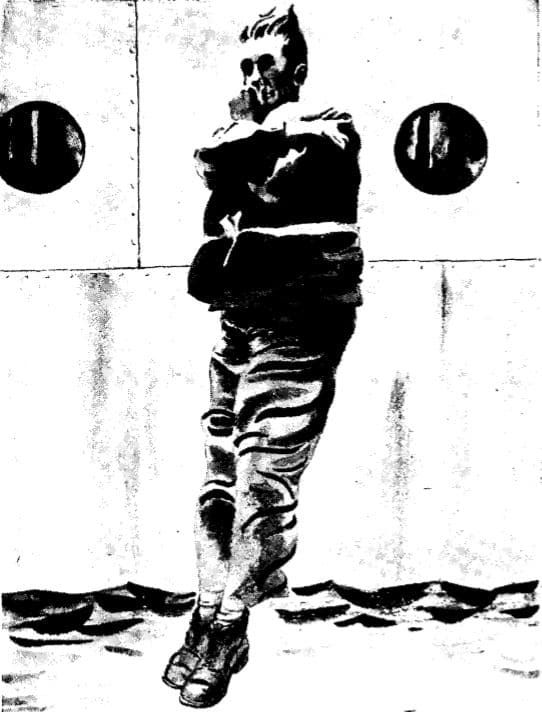
Use jelly-fish float to remove clothing.
(2) Jelly-fish float. The body is doubled up by bending the legs, pulling the knees to the chest, and dropping the head on the chest. Arms clasp knees. In this position the body will roll forward until only the back is visible above water. The jelly-fish float is used mainly when removing clothing.
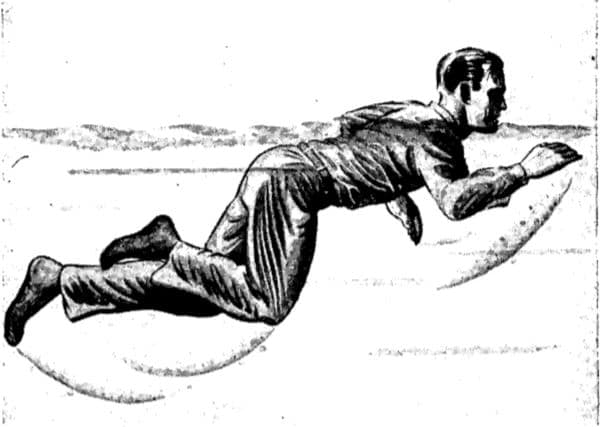
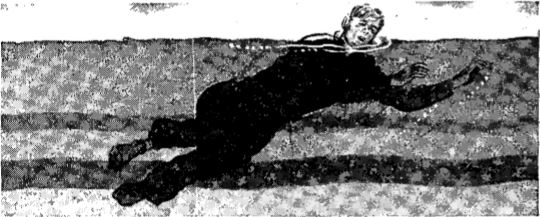
Prone float is basic position for all prone swimming; submerge face and open eyes to see under water or raise head high to observe over it; arms and legs are extended.
(3) Prone float. This is the basic position for all prone swimming strokes. It is performed by lying face down on the water, arms and legs extended. It is used with the face submerged, eyes open, to see under the water, or with the head high, to observe above it.
PRONE STROKES.
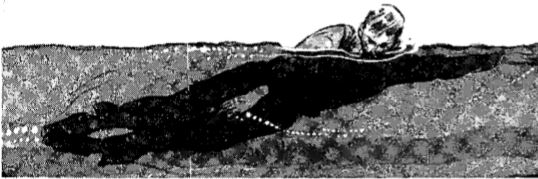
Dog paddle is elementary swimming stroke; used for silent swimming. Hands reach forward and pull back; legs push away on the water; left leg and arm and right leg and arm work together.
a. Dog paddle. This is done from the prone-float position by using the arms and legs in exactly the same manner as when climbing a ladder. The hands, slightly cupped, fingers joined, thumb along the forefinger, reach forward and pull on the water. They reach as far forward as possible without exertion and pull back on the water. The legs push back on the water by being doubled up and extended to the rear. Left leg and left arm, right leg and right arm, work together. Since legs and arms do not break surface, this is a useful stroke for silent swimming.
Breast stroke is dependable in all situations, in all types of water. Head may be raised or submerged. a. Start with prone float. b. Pull arms to sides horizontally. When arms reach shoulder level, start to draw in legs. Arms and hands meet under chest; legs assume deep knee bend with knees separated. c. Arms lunge forward under water and terminate as at a; legs are lashed out to side straddle hop then return to starting position.
b. Breast stroke. The breast stroke, like the dog paddle, is an extremely easy and relaxed stroke. It can be used in all types of water, calm or choppy, and should be done with the head held high for better observation. It is also used for underwater swimming. This is a good stroke to use when carrying equipment on the back. By splashing with hands and arms on the forward movement, the breast stroke may be used to push away debris and thin surface oil and flame. For this and other strokes not covered in detail, see FM 21-20.
TREADING WATER.
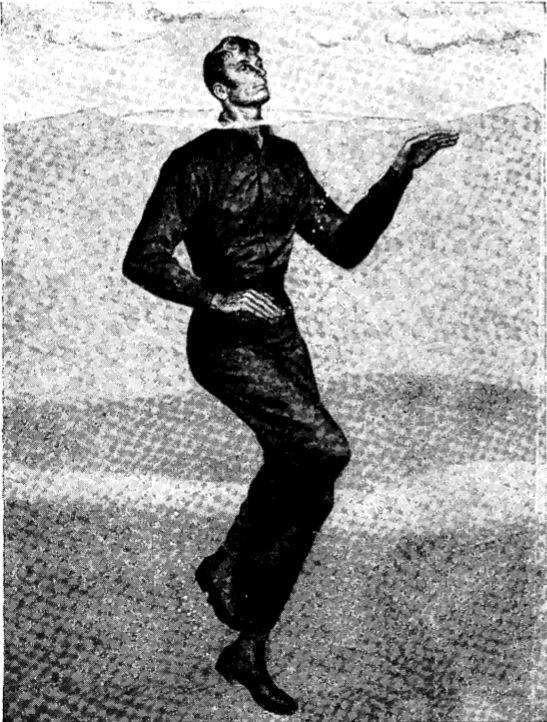
Observe while swimming by treading water. Stand upright and move feet as in climbing a ladder; hands push down on the water.
Treading water consists of standing upright in the water with the feet going ‘through the motions of climbing a ladder. It should be sufficient to keep the head high out of water. If desired, the hands may be employed to push down on the water. Treading water is extremely useful when stopping to observe.
SIDE STROKE.
1. Lie on side, one hand lower than other; execute deep knee bend with legs, knees together.
2. Thrust legs backward and apart, then close them fully extended. At same time thrust lower arm forward and upward and upper hand downward and backward across body.
3. Pull lower arm back in under chest and carry upper arm forward until position 1 is reached. Legs return to deep knee bend.
The side stroke may be performed on either side and hence is especially useful if either arm is disabled. This stroke can be used to carry equipment above water or to tow an object or another man.
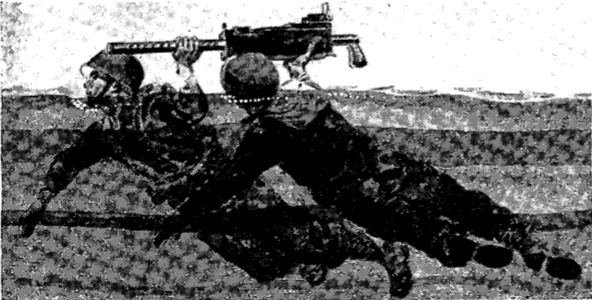
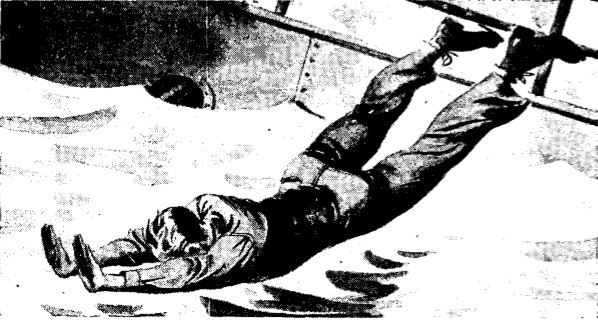
Use one-arm side stroke to carry machine gun. This method can be used by strong swimmers for short distances.
If an item of equipment is too heavy for one man to carry, two men, using the side stroke, can carry the object with their free arms.
ELEMENTARY BACK STROKE.
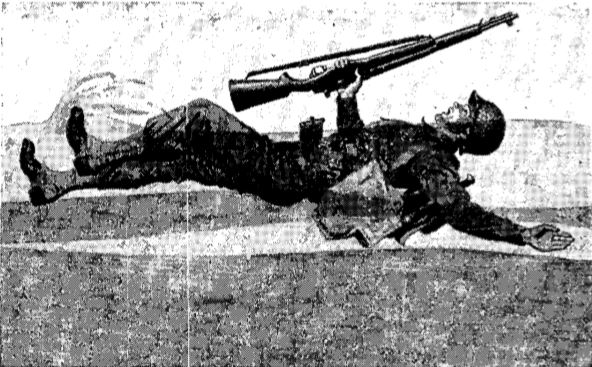
Use back stroke to carry equipment. It rests swimmer; restores normal breathing. Inverted frog or scissors kick suffices to make progress; pushing motion of arm from shoulder level toward legs aids progress. All movements occur under water. Strong swimmers can negotiate short distances with equipment in this manner.
The elementary back stroke is a relaxed stroke derived from the back float. The legs do the inverted frog kick or scissors kick. Arms are raised shoulder high, elbows straight, and then carried to the side, pushing the water towards the feet. When the arms are disabled or when it is necessary to carry equipment above water (as pictured), arm motions can be omitted.
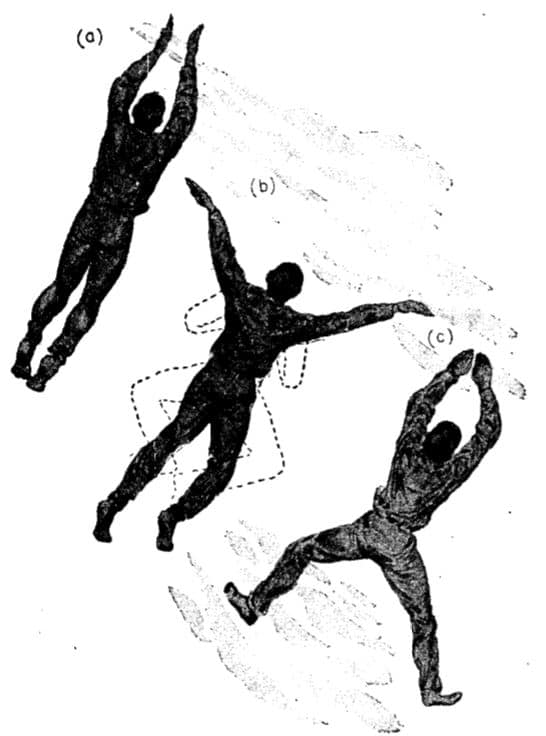
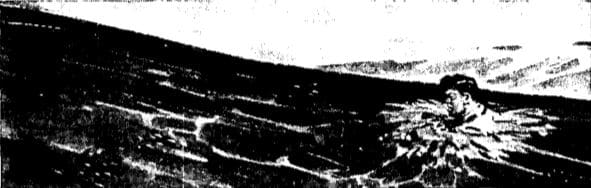
JUMPING.
Position of body while jumping: left hand pinches nostrils; right hand clutches left shoulder or vice versa. Body is relaxed, straight, feet together.
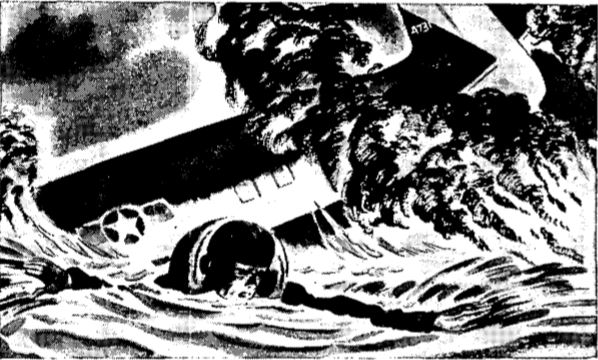
For military swimming, jumping into the water is better and safer than diving. It is safer than to chance hurting the head and face by diving into water of unknown depth or into debris. While jumping, it is easier to observe the surface, for instance, to locate lifeboats on the water. Remove the helmet before jumping. In jumping, the left hand pinches the nostrils together and the right hand clutches the left shoulder or vice versa. The arm across the chest protects the face from impact with the water. The head is held erect. The body is relaxed and straight and the legs are together. In training, jumping should start from about 3 feet and gradually be increased to 25 feet (the average height of a vessel’s deck from the water). When the soldier has mastered jumping, he should practice it from various heights while clothed.
UNDERWATER SWIMMING.
In underwater swimming, either the dog paddle or breast stroke is used, the latter being better. The head is held high to see ahead or to see the surface of the water. Underwater swimming is used to escape oil, surface flame, or debris.
ADVANCED SWIMMERS.
Use shallow dive in shallow water of unfamiliar deep water. Shove off strongly with feet; arch body by raising head and chest and throw arms upward, body skims over surface when it hits water.
Men who have mastered basic military swimming while clothed should learn the fundamentals of diving, especially surface and shallow diving. Surface diving is helpful when retrieving articles which have sunk in water no deeper than 10 feet. It is executed by ducking the head, rolling forward and downward, pulling backward with the arms and hands, and kicking with the legs. When using it to go under surface oil or flames, legs should be bent and the knees kept close to the chest. If the legs are extended before being completely submerged, they may be burned or covered with oil.
The shallow dive can be executed from a running start. It consists of diving forward when slightly above the surface of the water, and arching the body by raising the head and chest and flinging the arms upward so that when the body hits the water it skims along the surface instead of going under. The shallow dive is useful in shallow water or water of unknown depth or when it is necessary to cross a body of water quickly, as when escaping from an enemy shore. From the shallow dive it is easy to go into any strong swimming stroke.
SWIMMING TO SHORE.
1. Look ahead to check direction, look behind for oncoming waves.

2. Bob under breaking wave; do not fight undertow — it exists only short distance below surface and wave action will advance swimmer farther than undertow carries him back.
3. Break through surface and repeat 1 and 2.
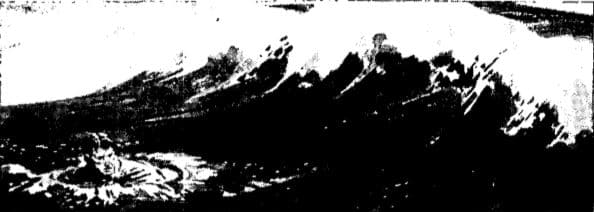
a. Surf. In case of shipwreck near shore or of the necessity of swimming to shore from a landing craft sunk or beached on a sand bar offshore, every soldier should know how to protect himself against surf, current, undertow, and tide rip. When approaching a shore, he should take up the breast stroke or dog paddle and survey the conditions of the beach (rock, sand), power of the surf, undertow, tide rip, and existing currents.
(1) Surf is the breaking of the waves on a beach. Undertow is the strong current beneath the surface that sets seaward after the wave has passed over. Tide rip is a condition set up when an outgoing tide opposes and slips under an incoming tide. The line of opposition is usually identified by a line of frothing water. Undertow is only within the first line of breakers; a strong push on the bottom with feet will push the swimmer to the surface immediately after being rolled, putting him in position to collect himself again and try for another landing. There is no cause for fear.
(2) Difficulty also sometimes results from encountering a body of water left between the beach and a sand bar by an outgoing tide. The trapped water may cut a path through the sand bar and create a strong outgoing current through the path and for some distance beyond the sand bar, with comparatively still water on either side. After surveying the beach the swimmer should swim opposite the point selected for landing; or if a current exists, to such a point that by going diagonally across the current the landing spot will be reached. He should remove the life preserver and all other means of support and discard them if possible. The weak swimmer may hang on to them but always should be ready to let go.
(3) Before swimming to shore one should remember the action of any sea animal in swimming through surf. The seal, for instance, disappears outside the line surf and reappears on the shore. It takes advantage of the calm water beneath the breaking waters of the surf. The soldier making a landing should follow its example; he should duck under breaking waves. He should use the breast stroke, side stroke, or dog paddle, looking behind to see the waves and looking ahead to check the direction.
He should bob under the breaking waves, then come up and swim toward shore continuously looking behind for the next approaching wave. He should not fight undertow and should remember that it exists only for a short distance out below the surface. He must avoid panic and conserve energy. The wave will advance the swimmer more than the undertow will carry him back. He should swim easily until the next breaker comes along and then come in on the forward swell following the breaker. If he can stand on the bottom easily, he should watch the waves more carefully. They vary in size. He should go under the large ones and walk toward shore with the small ones, bracing his feet against returning undertow. He must always be patient even though making only a few feet at a time.
b. Rocky shore. In landing on a rocky shore, the swimmer must not allow himself to be hit by a breaking wave. The danger is that a wave will throw him upon the rocks. He must bob under the wave before it breaks and cling to the bottom if possible. The bottom is usually calm.
c. Currents. He should not swim against the pull of a current; it will exhaust him. Instead he should swim diagonally across its pull without panic and with a strong stroke. Before long the effect will be avoided. Then he should continue swimming toward shore at some other point.
d. Weak swimmer. The weak swimmer must remain outside a breaking surf with his life preserver until help arrives. If no aid is available, he must swim along the shore outside the surf and with the current, looking for an inlet to a river or bay, a long jetty, or a point where the surf breaks only when close to shore.
Read the Entire Series
How to Climb Down a Ship’s Ropes and Cargo Nets
Abandoning Ship
Surviving Aboard a Life Raft