Several years ago my dad gave me my first handgun- a Smith & Wesson .357 magnum revolver. It didn’t come as a surprise. I had grown up around guns and had hoped that one day my dad would pass a few on to me. Because of the value of this gift, both sentimental and monetary, I felt a real responsibility to take care of it so that it would last for many years to come. I learned how to clean it well and have done so ever since.
Any gun owner knows that properly cleaning and maintaining your equipment is not only key in increasing a weapon’s lifespan, but is necessary to ensure safe operation. Just like shining your shoes there are as many ways to clean a gun as there are stars in the sky. The following is a guide to cleaning a standard revolver.
*Quick disclaimer: I am just a gun owner, not an expert or instructor. Read your gun’s owner’s manual for specific cleaning instructions and if in doubt, consult a certified arms dealer. And ALWAYS MAKE SURE YOUR GUN ISN’T LOADED BEFORE CLEANING.
Watch the Video
Step 1: Make sure your gun is not loaded.
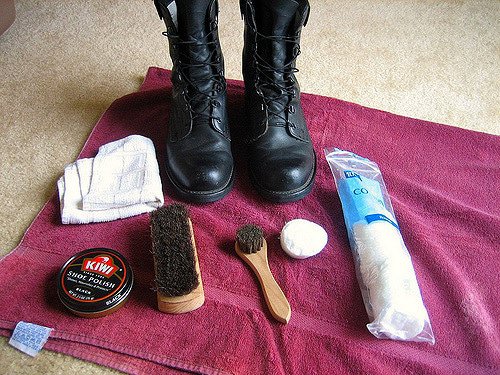
Step 2: Get your cleaning supplies together in the same place. Below is a typical universal gun cleaning kit that you can buy at most outdoor stores OR here for around $50. Besides this, you need some gun cleaning solvent and gun oil. There are many different kinds and most work for all types of guns. Here I am using Hoppe’s No. 9 Solvent and Remington Oil.
Step 3: Tie an old sock or rag around the rear cylinder opening. This will protect the revolver from damage when the bore brush gets pushed through the barrel.
Step 4: Dip your bore brush in the cleaning solvent. There are different sizes of bore brush that correspond with the barrel size, so make sure you match the size accordingly. It should be imprinted somewhere at the base of the bore brush.
Step 5: Feed the bore brush through the barrel of the gun. The bore brush handle will naturally twist in your hand as it follows the rifling inside the barrel, don’t try to stop this. Make sure the bore brush goes all the way through the barrel, exiting at the other end. Then come back through the barrel in the opposite direction.
Step 6: Take a cleaning patch and dip it in cleaning solvent then feed it all the way through the barrel of the gun. There are many different opinions on how many times to do this, but I have always used 1 solvent covered patch followed by 2 dry cleaning patches. If your barrel is especially dirty you may need to do this a few more times.
Step 7: Using a brush (you can use a toothbrush if you don’t have a cleaning kit), clean around the muzzle of the gun; then, using a little cleaning solvent, clean the rear cylinder opening.
Step 8: Using the brush again and some cleaning solvent, brush the cylinders, both outside and on the ends.
Step 9: Continuing on, clean the extractor rod with the brush and solvent. Clean both the front side then push it out and clean the star and the rest of the rod normally housed between the cylinders.
Step 10: Using the bore brush and the cleaning solvent, clean each of the cylinders in the same fashion that you cleaned the barrel. Remember to go all the way through on each side.
Step 11: Use the cleaning patches in the same manner as you did with the barrel, taking the first patch and dipping it in the cleaning solvent before feeding it through an individual cylinder. Clean up by using two clean patches to get any excess residue.
Step 12: Using a clean cloth, take a small amount of gun oil and begin covering the gun with the exception of the hand grips, inside of the barrel and inside of the cylinders.
Step 13: Wipe off any excess oil with a different rag then polish up the gun with a silicone gun cloth. If it looks like your gun is greasy or oily then you need to wipe it off some more; it shouldn’t look like a fat guy covered in baby oil.
Finally, remember this is simply a standard cleaning that should be performed after every time at the range or in the field. If your gun is used heavily, a more thorough dis-assembly and cleaning should be performed. If you aren’t sure how to do this, contact a qualified gunsmith or expert to help you out. And of course, always make sure to drink a Hansen’s Natural Soda while cleaning your gun; it will keep you sharp.