Is there a light fixture you want changed out in your house? There’s no need to call a handyman or pay Home Depot out the wazoo to come do it for you. With no electrical experience whatsoever, I was able to quickly learn how to perform this quick and simple home maintenance task by watching someone more capable than I just once. Today, I’m passing that knowledge onto you.
The great part about changing light fixtures is that it’s a pretty universal process. The light boxes in your ceiling are all the same size, and it’s always the same three wires being connected/disconnected. No need to research your particular situation other than making sure the size of the fixture itself fits okay in the space you’re putting it! In general, you can go out and buy any light fixture, and put it up in your home where any light fixture already exists. (The exception being ceiling fans; those have an extra wire. Generally, you want to install a new ceiling fan where there already was one.)
This article is specifically for replacing old light fixtures with new ones. To install a fixture in a brand new place where there was no light before is an endeavor that’s usually only suited for licensed electricians.
Let’s get to it!
1. Turn off power to the old fixture.
Your first task is to shut off power, at the source, to the fixture you’re changing out. This means knowing where your electrical panel is, and flipping the right switch. When you do this, leave the light on that you’re changing out, and when it shuts off, you’ll know you got the right switch. (Labels in the panel should help too, but in my experience they’re not always totally accurate.)
2. Remove the canopy to expose the wiring and fixture hardware.
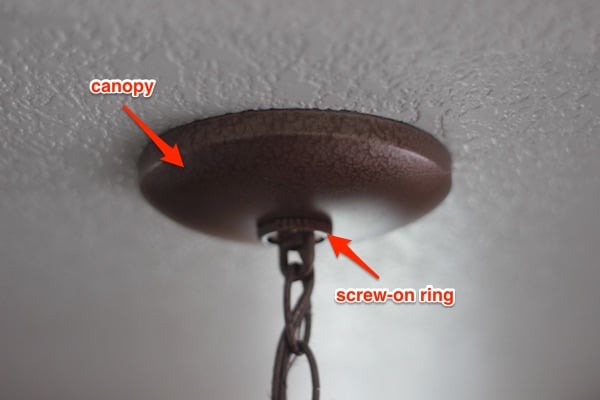
The fixture I was replacing used a simple screw-on ring to hold up the canopy (and fixture). Each fixture is different, but no matter what it is, it should be pretty easy to figure out.
The canopy is the rounded, broad covering that lies flush to the ceiling and hides the ugly-looking wiring and hardware. There’s usually some sort of screw holding the canopy in place; simply undo whatever mechanism is there and let the canopy drop down.
3. Unscrew the three wires: black, white, and copper.
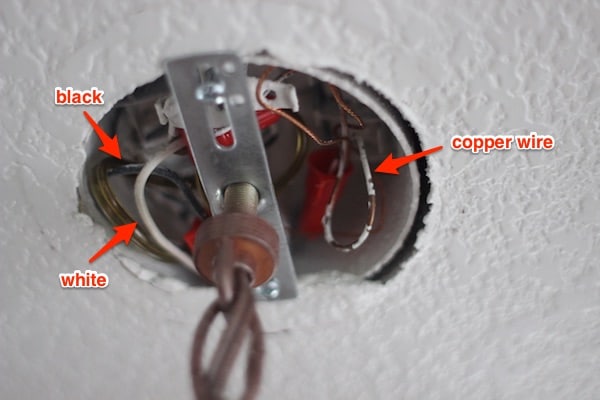
Three sets of wires, each held together by a red wire connector.
In a nutshell, when you’re installing a light fixture, you’re connecting three wires from the fixture to three wires installed in the ceiling, then mounting the fixture hardware. That’s about all there is to it.
The red cap connects the wires from the ceiling to the fixture, and screws/unscrews just like anything else — lefty loosey, righty tighty.
So when you get the canopy off, you should see three three sets of wires — black, white, and green (or copper) — that need to be disconnected in order to remove the old fixture. Unscrew the wire connectors (the red parts in the image above), and separate the fixture wiring from the ceiling wiring.
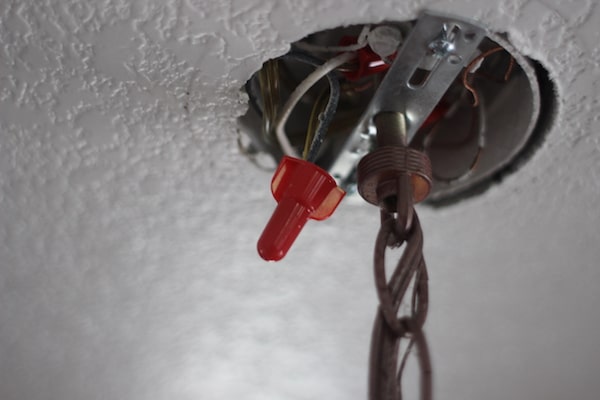
4. Remove old light fixture.
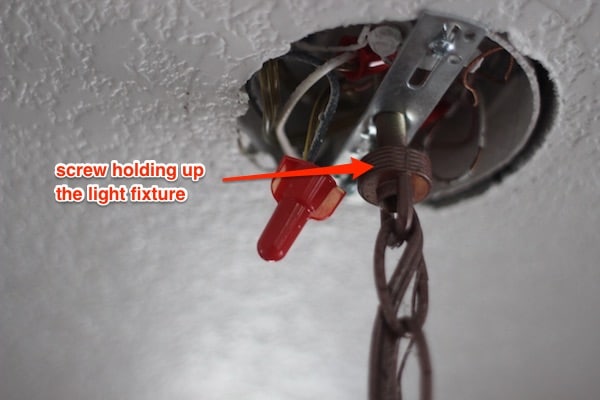
Same image as above, this one pointing out how to remove the light fixture. Once the wires are disconnected, unscrew here and the fixture is off the ceiling. Again, this may vary given the light fixture you’re working with.
After you’ve disconnected the wires, the old light fixture is generally free to be removed. There’s no universal way they’re attached to the ceiling or electrical box, but it’s generally just a screw or two. Anchors aren’t used, since you’re anchoring is to the electrical box, which is firmly rooted in your ceiling. Helps to have another person handy, especially if it’s a heavy and/or awkward light fixture.
5. Install new bracket (sometimes).

Without the fixture, this is what your light box should roughly look like.
All light fixtures have a universally-sized, pre-wired box in the ceiling, which the three electrical wires descend from. There will be some sort of baseplate serving as the mounting hardware for your light fixture. It’s either a single bar “strap” with a “nipple” screw (I hear you snickering…) or a circular, more universal mounting bracket. In all the light fixtures I’ve replaced, there’s been a bar strap present, which I’ve replaced with a new mounting bracket, simply because that’s what has come with the fixture itself. Refer to your light fixture instructions for more guidance here, but if your fixture comes with a new bracket, you should use that.
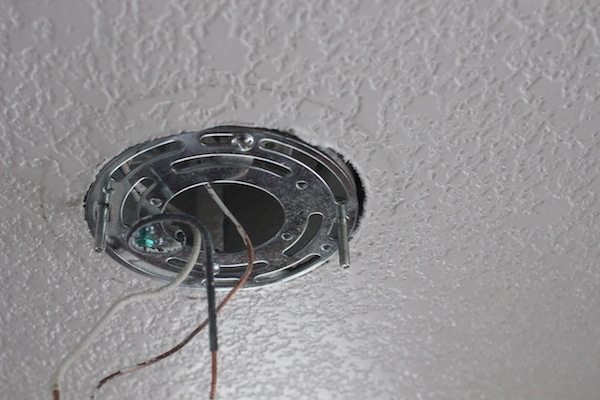
New baseplate. The two screws holding it up to the ceiling are a universal distance apart. You can also see the green ground screw (more on that below).
6. Connect new fixture wires.
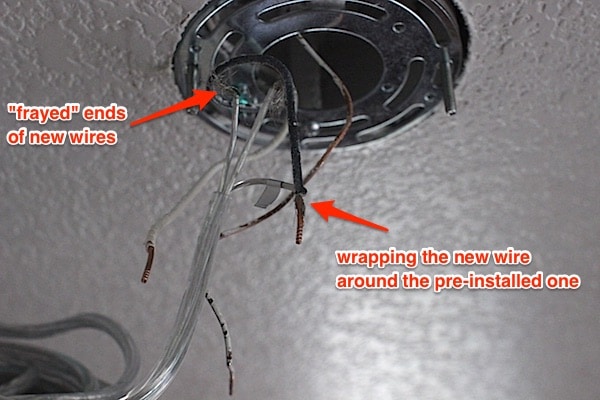
The wires descending from the ceiling will have bare ends, while the new wires will have what looks like frayed, silver ends. You can see that in the image above.
Twist the “frayed” threads on the end of the new black wire to the exposed end of the existing black wire, twist on a wire connector, and repeat with the white wire. The copper (or green) wire of the new fixture might be a little different; sometimes it connects to a green grounding screw and other times to a dedicated copper wire coming from the ceiling (electrical box). Refer to your light fixture instructions, and your individual situation: If there’s a copper wire pre-installed in your ceiling, connect the new wire there. If you just have a small green screw on your mounting plate, wrap the new copper wire around that.
6. Secure the new fixture and adjust length (if there’s a chain).
If there’s a chain for the fixture — that is, it doesn’t sit flush against the ceiling — now would be the time to adjust it to the proper length. Each fixture has a different mechanism for doing that, so refer to your individual instructions.
There’s likely some extra chain/cord that needs to be shoved up into the ceiling, or hidden within the canopy. Do that at this time as well.
With all that taken care of, you can secure the new fixture, usually with just a couple screws into the mounting plate. It’s much easier than putting up a new coat rack, or anchoring a heavy picture frame, in my opinion.
7. Restore power and test out the new fixture!
If you restore power and the light doesn’t work, it’s likely because either the white or black wires aren’t fully connected. You’ll have to pull down the fixture and inspect the wires and connections; I’ve had to do this just once among the handful of lights I’ve installed.