Making an axe handle is an old skill from long before you could purchase a pre-finished handle from the hardware store. Back then, the axe head was handmade and so was the handle.
An axe handle is strongest when split from a stave (simply a narrow length of “raw” wood) rather than cut out of a board. The grain of the wood should be continuous from end to end, or the shock from use will cause the handle to blow apart. When a growth ring “runs out” of the piece of wood, it creates a weak spot.
Long, straight-grained woods such as hickory or ash are traditionally chosen for axe handles because they are strong and produce long, straight staves. That said, there are other woods that work fine for axe handles, and because it’s my choice, I decided to make one out of cherry. I often work with cherry because I believe it makes the best canoe paddles, and when I started this project I had a good chunk of wood from a diseased tree we felled last year. The grain is reasonably straight and I can work around where it isn’t. I plan to use this project as a camp axe carried on canoe trips. I won’t be felling redwoods with it, so it doesn’t have to be indestructible.
Finding the right wood is probably the trickiest part of the project, but persistence works. Once you find a log, you can split several staves out and have them for a long time. You need a log that is straight, without twists, branches, or burls, and that hasn’t been cut into firewood. If possible, use the low part of a tree trunk, as trunks tend to be straighter closer to the ground. Your search can be made easier by making friends with a tree surgeon; that’s the best way to guarantee a good supply.
Materials
- 1 hardwood log, 4-5 feet long and 10-12 inches in diameter; straight and without branches (hickory, ash, hornbeam, cherry, or walnut)
- 3-4 splitting wedges
- Sledgehammer or splitting maul
- Hatchet
- Shaving horse or woodworking vise
- Drawknife or bowyer’s knife
- Pencil
- Patternmaker’s rasp (#49 or #50) or a four-in-hand rasp
- Axe head
- Wooden mallet or regular hammer
- Cabinet scraper (optional)
- 150-grit sandpaper
- Japanese saw or fine-toothed backsaw
- Pocket knife
- Safety glasses
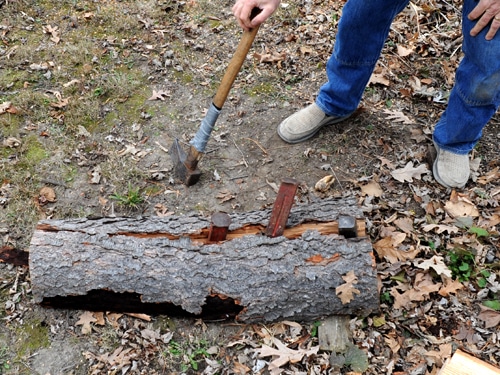
Step 1: Split your log in half.
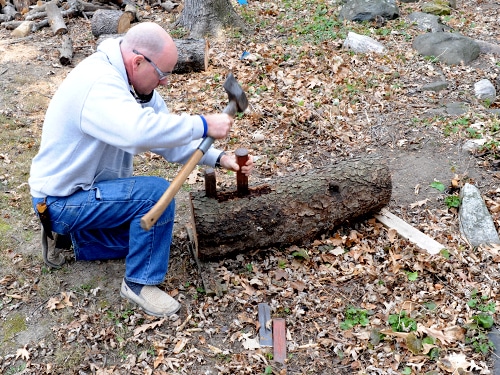
With the log lying on the ground, drive a wedge into it about six inches from the end. It’s a good idea to wear safety glasses when working with wedges, as bits of metal can break off the edges and go flying.
Use a sledgehammer or splitting maul to drive the wedge in until you see a crack open up and start running down the log. Insert a second wedge into that crack and drive that wedge into the log; it should now make popping and cracking sounds. Go back to the first wedge and give it another few taps. Add your next wedge into the crack ahead of the second wedge. Drive the third wedge in good and hard, and go back to the first and second wedges and tap those in good and tight as well. If things are going well, the first wedge should start to loosen up as the log splits. If not, drive the second wedge in a bit more. If the first wedge is still tight, you could add a fourth wedge ahead of the third.
 Work along the crack that will continue developing as you tap the wedges in place. Next, you’ll start to “leapfrog” your wedges. When the first one in the log becomes loose, remove it and reinsert it in the crack in front of your lead wedge.
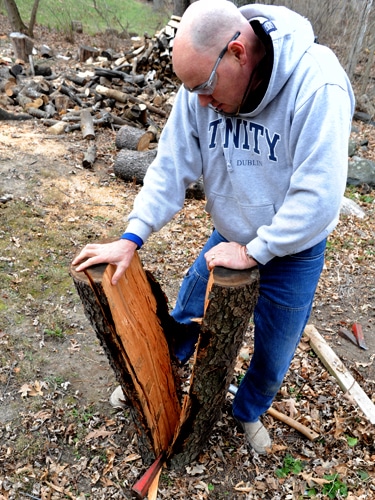 Eventually the log will be separated. Some logs will simply pop apart, but most often, tiny bits of wood will hold the halves together. Cut these with a hatchet and separate your two pieces.
Step 2: Split your log into quarters.
Place one of the log halves on top of a few pieces of wood. Examine the wood for an obvious place to start splitting off staves. If nothing jumps out, it doesn’t really matter where you start as long as the grain is straight. Use your wedges to repeat the process described in step 1. Thankfully this process is much faster with half a log.
Step 3: Cut your stave.
 Look through your log quarters and find the best stave for your handle. The wood inside a tree can have twists and turns even if the outside looks straight. You’re looking for the straightest grain you can find, with a minimum number of irregularities (or better yet, no irregularities).
Using a wedge, cut out your stave. With the wood in the photo above, I will use the chunk on the left, close to the bark and where the growth rings are fairly close. My thumb is near the center of the eventual handle. Drive your wedge down and create a crack that runs down the log. The crack should be relatively straight. A few extra wedges will help you split out the stave.
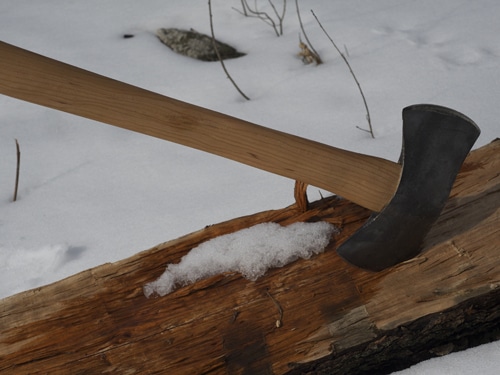
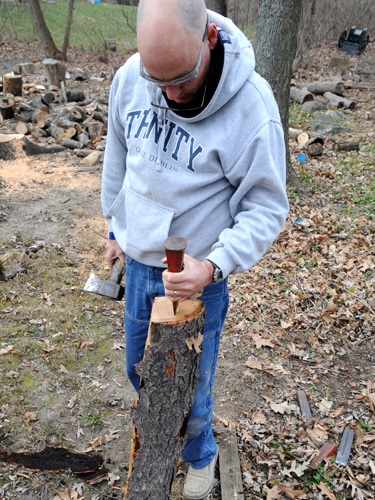
Step 4: Rough out your stave with a hatchet.

Start with the bark side first and trim away the bark and a few rings of growth. I use a carpenter’s axe, which has a sharp edge ground on only one side, much like a plane blade, but you can use any hatchet. The advantage of a carpenter’s axe is that the edge is straight and the blade cuts straight down rather than into your stave.
You don’t need a perfect cut, but the more you can cut out now the better. You want to remove a fair amount of wood, but make sure you’re following the grain down the stave as best you can.
Turn the stave around and do the same rough cuts on the inside. The stave is thinner closer to the center of the tree so you’ll take off wood more easily on this side.
Step 5: Shave the handle down to the rough size.
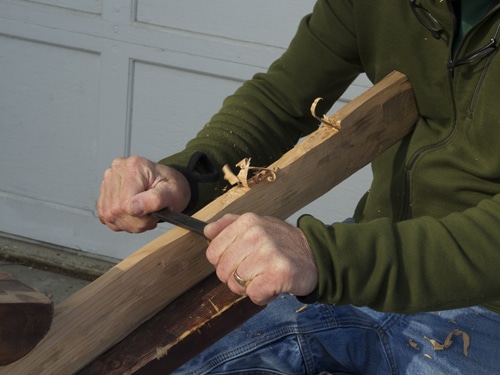
Place the stave in a shaving horse or a woodworking vise. Use a drawknife to establish a flat-ish edge on one side of the stave. Take wood off, looking for high spots and scraping them off too. Make the side reasonably straight and don’t worry about making it perfect.
Turn your work over and establish an edge as parallel to your first edge as possible. Again, not perfect, just close.
Step 6: Start to shape the sides of the handle.
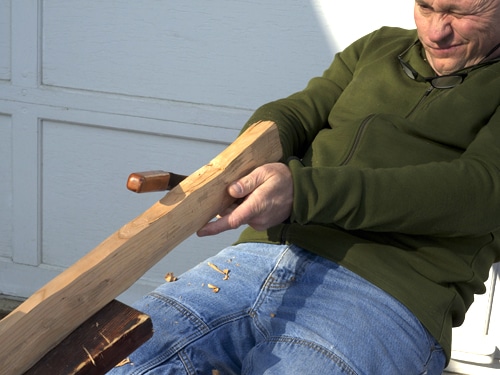 Turn your handle 90 degrees so one of the narrow edges is facing up. You will have to adjust your shaving horse jaws to do this by removing the fulcrum pin, raising the jaw up, and replacing the pin.
Use the drawknife to flatten the sides of the handle. As you remove wood, pay attention to your grain structure. If your stave is nice and straight-grained, the grain structure should be less of a problem. You don’t want to have the cut start to run into the handle and create a weak spot. If this happens, stop immediately, turn your handle around, and cut from the other direction.
After you’ve flattened one side, turn the handle over and work the opposite side. They should be mostly parallel.
As best you can, use a pencil to establish a line that follows the grain down the side of your handle. It’s important to be as centered as possible before further shaping the handle. You’ll notice in the photo above that there are still some high spots on the top of the handle. At this point, rather than adjust the shaving horse for every turn, I hold the handle in place with a block of wood.
Step 7: Start to refine the sides with a rasp.
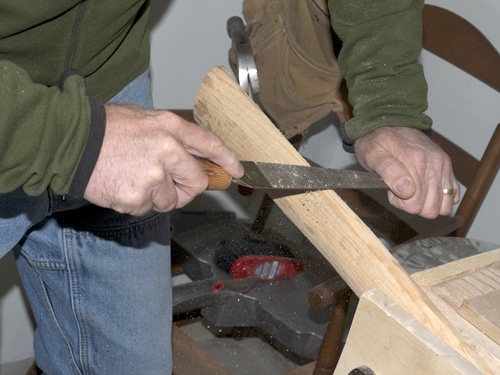 Use a patternmaker’s rasp or a four-in-hand rasp to start to shape the handle closer to its final shape. The sides should be parallel, and you can start to shape the edges a little so they taper to fit your hand. You’ll adjust the shape after the axe head is added, so don’t worry about making it perfect yet.
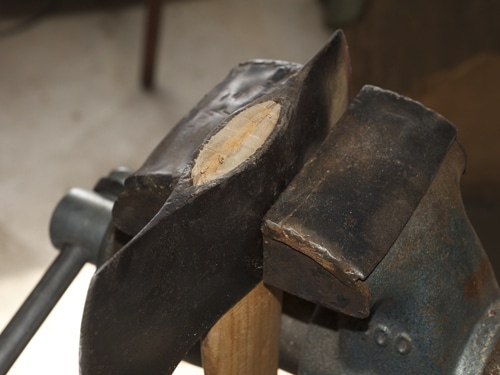
Step 8: Fit the axe head.
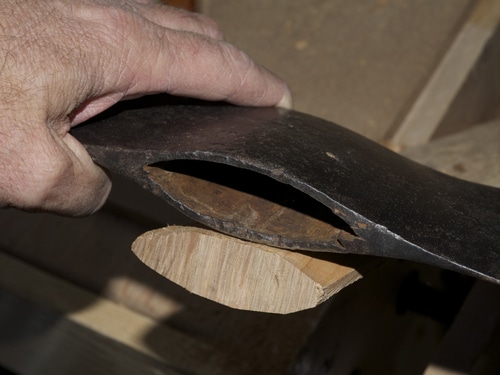 This is where you can make a fantastic difference in how an axe performs. A generic axe handle purchased from the hardware store is made to fit everything, so by nature it has to be loose and then shimmed up to fill the gaps between the handle and the head. Not so with a custom-made handle. The trick here is patience.
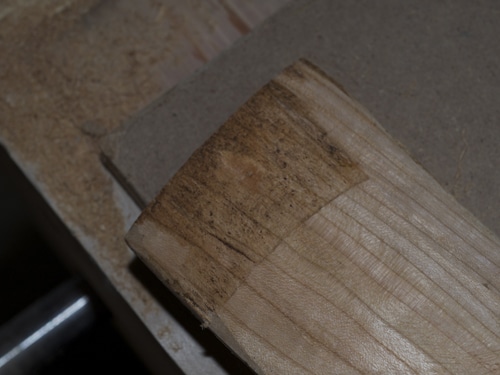
Make sure the end of your handle is close to the size of the eye (the hole where the handle fits). Continue lightly trimming at the tip until the eye just barely fits on the handle. Put the top of the axe head on a scrap piece of wood on the ground.
Place the tapered end of your handle in the eye and tap the other end of the handle with a wooden mallet. You can also use a regular hammer, but you will want to protect the end of the handle by holding another small block of wood against it. Just tap until you feel resistance.
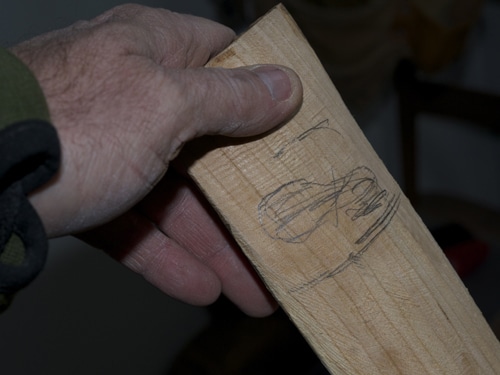
When you pull the head off, you’ll see where your handle and eye didn’t line up. Mark this with a pencil.
Using your drawknife, trim away the part that bound on the handle, and repeat the procedure. As you go, you will see larger areas that are binding. Trim off the parts that bind until the binding marks are just barely gone, and refit the head.
As the head slides farther onto the handle, you’ll see more high spots. Just keep shaving, fitting, and shaving.
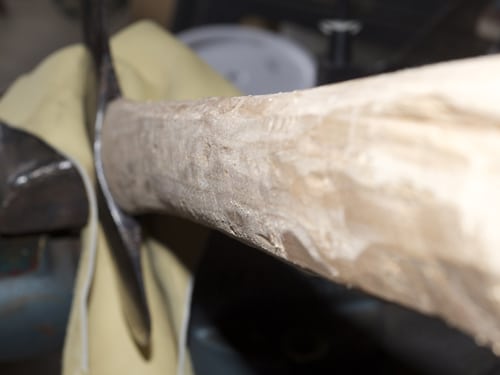
Step 9: Finish the scraping.
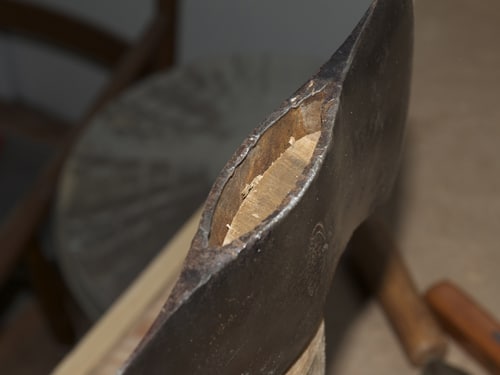
 You are almost done, and the head is almost fitted. You can see the handle has a high spot where the bottom of the axe head has bottomed out and has started to peel back the wood a little. This is your chance to clean things up a little. Trim back curls if there are any, and do the final scraping. Your head should fit snug with maybe ½” to ¾” left to go before it reaches the top of the head.
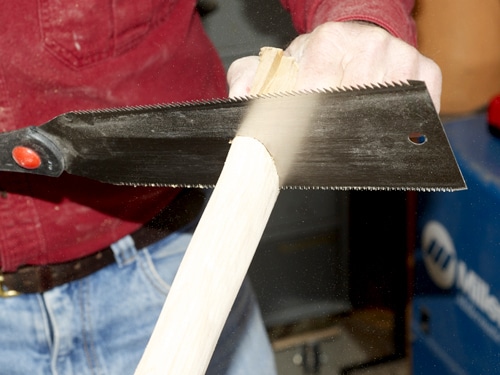
Step 10: Slot the top of the handle.
 Using a Japanese saw or other thin kerf saw, carefully cut a slot in the top of the handle that goes about ¾” down into it. The depth of your cut depends on the size of your axe head and depth of the eye. I’ve marked the depth I want to go with a pencil. This slot will allow a wedge to tighten the handle in place.
Step 11: Fit the axe head to the handle.
 Place the axe head on a board on the ground and use a mallet and wood block to drive the handle the rest of the way into the head until it’s flush or sticks out just a little.
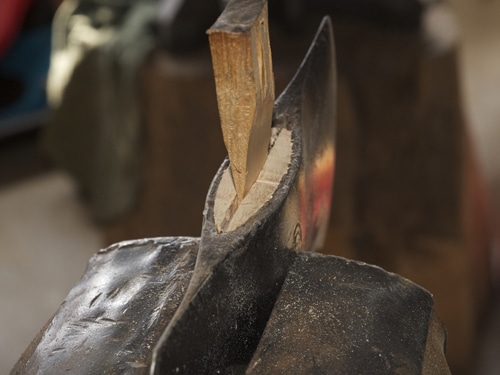
Using your drawknife or pocket knife and a piece of scrap wood, carve a wedge that will fit into the slot you cut on the top of the handle in step 10. Drive the wedge down into the slot until it’s very tight. If you want to carve two or three small wedges that’s fine too. It doesn’t make that much difference because the axe head was custom fit, but it may fill in the gaps and look a little nicer.
Break off the excess wedge by giving one side of it a good whack with a hammer. If you’re concerned about getting a clean break, you can use a saw to trim the wedge, or use a rasp and clean up the top of the handle where it protrudes.
Step 12: Put the final touches on the shape of the handle.
 I like a nicely finished handle, so I do the last of the finishing work after the head has been attached. Wrap the axe head in a piece of leather to protect it and place it in the woodworking vise.
The key to refining the shape is to take it slow and easy. This is a custom handle for you, so you decide the shape.
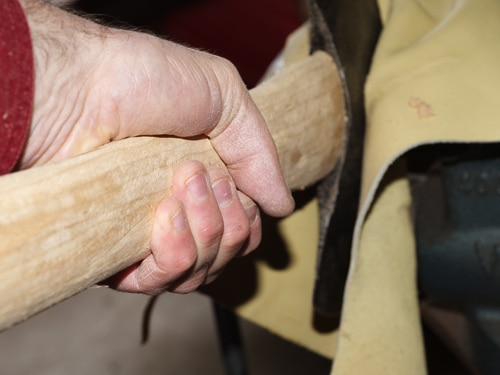
With the head still in the vise, take hold of the handle to test the grip size. I was happy with the thickness of my handle, but the diameter was a little large. So I used the patternmaker’s rasp to thin it down a bit. Always work both sides so the grip remains symmetrical.
As you approach the final shape, run your hands up and down the handle, looking for high spots. Calipers are all well and good, but your hand is better suited. When you find a high spot, mark it with a pencil.
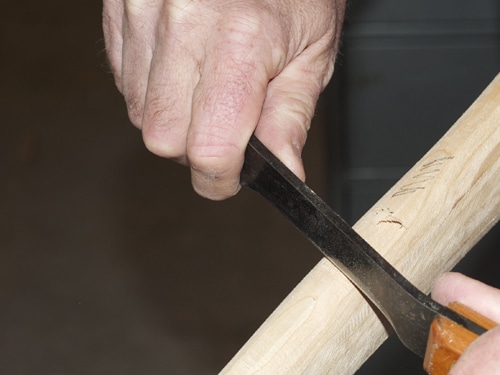 After you identify a high spot, scrape off the pencil marks and check again. If you don’t have a cabinet scraper, a sanding block will also work, you just have less control.
Step 13: Sanding the handle.
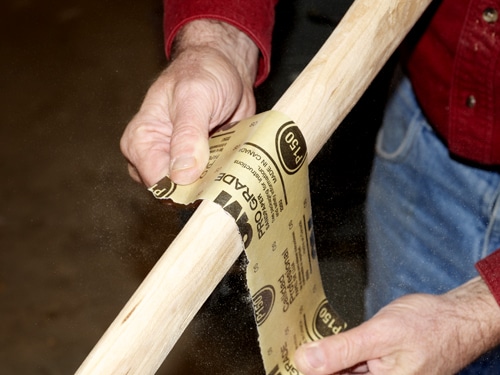 After you’ve removed all the high spots and you’re happy with the handle shape, it’s time to sand.
Sand your handle, moving up and down the handle until you don’t see any marks from the rasp. You may have to fold the paper over and sand with the grain close to the axe head. Just keep going until you’re happy with the final product.
Step 14: Trim the handle to length.
 This is going to be a shorter handle because it’s a smaller axe head. Cut the end off the tip of your handle so it’s square with the top of the axe head.
Use your rasp to clean up the end of your handle. Knock off any sharp edges or splinters. Then use sandpaper to round the ends.
Step 15: Finish your handle.
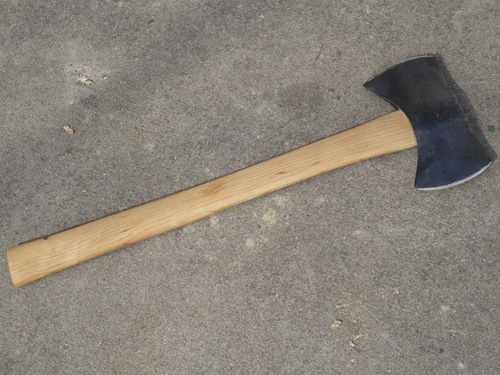 You can use an oil finish or any other wood finish you like. I am partial to oil finishes, as you can keep applying them and they penetrate the wood, so surface nicks don’t matter as much. Three or four coats are good to start, with a light sanding between coats to knock down the grain that might rise due to the wetting of the wood. I soak the top of the handle where it comes through the eye because you don’t want that area to dry out and loosen the axe head.
Working with dimensional wood from the lumberyard is the normal thing to do for most of us, so it’s kind of like magic to go from a log to an axe handle. Wood is wood, the stuff from the lumberyard is just more processed. The way I look at it, you can eat a bratwurst that was made by the butcher and it’s great stuff. But a home-ground sausage with meat you harvested yourself; that’s pretty dang elemental, son.