Sandbags are one of the most effective ways to deflect water when storms and heavy rains cause flooding. Arranging sandbags into a wall can direct the flow of water away from buildings, roads, or any sensitive structure that might be damaged by a deluge. Keep in mind that a sandbag wall is not completely waterproof. Make sure you have a strategy for dealing with any water that seeps in through cracks in the wall. Electric pumps are your best bet for handling additional water, but you can also bail extra water manually with buckets if necessary.
Organizing Labor
Building a sandbag wall is most efficient when treated like an assembly line. Each person involved should have a dedicated task so that time isn’t lost exchanging tools or positions. Ideally, building a sandbag wall is done with at least two people. While one person shovels sand, the other person holds the bag open. If more people are available, they can take the filled sandbags and place them on the wall, or sub in for the person shoveling when they get tired.
Numbers to Consider
Before you get started on your wall, consider how many bags and how much sand you’ll need, as well as how many people you have helping you. Without proper planning, you may begin building a wall that you ultimately can’t finish because of a lack of sand, bags, or manpower. Here are some numbers to consider:
- 35-40 pounds – weight of a typical bag
- 60 bags – minimum number needed to build a wall that’s a foot high and ten feet long
- 1 cubic yard – amount of sand it takes to fill 75 40-pound bags
- 3 minutes – time it takes for an average person to fill a sandbag
Wall Location
Never build your sandbag wall directly against a building where the force of water can drive the wall against the building and cause damage. Without a gap, you also don’t have room to maneuver or add to the wall if water levels rise. A good rule of thumb is to leave at least eight feet between your wall and the nearest building.
How to Fill Sandbags
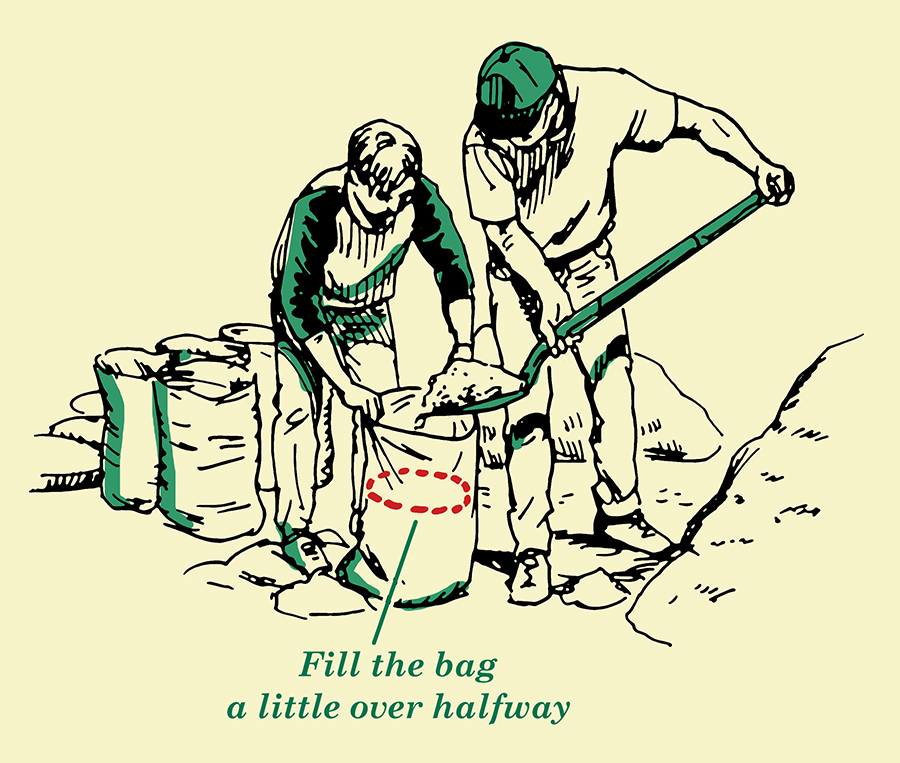
While one person crouches and holds the bag open, another person shovels sand into the bag. The person holding the bag should set the base of the bag on the ground, and roll back the open end to form a collar. Do not overfill the bags. Sandbags should be filled just over halfway. Overfilling makes them more difficult to carry and manipulate. After filling, close the bag by folding over the top of it. Never tie bags shut. Tying bags wastes valuable time and prevents them from conforming to the shape of your wall.
Building the Wall
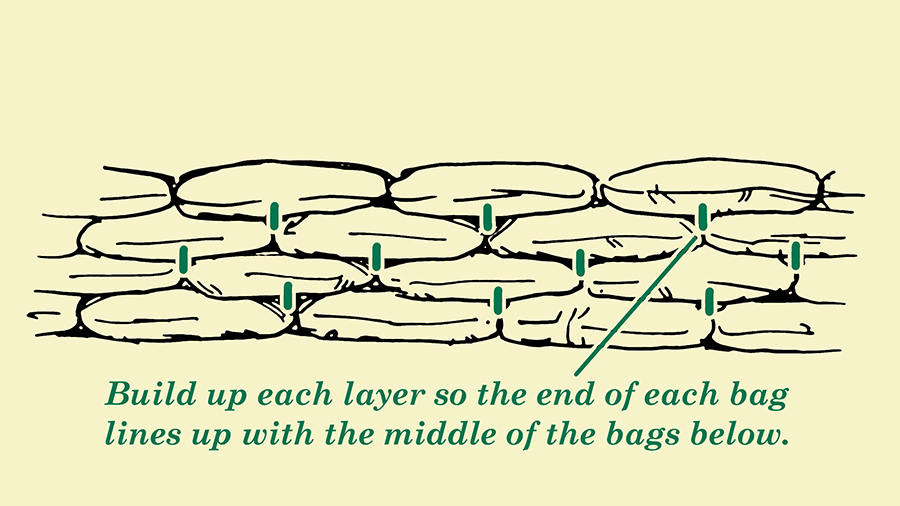
Lay a single line of bags end-to-end as long as you want your wall to be. With your first line of bags set, begin building your wall up by positioning another line of bags on top of the first. The second layer of bags should be offset from the first so that the end of each bag in the second layer lines up with the middle of the bags in the first layer.
A single stack of sandbags grows in height quickly but isn’t very strong. That’s why the Army Corps of Engineers recommends building sandbag walls that are three times wider than they are tall (or two times wider at bare minimum if lacking time/supplies). In other words, a one-foot high wall should have a three-foot-wide base, giving the wall a pyramid shape. You should always plan on building it at least one foot higher than the projected crest of the water.
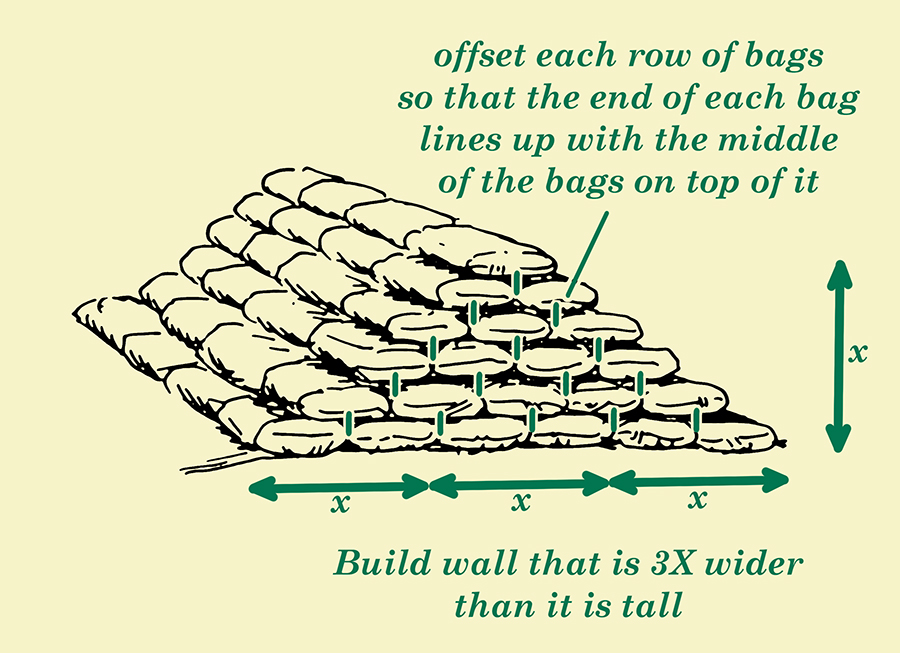
To expand the base of your wall, place another line of bags adjacent to your first line at the base of your wall. As it is with successive layers, successive rows of bags should also be placed offset to the bags they sit on top of. Continue adding more rows and layers of bags until your wall is at the desired height.
Seal It Up at the End
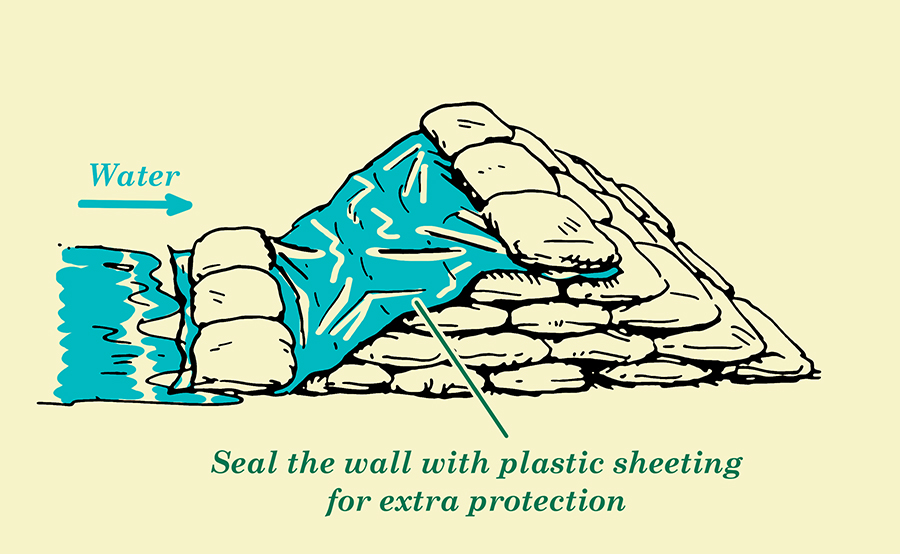
Your completed wall can be sealed with plastic sheeting in order to improve its watertight capacity. To do this, lay down a bed of soil or sand 1 inch deep and 1 foot wide at the bottom of the wall on the water side. Lay plastic sheeting over the sandbag wall so that its edge meets the edge of your soil/sand layer. Next, place sandbags on the bottom of the plastic to form a good seal (again, this is along the water side). The top of the sheeting should go over the wall; use sandbags to hold down this top edge as well.
The sheeting should actually be fairly loose and not pulled super tight. This way, the water pressure of an oncoming flood will allow the plastic to easily conform to the sandbag wall. If the plastic is pulled too tightly, the pressure of the water can actually rip it (in that same vein, take care to not puncture the plastic yourself with shoes, knives, etc.).