My passion for cooking was first born in my grandmother’s kitchen. On Sundays, she would always host our entire family, extended family, friends, and strangers for a post-church lunch that invariably stretched well into the evening. It was a day filled with food, laughter, and fellowship. Of course, the Southern staples of collard greens, black-eyed peas, mac n’ cheese, squash casserole, and spiral-sliced ham always made their way onto our family table. But my grandmother — Sitty as she was known — was famous throughout Valdosta, Georgia for one thing: fried chicken.
Wet battered and fried in a black cast-iron skillet, the crispy skin and moist, tender chicken was almost prophetic. My father still jokingly tells my mother that Sitty’s fried chicken was one of the reasons he proposed over 30 years ago. Rightfully so — we Southerner’s take pride in our traditions and food.
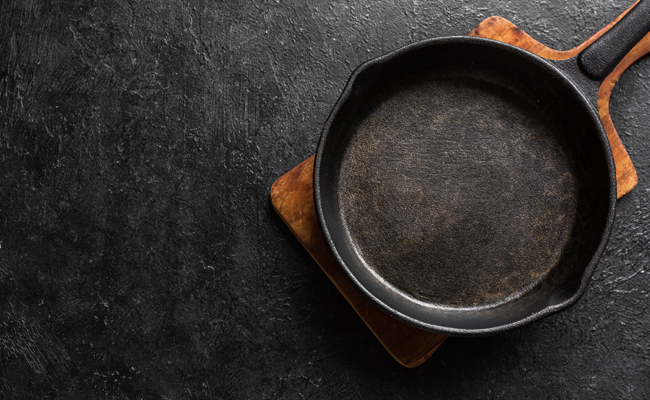
Sitty passed a few years ago, but her memory still lives on. Not only through the memories of her joyous smile or sharp sense of humor — but also through her cookware. That’s right — I celebrate her love every time I pull out that perfectly seasoned cast-iron skillet she handed down to me.
There’s something incredibly comforting about cooking in her old skillet. I’m reminded of those childhood family meals, while at the same time I know that I am creating new memories for myself and friends — all through the same cookware.
For that very reason, I have long felt that when it comes to cookware, cast iron is king. It lasts a lifetime(s), cooks evenly, and even supplies a healthy low-dose of iron to your diet. It’s arguably the most versatile piece of cookware you will ever find. It performs on the stove top, in the oven, over coals, or even on top of a grill. From frying, to sauteing, to searing, to baking – it’s truly the Swiss Army knife of the kitchen.
The best part? Cast-iron cookware is super affordable when bought new and can also be snagged on the cheap at yard and barn sales and restored.
So, listen up men. Before you go buy a bunch of expensive gadgets to outfit your kitchen, start first by picking up a cast iron pan. Treat it right, and you’ll be passing it on to your grandkids.
MM

SEASONING CAST IRON
Unlike Teflon pans, which get their non-stick properties from chemical compounds, the stickiness of a cast iron pan is diminished by a natural layer of oil/fat called “seasoning.” The seasoning also protects the pan from rust.
These days, the majority of skillets you will find come pre-seasoned by the manufacturer. While you should always take steps to maintain the seasoning (see below), you may encounter times that you want to repeat the seasoning process. Of course, if you are starting with a brand new, unseasoned skillet, you will need to follow this process before you begin using your cast iron.
WASH – This will be the only time I advise you to use soap on your cast iron, as you will want to strip it completely clean. Repeat, only use soap on your cast iron prior to seasoning your skillet — never again — got it? Good. Now, rinse that skillet with hot water to remove ALL of the soap. Done? Rinse it some more to be sure — you want ALL of that soap out of the pan prior to seasoning. If you are re-seasoning the surface due to stuck-on food particles or uneven color, go ahead and use a brush or even steel wool to form an even, clean surface.
DRY – After the skillet is completely cleaned, make sure the entire surface is dry and smooth.
SEASON – I prefer to use a thin layer of melted (vegetable) shortening. You will want to apply this layer over every part of the skillet. If you do not have access to shortening, choose a cooking oil such as canola, soybean, or safflower, and follow the same procedure. Avoid using low-smoke point oils such as extra virgin olive oil or butter.
BAKE – Set the oven to 350 – 400 degrees F and place the cookware (upside down) on the top rack of the oven. Bake the cookware for at least one hour. You can place aluminum foil underneath the pan to avoid drippings getting on the heating element. Then turn off the oven and allow the cookware to cool to room temperature in the oven — several hours.
STORE – cookware in a cool, dry place. Thinly coat the cookware with cooking oil in-between uses to maintain seasoning.
USING CAST IRON
As I mentioned earlier, cast iron cookware is extremely versatile. This is good news, because the more you use it, the more slick with seasoning it will become over time.
One thing is also certain: the handles will typically become VERY HOT! Always use an oven mitt or folded towels over the handles to prevent burns when handling cast iron.
PREHEAT – cast iron typically takes a bit longer to preheat than standard stainless pans, and it should be done slowly. Heat the pans slowly over low heat, and then adjust to your desired cooking temperature.
COOK – Once the pan has reached your desired temperature, begin cooking. Cast iron will maintain that level of heat, thereby providing a reliable and steady heat source. The pan can also be placed on top of a trivet or towel on the serving table, keeping dishes warm through most of your dinner service.
CLEANING CAST IRON
DO NOT – put your cast iron in the dishwasher.
AVOID – running cold water over the surface of a hot pan, as this can shock the pan, causing fissures or possibly even warping the pan. Allow the pan to slowly cool before rinsing with hot water.
CLEAN – the surface with a stiff nylon brush and hot water. For stubborn food particles, you can also add kosher salt to the pan, and work the brush against the salt to serve as an abrasive. For more stubborn food particles, heat some oil in the pan along with some kosher salt and use a kitchen towel to scrub the surface to remove the particles — careful to ensure you fold the towel enough to protect yourself from the heat. For super-duper stubborn food particles, boil some water in the skillet for a few minutes while carefully loosening the residue with the brush.
DRY – the cookware thoroughly after cleaning. If you had been using the oven, you can stick the pan in the cooling, still-warm oven for awhile or heat it on the stovetop for a few minutes to make sure all the moisture is removed.
APPLY – a thin layer of cooking oil to the surface while the pan is still warm.
STORE – cookware in a cool, dry place. Storing the pan in the oven is a viable option, but remember to remove the pan prior to turning on the oven. If your pan has a lid, store the pan and lid separately, or place a folded piece of paper towel between the lid and the pan so the pan is ventilated.
***************************************************************************
Let’s put all of that information to use — here are a few of my go-to recipes!
Cast Iron Pan Seared Salmon

A unique attribute of cast iron is its heavy weight and reliable temperature control. It makes for the perfect piece of cookware to get that crispy sear on a salmon filet every time — without the smoke. That’s right – I simply cook this fish over medium heat to get a great sear without smoking out or smelling up my kitchen. It’s a great one skillet meal for the busy bachelor. (Prep 5 minutes, Cook 10 minutes, Serves 1)
1 Tablespoon Extra Virgin Olive Oil
Kosher Salt
Fresh Cracked Pepper
1 8 oz. Fresh Salmon Filet
1 Zucchini, roughly chopped
1 Vine Ripe Tomato, cut into quarters
½ Fresh Lemon
Preheat skillet over medium heat, add oil. Liberally season salmon filet on both sides with salt and pepper. Add to skillet and cook for 3 – 4 minutes on each side. Don’t poke or play with the fish! Leave it alone to develop a nice sear. Add zucchini and tomatoes in the last five minutes to soften and cook through. Season with salt and pepper and finish with freshly squeezed lemon. Serve.
Cast Iron Grilled Strip Steaks

No matter your choice of cast iron — steaks love direct heat. Cast iron pans or grill pans can be heated directly over the stovetop for creating that perfect sear. For thicker cuts, sear the steaks on the stovetop over medium-high heat, flip, and insert into a high-heated oven (500 degrees F) to finish cooking through. Many conventional grills also offer cast iron cooking grate inserts. These grates essentially work the same way, while retaining high heat levels and a durable cooking surface. Better yet, pick up one of these cast iron camp grills (as pictured) and you’ll have the best of both worlds. (Prep 5 minutes, Cook/Rest 12 minutes, Serves 4)
4 8 oz. Strip Steaks, at room temperature
Canola Oil
Kosher Salt
Fresh Cracked Pepper
Heat cast iron cooking device over direct heat. If using a cast iron pan/grill pan on the stovetop, preheat to medium-high. If using a gas grill, preheat burners to medium-high. If using charcoal, pile the coals to one side to create a high-heat, direct grilling surface. Coat the steaks in a thin layer of oil and season liberally with kosher salt and fresh cracked pepper. Place the steaks directly over the heat, and grill for 2 – 3 minutes per side, flipping only once — do not mess with the steaks during the cooking process. Remove steaks from grill and allow to rest 3 – 5 minutes prior to serving. Serve.